HDD Audio Player HDP-M3000 Version 1.
Contents Accessories ..................................................................................................................................................................... 2 Precautions ..................................................................................................................................................................... 3 Controls ......................................................................................................................................
Precautions - - - - IBM and PC/AT are registered trademarks of International Business Machines Corporation. Microsoft, Windows MediaTM, and the Windows® Logo are trademarks or registered trademarks of Microsoft Corporation in the United States and/or other countries. Windows MediaTM Player is trademark or registered trademark of Microsoft Corporation. Adobe (Acrobat) Reader is a registered trademark of Adobe Systems Incorporated.
Controls 5 6 7 1. Play/Stop, Top menu, Set button (m) 2. Volume, Skip/Search, Menu select button (o, p, d, c) 3. LCD display 4. Necklace connection hole 5. Headphones socket ( ) 6. Reset switch (Rear of the unit) 7. Hold switch (b HOLD) 8. USB terminal 9. Power, Play/Stop button (a/n z) 10. Menu button (MENU) 11. Repeat button (REPEAT) 4 8 3 9 10 2 11 1 6 5 4 3 2 1 7 8 LCD display 9 a 0001 / 0020 A V B F X R BASS Song 0001 Artist-0001 MP3 128kbps 00 : 00 : 12 / 00 : 05 : 46 13 1. 2. 3. 4. 5.
How to connect the player to your PC Pay attention to the direction of the terminal Selecting the action Windows is to take (Windows XP only) After connection, the following screen will appear. Example: Original USB cable (supplied) Note: - Do not use an USB hub or USB extension cable (Operation is not guaranteed). Use only the supplied USB cable for connection. - When you connect the player to the PC for the first time, it sometimes may not be recognised as a Removable Disk.
How to install the MusicFileMaster software - Reproduction of this software is forbidden. This software shall not be copied and reprinted. SANYO shall not be liable for any damages arising out of the use of this software. - The screen shots are of Windows XP. The screens displayed on your PC may not exactly correspond to those shown in this manual depending on the OS version and manufacturer. Copying [MusicFileMaster] and [Manual] folders to your PC for backup Click [Removable Disk (F:)].
Installing the MusicFileMaster software 1. In the step 2 on the previous page, click [Removable Disk (F:)] > [MusicFileMaster] folder. 2. Double click [Setup.exe] in [MusicFileMaster] folder. [InstallShield Wizard] screen appears. 5. Select a folder where setup will install the files. Check “Destination Folder” then click [Next]. To install to a different folder, click [Browse...] and select another folder. 6. After the setup has finished installing MusicFileMaster software, click [Finish]. Click [Next].
Disconnecting the player from your PC Before disconnecting, make sure no data is being transferred. 4. Check that [SANYO HDD PLAYER USB Device] is in the list, select [USB Mass Storage Device] and click [OK]. 1. Right-click the Task tray icon at the bottom right of the Windows screen. If the icon is not displayed, refer to the Windows help. 2. Click [Safely Remove Hardware] displayed. 3. Select [USB Mass Storage Device] and click [Stop]. 5. Disconnect the player from your PC.
Removable Disk display An icon [Removable Disk] will appear in My Computer in Windows when the player is connected to your PC. [PLAYLIST] folder This folder stores playlist files. - The player can recognize up to 250 files in the PLAYLIST folder. [MusicFileMaster] folder This folder is for installing MusicFileMaster. [Manual] folder This folder stores instruction manual files. [MUSIC] folder Files transferred from your PC are stored in this folder.
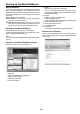
Starting up the MusicFileMaster 5. Library Music file list in your PC is displayed. The list is displayed in [Library] mode. [All Songs], [Artist/Album], [Album], [Genre] and [Format] can be displayed individually. 6. Playlist Playlists in your PC are displayed. 7. Library in portable device List of music information in portable device is displayed. 8. Music information in your PC 9. Music information in device 10. List control buttons 11. End button This button is used to end the MusicFileMaster.
Transferring data by MusicFileMaster Start up the MusicFileMaster (refer to page 10). Note: - Registration of too many pieces of music may make the player action slower. It is recommended to register about 5,000 pieces at maximum as standard registration. The player may not work depending on the environment of your PC. - Only the files of MP3 and WMA formats (without copyright) can be transferred to the device and played back by MusicFileMaster.
Transferring data using the Media Player If you have the Microsoft Windows Media Player installed, you can transfer WMA files to the player and listen to them. See the Windows Media Player on-line help for details on how to do this. Precaution with playing/transferring of WMA (Windows Media Audio) files: Note: DRM: Digital Rights Management: a copyright security protection system that is used in WMA music files sold over the internet. This systems disables illegal copying of music.
Before playing Using the headphones Connect the headphones to the Battery indicator socket. “ ” indicates that the battery is full and the power in battery will be come less when using. “ ” indicates low battery power and the battery should be charged. Turning the power on and off Hold function a/n z Press [a/n z] (for at least 2 seconds). “HELLO” appears briefly on the display and the power turns on. This prevents operation from stopping by accidentally pressing a button.
Date and time setting 5. Press [o] or [p] to select “Preset Time”, then press [m] or [c]. The player enters to the date and time setting mode. The year display selects. 1. In the stop mode, press [m] (for at least 2 seconds). The first stage menu appears. o Preset Time d c 2005Y 01M 01D 01 : 00 MUSIC p EXIT N 00 : 00 : 00 n 00 : 00 : 00 2. Press [d] or [c] to select “SETTINGS”. 6. Press [o] or [p] to select the year, then press [m] or [c]. The month display selects.
Play music 6. Press [m]. Playback begins. Playing the selected music file in the MUSIC menu Valid only for music files transferred by MusicFileMaster 1. In the stop mode, press [m] (for at least 2 seconds). The first stage menu appears. Music file number Music (song) name Artist name Elapsed playing time a 0003 / 0020 Song 0003 Artist-0003 MP3 128kbps 00 : 00 : 02 / 00 : 04 : 38 MUSIC EXIT - N 00 : 00 : 00 Music (song)/Artist name may not display on some music files.
Note: - Name of artist or album may not be displayed depending on the music file. - Registration of too many pieces of music may lower the player performance. It is recommended to register about 5,000 pieces at maximum as standard registration. Selecting the repeat playback Press [REPEAT] (for at least 2 seconds) to select the repeat mode. Each time [REPEAT] is pressed (for at least 2 seconds), the repeat mode changes as follows: 1 X: Plays a single file repeatedly.
Examples of playback mode selection display MUSIC menu (Valid only for music files transferred by MusicFileMaster.) ALL SONGS: Display of all the music files ARTIST: [ALL] [ALL]: Display of all the music files Display of all the album names – Hereafter is same as ALBUM search.
Note: Use of the [Remake Management File of Device] function of the [Tools] menu of the Music File Master enables you to search for the piece of music which has been transferred by Explorer or Windows Media Player.
Formatting 3. Press [o] or [p] to select “File Menu”, then press [m] or [c]. (Erasing all files in all folders) If you select the format function from the menu, the memory will be initialised and all files will be erased. Use only when you need it. Save a backup copy of your data on a PC, etc. File Menu Format 1. In the stop mode, press [m] (for at least 2 seconds). The first stage menu appears. n 00 : 00 : 00 4. Press [m] or [c]. MUSIC Format EXIT N 00 : 00 : 00 Format No Yes 2.
Menu setting 4. Select the menu and confirm it in the same way. 5. To change the setting of the selected menu, press [o] or [p]. Then press [m]. When the setting is completed, the current menu returns. - Press [d] once during the menu setting. The setting is cancelled and the previous menu returns. 6. Press [MENU] to quit the menu setting mode. Common procedures of menu setting 1. In the stop mode, press [m] (for at least 2 seconds). The first stage menu appears. 2.
Equalizer: Setting up the sound equalizer MUSIC Setting up the playback mode Playing the selected music file Specify a playback mode (ALL SONGS, ARTIST, ALBUM, GENRE or PLAYLISTS), and search it, and playing music file. ALL SONGS ALL SONGS ARTIST ALBUM GENRE PLAYLISTS n 00 : 00 : 00 Equalizer Normal Pop Rock Jazz User EQ ALL SONGS: Selects all the files. ARTIST: Selects the files by artist name. ALBUM: Selects the files by album name. GENRE: Selects the files by genre name.
Sleep: Setting up sleep time The sleep time function turns off the player after a specified period of time. It is convenient when you want to sleep while listening to the music.
Troubleshooting guide Symptom Possible cause Corrective action Symptom Possible cause Corrective action The player does not start. Charging battery has run down. Charge the built-in battery. Internal HDD error. Format (initialize) the internal HDD. The Removable Disk is not displayed when the player is connected to the PC. The PC and the player are not connected correctly. Make sure the connect is corrected. Disconnect the USB cable from the PC and reconnect it again.
WHAT TO DO IF... If the operation of the player or display is not normal, 1. Press [RESET] using a small ball-point pen, etc. 2. Resume operation. b HOLD This operation should not be performed under ordinary circumstances. [RESET] Cleaning the cabinet Clean the outside of the player with a clean soft cloth, moistened with lukewarm water. Do not use benzene, thinner or alcohol since they will mar the finish of the surfaces.