INSTRUCTION MANUAL ICR-FP600D ICR-FP700D Digital Voice Recorder GB D F E KETAGP KPFF English Deutsch Français Español
ENGLISH Please read this manual before use. Keep the manual in a safe place for future reference. FOR EU USERS The symbol mark and recycling systems described below apply to EU countries and do not apply to countries in other areas of the world. Your SANYO product is designed and manufactured with high quality materials and components which can be recycled and/or reused.
CAUTION - It is forbidden to copy this manual, whole or in part, without prior written permission. - All images and illustrations given in this manual are for explanation purposes and may differ slightly from that of the actual product. Also, actual specifications are subject to change without prior notice and therefore may differ from the contents of this manual. Sanyo cannot be held responsible for damage caused by improper use or modifications to the device, or data that is lost or destroyed.
Precautions - - The apparatus shall not be exposed to dripping or splashing. Do not remove the battery during operating the unit. Do not insert pins, etc., inside the unit. Do not drop the unit or subject it to strong shocks. Do not throw into a fire or apply heat. Do not immerse in water or use in humid areas such as a bathroom. Do not use while driving. Do not listen for long periods of time at high volume. Keep out of reach of infants. Store in an area out of reach of small children.
Contents Introduction ....................................... 5 Accessories......................................................... 5 Controls ............................................................... 6 Main unit ..................................................................6 LCD display .............................................................7 File and folder ................................................... 8 Folders for recording..........................................
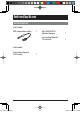
Introduction Accessories [ICR-FP700D] USB connection cable 1 AAA/LR03/HP16 alkaline battery 1 Instruction Manual (This book) 1 [ICR-FP600D] Instruction Manual (This book) 1 GB-5 gap]vkjcb]cl,glbb 3 .
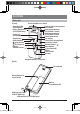
Controls Main unit Stereo headphones socket [Front] Recording LED (See Page 35) Built-in microphones (ICR-FP700D only) Folder/ (repeat) button Stop button Record button (play) button (fast-reverse) button Volume button ( ) External input (microphone/ line) socket Built-in microphones (ICR-FP700D : stereo) Built-in microphone (ICR-FP600D : mono) Power/Hold switch LCD display Scene select (microphone sensitivity) switch Volume button ( Menu button (fast-forward) button Erase button Speaker ) Playback spe
LCD display 1) 5) 2) 3) 6) 4) 7) 8) 9) 10) 1) Folder name (storage location of recorded voice) (See Page 8) : Storage location of microphone recorded voice files : Storage location of voice files recorded using other equipment : Storage location of files transferred from PC 2) Battery indicator : Battery low : : : Battery fully charged 3) Information display Displays the file number of the recorded voice file, etc.
File and folder A "File" is an individual voice recording and a "Folder" is a location to classify and store multiple files. - This unit includes three folders: MIC, LINE, and MUSIC. Files can be stored in each folder. Note A "DATA" folder for storing PC data is included, though it is not shown on this unit. (See Page 38) Folders for recording These folders are used for recording on this unit.
Recording file names Files recorded with this unit, are automatically given a name with the following configuration. File format Recording time (hour, minute) Recording date (year, month, day) Folder type (M: MIC, L: LINE) File number (001 - 199) - On this unit, only the file number in the file name above is displayed. The file name can be seen when this unit is connected to a PC.
Sort function in the "MUSIC" folder In the "MUSIC" folder, files in each folder are automatically sorted in ascending order of the first number of the file name and then played. In the case of numbers starting in "001...", "01...", and "1...", "001..." takes precedence and "01..." and "1..." follow after. GB-10 gap]vkjcb]cl,glbb /. .
Preparation Inserting a battery Note Be sure to turn the power off when you replace the battery. Inserting or removing the battery with the power on may cause a failure or damage to data. Illustrations of ICR-FP700D are used below for explanation. 1 While gently pressing the portion of the battery compartment lid shown in the figure, slide the lid in the direction indicated by the arrow. Press here and slide the lid. Back 2 Insert an AAA/LR03/HP16 battery. First insert the minus side side.
Turning the power on and off Turning the power on Set the Power/Hold switch on the side of the unit to the "ON" position. When the power is turned on, the screen initializes in the following order. Version display Starting Operation screen * The screens above are examples. The operation screen that was last displayed when the power was turned off, will be displayed.
Battery indicator Remaining battery power is displayed. > > Battery fully charged If the battery is exhausted, " automatically. Note > Low battery " is displayed and then the power turns off The battery indicator display varies according to surrounding temperature and status of use. Use this indicator as reference. Note - If is indicated, replace the battery promptly.
Preventing mishandling (Hold function) When this unit is placed in a pocket and used, this function can prevent unintentional battery consumption and operation of the device due to inadvertent pushing of buttons. Set the Power/Hold switch to (OFF) in the figure below during playback or recording. The following screen is displayed and button operation is disabled. If the Power/Hold switch is set to (ON) in the figure below, the following screen is displayed and button operation is enabled.
Inserting and removing the SD card All recorded files are stored on the SD card. Before using this unit, ensure that the SD card is correctly inserted. 1 2 Check that the Power/Hold switch is set to "OFF."(See Page 12) Open the SD card slot cover. Open the cover fully. Cover Note 3 Do not pull the cover too hard. The cover may be damaged. Insert the SD card straight in the direction shown in the illustration until it clicks. Pay attention to orientation.
Notes on handling the SD card - Do not directly touch the terminals, allow them to make contact with metal or hard objects, or short-circuit them. Data may be damaged or lost by static electricity or the like. - Insert the SD card with the correct orientation all the way into the unit. If it is inserted with an incorrect orientation or is insufficiently inserted, the unit will not operate properly. - Do not release your fingers from the card before the card is completely inserted or removed.
Setting the date and time If the date and time are set, information regarding "Recording date and time" is automatically logged in the file being recorded (Time stamp function). Also the recording date and time information is included in each file name therefore it is recommended to set the date and time correctly. 1 Turn the power on and press the [ 2 Press the [ (fast-reverse)] or[ forward)] button to select " press the [ (play)] button.
Recording Two recording methods are provided: recording with a microphone and recording from external sources. Note During recording, you can monitor the recorded voice through headphones. Press the [ ] or [ ] button to adjust the volume. Recording with microphone 1 2 Turn the power on.(See Page 12) Set the microphone sensitivity according to the recording conditions. Set the [ (microphone sensitivity)] switch located on the side of this unit.
Using an external microphone To use an external microphone for recording, connect the microphone to the external input socket and set the [Microphone/Line input] switch to the [Microphone] position in advance. External microphone VAS (Voice activated system) VAS is a function that automatically starts recording when the unit senses a voice, and causes recording to pause automatically putting the unit in the recording standby state, when the voice becomes lower than a certain level.
Setting the voice sensing level (VAS value) You can adjust the voice sensing level in five steps (1-5) to accomodate the source volume level. A larger value will increase the voice activation sensitivity so recording will be triggered by lowerlevel audio. If the value is too small, this unit may not detect voice. Set the microphone sensitivity (see page 18) in accordance with the source input level so that the VAS function can work more effectively.
4 Change the recording quality of this unit as required. (See Page 32) 5 Start playback on the external source. 6 Press the [ start recording. Note 7 ] button of this unit to Input level meter - Conduct test recording to adjust the playback volume of the external source. If the volume is too high, sound distortion may occur. - By pressing the [ (fast-forward)] button during recording, you can toggle the display between the input level meter and the remaining recordable time.
Playback Play a recorded file or a file transferred from a PC. Playing a file 1 Press the [ (repeat)] button to select the folder in which the desired file for playback is stored. 2 Press the [ (fast-reverse)] or [ (fastforward)] button to select the desired file number for playback. File number 3 Press the [ (play)] button to start playback. To finish playback, press the [ ] button.
Fast forward Pressing and holding down the [ (fast-forward)] button during playback for one second or more starts fast forward. After fast forward starts, it continues even if the button is released. (play)] button. To return to normal playback speed, press the [ Fast reverse Pressing and holding down the [ (fast-reverse)] button during playback for one second or more starts fast reverse. After fast reverse starts, it continues even if the button is released. (play)] button.
Repeat playback One file can be played repeatedly or all files in a folder can be played repeatedly. Press and hold down the [ (repeat)] button for two seconds or more during stop or playback to toggle between repeat modes. Lit Blink :Only the selected one file is played repeatedly. :All files in the selected folder are played repeatedly. Setting over two or more folders is not available. No display :Normal playback. When playback of the last file finishes, the unit stops.
Playback from designated position (Time search) The start position (start time) of playback can be designated. 1 Press the [ ] button during playback. Playback stops and the current position (time) is displayed. 2 Set the designated time. (fast-reverse)] and 1) Press the [ [ (fast-forward) buttons to select "Hour," "Minute," and "Second." 2) Press the [ ] or [ ] button to adjust the value. 3 Press the [ (play)] button. Playback starts from the designated position.
Folder skip (only if " " folder is selected) If the " " folder is selected, pressing the [ ] or [ ] button in the stop state skips folders in the " " folder sequentially and selects the first file in each folder. Level 1 A Level 2 Level 3 In the case of folder configuration shown in the left figure, pressing the [ ] or [ ] button skips in the following order.
Erasing Erase unnecessary files. Three methods of erasing are provided. : Erases one selected file. : Erases all files in a selected folder. : Erases all data in the SD card (formatting). - Note - The erased file is not recoverable. Carefully confirm whether or not the file is needed before erasing. - Before this operation, check that the remaining quantity of battery power is sufficient. - With file erasing, only files playable on this unit can be erased.
4 Press the [ (fast-reverse)] or [ (fastforward)] button to select the method of erasing and press the [ (play)] button. Select one of " ", " ", and " ". In this operation, select erasing of one file. FOLDER (Folder erasing) Note 5 ALL ERASE (Formatting) Take care not to select when erasing only one file. or Press the [ (fast-reverse)] or [ forward)] button to select " press the [ (play)] button. If " " is displayed and then " erasing is complete.
Recording at Designated Time (Timer) Recording can be started automatically at a designated time. Before setting, check that the remaining quantity of battery power is sufficient. 1 In the stop state, press the [ button. 2 Press the [ (fast-reverse)] or [ (fastforward)] button to select " " and press the [ (play)] button. 3 Press the [ ] or [ ] button to select the recording time and press the [ (fast-forward)] button. : : : : : ] 30 minutes 1 hour 2 hours Until all available space is used.
Dividing Recorded File A file can be divided. This function is useful for dividing a file into necessary parts and unnecessary parts. For dividing a file, available space is required. Only files in the MIC folder and the LINE folder can be divided.(Files in the MUSIC folder cannot be divided.) 1 Play the desired file to divide.(See Page 22) 2 3 Press the [ playback. ] button at the desired division position to stop Press the [ ] button.
File division and file naming after division Example: File 001M_090101_1631.MP3 is divided. Before division 002M_090225_1210.MP3 001M_090101_1631.MP3 File name is automatically changed. File is divided. After division 001M_090101_1631.MP3 002M_090101_1631.MP3 003M_090225_1210.MP3 If file 001M_090101_1631.MP3 is divided, file 002M_090101_1631.MP3 is created.
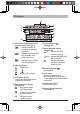
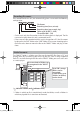
Menu Method of operation (example of sound quality setting) On the menu screen, the settings of this unit can be changed and various functions of the unit can be used. 1 Turn on the unit and press the [ ] button in the stop state. 2 Press the [ (fast-reverse)] or [ (fastforward)] button to select the desired menu item. 3 Press the [ ] or [ ] button to select the desired setting item. 4 Press the [ (play)] button. Setting is now complete. GB-32 gap]vkjcb]cl,glbb 10 .
List of menus Main menu Press the [ ] button in the stop state. *Settings indicated with boldface characters are factory default settings. Menu item Setting : Selected file is divided. Page for reference Page 30 : Division of file is cancelled. : High quality mode (192 kbps, stereo) Page 32 : Standard quality mode (64 kbps, stereo) : Long play mode (32 kbps, mono) : Beep off Page 35 : Beep on : Not lit Page 35 : Lit Note Date and time setting. Page 17 Timer recording setting.
Sub menu Press and hold down the [ state. ] button for two seconds or more in the stop *Settings indicated with boldface characters are factory default settings. Menu item Auto divide at silent pause ( ) Voice activated recording ( ) Setting : Off Page for reference Page 36 : On : Off Page 19 : On : The equalizer is not used. Page 37 : The low tone range is emphasised. Equalizer ) ( : The low tone range and thehigh tone range are emphasised slightly.
Other functions Beep sound Whether or not a beep is emitted during operation of the unit can be set. 1 2 3 Turn on this unit and press the [ ] button in the stop state. Press the [ (fast-reverse)] or [ select " ". (fast-forward)] button to Press the [ ] or [ ] button to select " (play)] button. the [ " or " " and press :A beep is emitted during operation. :A beep is not emitted during operation. Setting is now complete.
Automatically dividing a file at a silent pause (line input only) When a recording is made with external equipment connected, if there is a silent pause for two seconds or more in playback sound at the source, recording stops automatically. When any sound is produced, recording restarts as another file. 1 2 Turn on this unit and press and hold down the [ two seconds or more in the stop state. When " " is displayed, press the [ " " and press the [ (play)] button.
Setting the equalizer Adjust the volume of high tone/ intermediate tone/ low tone to a preferred level according to the type of music. 1 2 Turn on the unit and press and hold down the [ two seconds or more in the stop state. When " " is displayed, press the [ ] or[ the desired category of music and press the [ ] button for ] button to select (play)] button. :The equalizer is not used. :The low tone range is emphasised. :The low tone range and the high tone range are emphasised slightly.
Connecting to a PC (ICR-FP700D only) What you can do by using a PC By connecting this unit to a PC, you can transfer files between this unit and the PC. - Files in this unit can be copied to a PC. Recorded files on this unit can be copied to a PC and played on the PC. (See Page 46) - Voice files can then be copied to a CD-R/RW. If your PC is equipped with a CD-R/RW drive, recorded files from this unit can be copied to a CD-R/RW disk (CD in which data can be recorded).
Computer system requirements This unit can be connected to a PC that satisfies the following requirements. Supported PCs Windows preinstalled PC Supported OS Windows Vista Windows XP Windows 2000 Professional (After SP3) USB port One required for connection Other Speakers or headphones required Sound playback function required * The system environment as of January 2009 is listed above. Use any of the following Windows Media Player versions compatible with your OS.
Notes - Operation is not guaranteed for Macintosh PCs. - Operation is not guaranteed for the following environments. Upgraded Windows environments Windows 95, Windows NT, Windows 98, Windows 98 SE, Windows Me Dual-boot Windows environments - Standby, suspend, and other modes may not work properly with your particular environment. If this is the case, do not use those modes. - This is not guaranteed to operate with all PCs in the recommended setup.
How to connect to / disconnect from your PC Notes on connection - If a recorded file from this unit is copied to a PC and the file name is changed, the file cannot be played after it is restored to the original folder (storage location) of this unit. Assign a name according to the following "File name rules" or move the file to the "MUSIC" folder and then play the file. * - - - File name rules - "MIC" folder : Three-digit number (001 - 199) + M + _ + Date + _ + Time (hour, minute) + .
Connecting this unit to your PC 1 Open the USB terminal cover of this unit. USB terminal cover 2 Use the supplied dedicated USB cable to connect this unit to your PC. When this unit is connected to your PC, " " is displayed on the screen of this unit. USB terminal of PC USB connection cable (supplied, ICR-FP700D) 3 When the following screen is displayed, click "Open folder to view file" to select and click the [OK] button, The folders in this unit are displayed. GB-42 gap]vkjcb]cl,glbb 20 .
Displaying folders in this unit 1 2 Connect this unit to your PC. (See Page 42, "Connecting this unit to your PC") Cl i c k [St a r t] a n d t h e n [My Computer]. Alternatively double-click the [My Computer] icon on the Desktop. 1) Click. 2) Click. GB-43 gap]vkjcb]cl,glbb 21 .
3 Double-click the [Removable Disk] icon. The folders in this unit are displayed. Double-click. Note If the "Removable Disk" icon is not displayed, refer to page 49, "If this unit is not recognized by a PC." Folder names in this unit For folder names, the display on this unit is different from the display on a PC. Displayed folder name - (*) Display on this unit Display on PC MIC LINE MUSIC DATA * Although data from a PC can be put in the "DATA" folder, this folder cannot be seen on this unit.
Disconnecting this unit from your PC Note 1 Before disconnecting, make sure no data is being transferred. Click displayed in the task tray (normally at the lower right) of PC screen. Click. 2 When message "Safely remove USB Mass Storage Device" is displayed, click it. Click. 3 When the following message is displayed, remove the USB connection cable (supplied) from the PC and this unit. GB-45 gap]vkjcb]cl,glbb 23 .
Copying a file from this unit to your PC 1 2 Connect the unit to your PC and open the removable disk. (See Pages 42, 43, 44) Double-click the folder in which the desired file to copy is stored. An example of copying a file from the [MIC] folder is used here for explanation. Double-click. 3 Right-click the desired file to copy and click [Copy] in the displayed menu. 1) Right-click. 2) Click. 4 Open the folder in which you 2) Click. wish to store the file.
Copying files to CD-R/RW Copy files that have been copied from this unit to a PC and then on to CD-R/RW using Windows Media Player. Note 1 2 3 While copying files to CD-R/RW, do not conduct other operations on the PC. Doing so may cause extraneous noise. Copy the desired files to your PC. (See Page 46) Click [Start], [All Programs], and then [Windows Media Player]. Windows Media Player starts. Click [Burn]. Click. 4 Right-click [Burn] and click the type of CD to create. 1) Right-click.
6 Open the folder in which the 2) Click. f iles you wish to copy are stored. An example of files stored in the [My Documents] folder of PC is used here. 1) Click. 7 Drag and drop the desired files to copy into the [Burn list] of Windows Media Player. Drag and drop the files. Burn list 8 Click the [Start Burn] button. Click. W h e n " C o mp l e t e " i s d i splay ed , copying to CD-R/RW is complete. Display of "Complete" GB-48 gap]vkjcb]cl,glbb 26 .6,//,06 180181.
Troubleshooting Guide If this unit is not recognized by a PC: (ICR-FP700D only) Follow the procedure below to check for problems. - Check whether or not the supplied USB connection cable is used for connection. - Close all applications. - Remove all USB devices leaving only the regular mouse and keyboard. In this state, connect this unit to the PC. - If the PC is equipped with multiple USB terminals, connect this unit to each terminal sequentially.
A file in the " " or " " folder cannot be played. Possible cause The file name is wrong. Corrective action If the name of a recorded file from this unit is changed on a PC, the file cannot be played after it is restored to the MIC or LINE folder, but can be played if it is transferred into the MUSIC folder. (See Page 9) A file in the " " folder cannot be played at all or cannot be played correctly. Possible cause The file format is not MP3.
Frequently asked questions (Q & A) Q: Can a manganese battery or a rechargeable battery be used? A: Manganese battery and nickel-cadmium battery cannot be used. It is recommended to use an alkaline battery. Although our rechargeable battery "eneloop" can be used, its duration is approximately 70% in comparison with an alkaline battery. Also since the voltage is different, the battery indicator of this unit may not be accurate. Alternately, an Oxyride battery can be used.
Cleaning the cabinet Clean the outside of the unit with a clean soft cloth. If the dirt is heavy, wipe it off with a dry cloth. Note: Do not use benzene, thinner or alcohol because they will deteriorate or discolour the unit. Temperature rise If this unit is used for a long time, the temperature of the main unit may rise but this is not a failure. GB-52 gap]vkjcb]cl,glbb 30 .
Data Specifications Note The following specifications (recording time, battery duration, etc.) show values obtained with an SD memory card manufactured by Toshiba. The recording time, playback time, and battery duration depend on the type and manufacturer of battery and SD memory card. The time values below are for reference and are not guaranteed. Applicable media : SD memory card, SDHC memory card Depending on the manufacturer and the type, the SD memory card may not function correctly in this unit.
Frequency response Recording format Playback format Frequency response (playback) Sampling frequency Bit rate : 60 - 20,000 Hz (HQ stereo mode, 192 kbps) 60 - 7,500 Hz (HQLP stereo mode, 64 kbps) 60 - 6,500 Hz (LP monaural mode, 32 kbps) : MP3 : MP3(MPEG1 LAYER3, MPEG2 LAYER3) : 40 - 20,000 Hz : 16 - 44.1 kHz : 16 - 320 kbps * Playback may not be conducted normally depending on the file. Terminal : USB/stereo headphones 3.5 mini Stereo microphone 3.