INSTRUCTION MANUAL SLIM3010
Thank-you for choosing Fisher. This executive audio system includes a built-in CD player, AM/ FM stereo tuner, alarm clock, timer, motorized CD door, removable speakers and remote control. The unit can be wall mounted in order to save desk or counter space. FCC information For CD player section: This device complies with Part 15 of the FCC Rules.
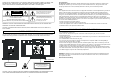
1. Read Instructions - All the safety and operating instructions should be read before the product is operated. 2. Retain Instructions - The safety and operating instructions should be retained for future reference. 3. Heed Warnings - All warnings on the product and in the operating instructions should be adhered to. 4. Follow Instructions - All operating and use instructions should be followed. 5. Cleaning - Unplug this product from the wall outlet before cleaning.
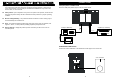
CONNECTIONS 19. Replacement Parts - When replacement parts are required, be sure the service technician uses replacement parts that have been specified by the manufacturer or that have the same characteristics as the original part. Unauthorized substitutions may result in fire, electric shock, or other hazards. LINE (AUX) IN/OUT CONNECTIONS Press the LINE (AUX) button (34) to select IN or OUT mode. 20.
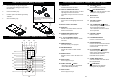
LOCATION OF CONTROLS - UNIT 8 4 5 6 9 7 10 11 LOCATION OF CONTROLS - UNIT (cont.) 12 13 14 15 3 1. Headphone Jack 20. Pedestal 2. CD Door 21. TUNER/BAND Button To select AM or FM tuner (radio) modes 3. Detachable Three-Way Speaker (L) 4. CD Door OPEN/CLOSE Button Open or close the CD door 5. VOLUME UP/DOWN Button Adjust volume level 6. MOODLIGHT Button Illuminates the CD compartment 7. Remote Sensor 8. LCD Display 9.
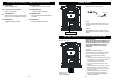
LOCATION OF CONTROLS - UNIT (cont.) 35. SURROUND Button Press to turn the surround sound ON or OFF. The indicator lights while surround is ON. 36. DYNAMICBASS Button Press for a rich bass sound. 37. EQ Button Selects FLAT, POP, ROCK, JAZZ and DISCO sound effects 38. STEREO Button Stereo / mono switching for FM stations 39. PRESET/REPEAT Button -Retrieve preset radio stations (Forward) -Repeats track / 1 disc / all discs for CD mode 40. 3 CD Changer Compartment Button 41.
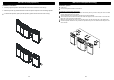
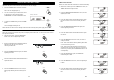
INSTALLATION (Speakers) INSTALLATION (Wall Mounting) ASSEMBLE SPEAKERS Installation options: 1. Carefully align the speaker studs with the holes on the side of the main unit (1). 2. Slide the speaker (2) downwards until it locks into place. Repeat for the remaining speaker. To detach the speaker, pull up on the speaker (3) then release from the main unit (4).
REMOTE CONTROL (Battery Installation) 1. Remove battery tray by pressing point (1a) inside then sliding point (1b) area at the same time. 2. Pull out the battery tray. 3 Install or replace the button type battery “CR2032”. 4 LOCATION OF CONTROLS - REMOTE CONTROL (Cont.) Note: Pull out insulation tag from the button battery tray before operating the remote control. Close the battery tray. 55. TIMER Button Activates/deactivates the timer 68. FOLDER Button Selects MP3 album (reverse) 56.
LOCATION OF CONTROLS - REMOTE CONTROL (Cont.) 79. SLEEP Button Press for sleep to music 83. INTRO Button Plays 10 seconds of each CD track 80. CD selection - Disc 1 Button Press to access disc 1 84. RANDOM Button CD play in random sequence 81. SNOOZE Button Switches off the unit for 9 minutes while timer is on. The unit will then start again. 85. PRESET Button Press to retrieve preset radio stations (Forward) 82. MODE Button Toggles the display contents 86.
OPERATING INSTRUCTIONS TIMER ON/OFF SETTING POWER ON/OFF When the AC power is connected, the clock shows on the LCD display. NOTE: The clock should be set before the Timer On/Off setting. 1. Press the POWER button to turn the unit 'ON'. POWER/STANDBY 1. With unit at off mode, press the TIMER button once, the TIMER ON indicator begins to flash. Note: The LCD display lights up. 2. Press the MEMORY/PROGRAM button once, the hour digits begin to flash. 2.
10. Press the MEMORY button again, the minute digits begin to flash. BASIC OPERATION DYNAMICBASS Control Electronic volume control Press the DYNAMICBASS button to get a rich bass sound. Electronic volume control display Note: Display will recall the most recent setting when you first press DYNAMICBASS button. 11. Press the SKIP forward or backward buttons to adjust the minute. 1.
LISTENING TO THE RADIO 1. Press the POWER button to turn the system 'ON'. PLAYING COMPACT DISCS 4. Press the SKIP forward or backward buttons to tune to the desired station. 2. Press the TUNER/BAND button to select the radio function. 1. Switch on the power and press the PLAY/ PAUSE button to select the CD mode. 2. If there is no CD inside, a "NO DISC" display will appear. To play the disc Press PLAY/PAUSE button to play the CD.
To repeat a track or disc PLAYING MP3 DISC Press REPEAT button on remote control: Press twice to repeat all tracks Press once for one track repeat in playing disc 1. Press three times to repeat tracks in all discs Switch on the power and press the PLAY/ PAUSE button to select the CD mode. 2. Press this button twice, MP3 plays all tracks within the selected album repeatedly and “REPEAT ALL” is displayed. After reading TOC With one further press, the repeat mode is cancelled.
CARE AND MAINTENANCE PROGRAMMED PLAYBACK The MP3 player enables you to program up to 40 tracks in a sequence of your choice. First select CD stop mode. 1. 2. Press the MEMORY button on remote control once. 4. Continue to program, repeating steps 1 to 3. 5. Press PLAY/PAUSE to play the programed tracks. Press the SKIP or buttons or Numeric buttons on remote control to select your desired track.
TROUBLESHOOTING GUIDE Should this unit exhibit a problem, check the following before seeking service. Possible cause Symptom Radio Noise or sound distorted on AM or Station not tuned properly for AM Retune the AM or FM broadcast station. or FM FM broadcasts. FM: Line antenna is not extended. Extend FM line antenna. Rotate unit until best reception is AM: Unit is not positioned correctly. obtained. FM MODE button is set to MONO Set FM MODE to FM STEREO FM STEREO indicator does not position. position.