L73T4/US GB 1999, 8, 3 INSTRUCTION MANUAL B/W CCD Camera About this manual Before installing and using the camera, please read this manual carefully. Be sure to keep it handy for later reference.
L73T4/US GB 1999, 8, 3 SANYO INDUSTRIAL VIDEO B/W VIDEO CAMERA LIMITED WARRANTY OBLIGATIONS In order to obtain warranty service, the product must be delivered to and picked up from an Authorized Sanyo Service Center at the user’s expense, unless specifically stated otherwise in this warranty. The names and addresses of Authorized Sanyo Service Centers may be obtained by writing to SFS Corporation, SFC’s warranty administrator, at any of the addresses listed below, or by calling (toll-free) 1-800-421-5013.
L73T4/US GB 1999, 8, 3 Depending on the conditions of use, installation and environment, please be sure to make the appropriate settings and adjustments. If you need help with installation and/or settings, please consult your dealer. CONTENTS FEATURES • Built-in interline transfer method 1/3" CCD, approx. 270,000 picture elements • Low smear, anti-blooming, low lag, no burning and no geometric distortion using the CCD solid state image device. INFORMATION TO USER .......................................
L73T4/US GB 1999, 8, 3 INFORMATION TO USER Safety Guard THIS SYMBOL INDICATES THAT THERE ARE IMPORTANT OPERATING AND MAINTENANCE INSTRUCTIONS IN THE LITERATURE ACCOMPANYING THIS UNIT. WARNING: TO PREVENT THE RISK OF FIRE OR ELECTRIC SHOCK , DO NOT EXPOSE THIS APPLIANCE TO RAIN OR MOISTURE. For the customers in Canada This Class B digital apparatus complies with Canadian ICES-003. Pour la clientèle canadienne Cet appareil numerique de la Classe B est conforme a la norme NMB-003 du Canada.
L73T4/US GB 1999, 8, 3 PRECAUTIONS In case of problem Do not use the camera if smoke or a strange odour comes from the unit, or if it seems not to function correctly. Disconnect the power cord immediately, and consult your dealer (or a Sanyo Authorized Service Centre). Do not open or modify Do not open the cabinet, as it may be dangerous and cause damage to the unit. For internal settings and repairs, consult your dealer (or a Sanyo Authorized Service Centre).
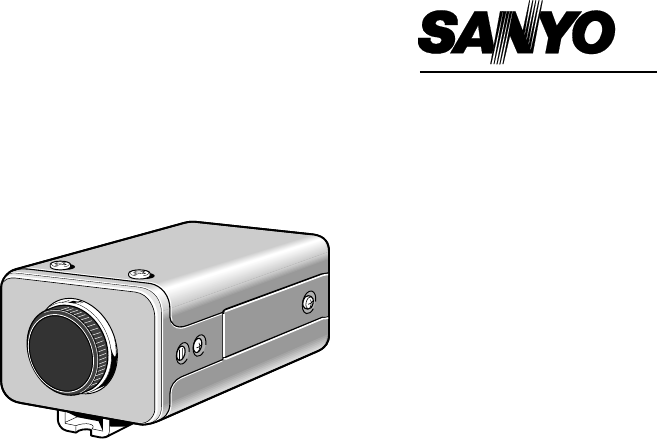
L73T4/US GB 1999, 8, 3 PARTS NAMES 1 Video output connector (VIDEO OUT: BNC type) Connect this connector to a device such as a VCR or monitor with a VIDEO IN connector. 3 1 2 Line phase adjustment volume (LINE PHASE) When using two cameras or more, the image on the monitor may roll vertically when switching sources. This rolling can be minimized by turning this volume. 3 Power indicator (POWER) 2 4 Comes on when the power to the camera is on.
L73T4/US GB 1999, 8, 3 PARTS NAMES 7 Lens mount cap The cap is installed to protect the lens mount section. Remove the lens mount cap before installing a lens (sold separately). 9 7 8 Flange-back adjustment screw (FLANGE BACK ADJ.) 9 Flange-back lock screw (FLANGE BACK LOCK) 8 F F Camera installation bracket 1 2 3 2 The bracket can be fixed at the top or bottom of the camera.
L73T4/US GB 1999, 8, 3 PARTS NAMES Concerning auto-iris lenses DC VIDEO A. I. LENS DC type auto-iris lens A lens without amplifier circuit that operates only on a DC power source. In general, this type of lens is referred to as DC type coil lens or DC type non-amplifier lens. (Set the A.I. LENS switch to the DC position.) VIDEO type auto-iris lens A lens with amplifier circuit that operates on video signal and DC power source. In general, this type of lens is referred to as EE amplifier type lens.
L73T4/US GB 1999, 8, 3 MOUNTING THE LENS Please use a DC type auto-iris lens (sold separately). Checking the lens mount Do not use a lens if length “L” is more than 7 mm. If not, that may damage the camera and prevent proper installation. L 1 2 1 C mount type lens 2 3 3 2 CS mount type lens English 7 Remove the lens mount cap from the camera. Install the auto-iris lens. CS mount type lens Carefully align the lens mount with the camera opening, then turn the lens slowly to install it.
L73T4/US GB 1999, 8, 3 MOUNTING THE LENS Rewiring the lens cable in the lens iris plug 1 1 2 2 Prepare the lens cable. Cut the cable at the plug, then remove approx. 8 mm of the cable sheath and strip about 2 mm from each wire. Install the lens iris plug. Solder the cable to the pins following the correct pin layout (refer to the table and illustrations), then close the plug cover.
L73T4/US GB 1999, 8, 3 CONNECTIONS (A) 1 Basic connection for monitoring or recording The peripheral devices (VCR, monitor, lens, etc.) and cables are sold separately. 1 2 24 V 24 V Make the video signal connection between the camera and the monitor or time lapse VCR. Connect to 24 V AC UL listed class 2 power supply. CAUTION: • To prevent camera and/or power supply failure, pay close attention to polarity when making the 2 connections.
L73T4/US GB 1999, 8, 3 SETTINGS Camera setup section Electronic iris function setting a bc Use a manual or fixed iris lens and set the lens aperture to the shortest F stop. Set the EI switch to ON position. e VR401 L E V E H L Note: L DC VIDEO BLC EI OFF Please refer to the specifications for dynamic range of the electronic iris. A. I. LENS MIR ON EI CAUTION: d • The electronic iris is suitable for normal indoor use.
L73T4/US GB 1999, 8, 3 SETTINGS Lens iris adjustment Backlight compensation setting If using a DC type auto-iris lens, you will need to set the LEVEL (VR401) volume when shooting in the conditions described below. L (counterclockwise): To decrease the contrast H (clockwise): To increase the contrast • If shooting simultaneously in a dark room and through a bright window. VR401 L E • If the subject background is extremely V E bright or dark.
L73T4/US GB 1999, 8, 3 SETTINGS Line phase adjustment When using a camera switcher to connect 2 cameras or more to one monitor, there may be a vertical roll of the images when switched. In such a case, set as described below. Switch the display on the monitor from camera 1 to camera 2. Adjust the LINE PHASE volume on camera 2 until the vertical roll of the image stops. If more than two cameras are used, please repeat this procedure for all the cameras.
L73T4/US GB 1999, 8, 3 SPECIFICATIONS Scanning system Interlace Image device Picture elements Effective picture elements Synchronizing system Resolution Video output level Video S/N ratio Minimum required illumination (incandescent lighting) Backlight compensation Electronic iris function Mirror image Electronic iris range Flange-back Gamma correction Lens mount Environmental conditions Power supply English 13 : EIA standard (525 TV lines, 30 frames/sec.