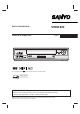
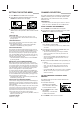
INSTRUCTION MANUAL 4-HEAD Hi-Fi STEREO VCR Only cassettes marked VWM-900 English can be used with this video cassette recorder. As an ENERGY STAR® Partner, SANYO has determined that this product or product model meets the ENERGY STAR® guidelines for energy efficiency. SANYO'S HELP-LINE Call the toll-free number below if you have any difficulties operating this product.
REGULATORY INFORMATION: FCC Part 15 This product has been tested and found to comply with the limits for a Class B digital device, pursuant to Part 15 of the FCC Rules. These limits are designed to provide reasonable protection against harmful interference when the product is operated in a residential installation.
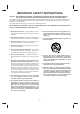
IMPORTANT SAFETY INSTRUCTIONS CAUTION: PLEASE READ AND OBSERVE ALL WARNINGS AND INSTRUCTIONS IN THIS OWNER’S MANUAL. AND THOSE MARKED ON THE PRODUCT. RETAIN THIS BOOKLET FOR FUTURE REFERENCE. This product has been designed and manufactured to assure personal safety. Improper use can result in electric shock or fire hazard. The safeguards incorporated in this product will protect you if you observe the following procedures for installation, use, and servicing.
CONTROL NAMES AND LOCATIONS REMOTE CONTROL POWER FRONT POWER Number buttons STOP/ EJECT CASSETTE COMPARTMENT REW PLAY SLOW FF CHANNEL (V/v) Remote Sensor REC PAUSE/ STILL INDICATOR PANEL POWER indicator TAPE IN indicator TV/VCR Ad JUMP PLAY INPUT REW SP/SLP CLEAR PAUSE REC VIDEO IN/ AUDIO IN (L/R) JACKS EJECT FF D E F G arrows STOP TV CONTROL buttons TV POWER, TV INPUT, TV CH + and TV CH – , VOL + and VOL –.
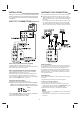
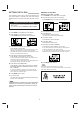
INSTALLATION ANTENNA TO VCR CONNECTIONS Placing your VCR on top of or under the TV receiver may result in interference on the TV screen when the VCR is on. If this occurs, move the VCR to a position beside the TV receiver. 1 2 VCR TO TV CONNECTION R-AUDIO-L Disconnect the antenna leads from the rear of the TV receiver. Identify the type of cable from your antenna. If it is a round cable as illustrated, it is a 75 ohm coaxial antenna cable. This cable will connect directly to the connector marked ANT.
ONSCREEN DISPLAY (OSD) EASY INFORMATION If Extended Data Service (XDS) signals are provided along with normal TV signals in your area or during playback of a tape recorded with Extended Data Service (XDS) signals, the station ID, program title, and program details are shown on the TV screen. When viewing a channel with Extended Data Service (XDS) signals, press ENTER and the station ID will appear on the TV screen. Press ENTER again and the program details will appear on the TV screen.
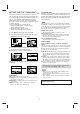
SETTING THE SETUP MENU CHANNEL SELECTION 1 Press MENU and the MAIN menu will appear. 2 Press v or V to select the SETUP menu, then press This VCR is equipped with a frequency synthesized tuner capable of receiving up to 181 channels. These include VHF channels 2-13, UHF channels 14-69, and CATV channels 1-125. ENTER. The SETUP menu will appear. PREPARATION • Connect the VCR to the desired type of antenna or cable TV system, as shown in ANTENNA TO VCR CONNECTIONS .
SETTING THE CLOCK MANUAL CLOCK SET Example: July 5, 2004 ; 2:15 AM 1 Press MENU and the MAIN menu will appear. The VCR gives you two ways to set the time and date: the Auto Clock Feature or manually. The Auto Clock Feature enables the VCR to set up the clock when the VCR is turned off. 2 Press v or V to choose the CLOCK menu. Press ENTER and the CLOCK menu will appear. Things to know before starting • The clock uses the 12-hour system. (Be sure to set AM and PM correctly.
SETTING THE TVG® (TVGuardian®) TVG WORD SETS In addition to the main TVG modes, three additional sets of words are available to the user to selectively turn on or off. ON means that the words belonging to the set will be filtered. OFF means that they will not be affected by the TVG processing. TVGuardian® Technology embedded into the VCR will filter foul language from pre-recorded movies which have CC (Closed Caption).
NORMAL PLAYBACK TO WATCH A STILL (or Frame Advance) PICTURE PREPARATION • • • During PLAYBACK mode: 1 Press PAUSE or PAUSE/STILL on the front panel. A still picture will appear on the TV screen. Turn on the TV. Be sure the TV is set to the VCR Output Channel (CH 3 or 4). If a direct VIDEO/AUDIO connection is made between the VCR and the TV, set the TV’s source selector to VIDEO. • If the still picture vibrates vertically, stabilize it by pressing CH/TRACK (v/V) on the remote control.
TIMER RECORDING AUTO POWER SHUT-OFF FUNCTION This feature is especially helpful when you finish watching a tape. Press STOP, REW, and POWER. The VCR will rewind the tape and turn itself off automatically. 1. Press STOP when you finish watching a tape. 2. Press REW to rewind the tape. 3. Press POWER during the REWIND mode, the VCR will enter the AUTO POWER SHUT-OFF mode. 4. The POWER indicator will flash on the VCR indicator panel. 5. After the tape is rewound, the VCR will turn off automatically.
10 Press V for SPEED. Press b or B to choose the desired tape speed (AUTO, SP, or SLP). Example: SP • The AUTO mode determines how much tape is left and switches speed from SP to SLP, if necessary, to complete recording the program. There will be some picture and sound distortion at the point of the speed change. 3 Press b or B to select a program you want to check or erase. If you want to erase the program, press CLEAR. 11 Press V to choose the REPEAT item. 4 Press MENU to return to the TV screen.
VHS Hi-Fi STEREO SYSTEM/ MTS BROADCAST CHECKING THE RECORDING TIME Press REC once to check the recording time. The recalled setting will automatically appear on the TV screen after 6 seconds. This VCR is equipped with the VHS Hi-Fi audio sound system for recording and playback. The information below gives a brief description of Hi-Fi audio and how to record and play a tape in the Hi-Fi audio mode. TO EXTEND THE RECORDING TIME The recording time can be extended at anytime by pressing REC.
MULTICHANNEL TV SOUND INDICATOR (MTS) COUNTER MEMORY FUNCTION This is useful if there is a section of tape you want to view immediately after recording or if you want to return to the same point several times. 1 Begin recording or playing a tape. 2 Press CLK/COUNT repeatedly to display the real-time counter on the TV. 3 At the point that you want to locate later, reset the real-time counter to 0:00:00 by pressing CLEAR. 4 Continue to play or record. 5 Press STOP when recording or playback finishes.
TROUBLESHOOTING SPECIFICATIONS Cassette cannot be inserted. • Load the cassette correctly (refer to arrow on cassette). • A cassette is already in the VCR. • Check if the POWER indicator is lit on the VCR indicator panel. If not, make sure the power cord is plugged in. • If the TAPE IN indicator flashes, press POWER again. GENERAL Head System Four head helical scan azimuth system Power Source AC 120V, 60Hz Power Consumption Approx. 12 Watts Dimensions (WxHxD) 14.3" X 3.2" X 9.
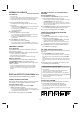
For assistance in obtaining repairs and operational information, please contact the following Toll Free Number: DIAL TOLL FREE: 1-800-813-3435 Weekdays 7:30AM ~ 4:00PM Central Time Also, you may write to SANYO Manufacturing Corporation, 3333 Sanyo Road Forrest City Arkansas 72335 LIMITED WARRANTY LABOR 90 DAYS PARTS 1 YEAR CARRY-IN ONLY THIS WARRANTY IS VALID ONLY ON SANYO PRODUCTS PURCHASED FROM A WAL-MART STORE AND USED IN THE UNITED STATES OF AMERICA, EXCLUDING HAWAII AND ALL U.S.