SC4H/CA3 (VHR-H690 GB) Tue. Mar. 14/2000 Language Contents VHR-H690 INSTRUCTION MANUAL Video Cassette Recorder (CA) Only cassettes marked w can be used with this video cassette recorder. As an ENERGY STAR® Partner, SANYO has determined that this product meets the ENERGY STAR® guidelines for energy efficiency. ® VCR Plus+ and PlusCode are registered trademarks of Gemstar Development Corporation. The VCR Plus+ system is manufactured under license from Gemstar Development Corporation.
SC4H/CA3 (VHR-H690 GB) Tue. Mar. 14/2000 PRECAUTIONS WARNING: To reduce the risk of fire or electric shock, do not expose this appliance to rain or moisture. CAUTION: To prevent electric shock, match wide blade of plug to wide slot of electrical outlet and insert fully.
SC4H/CA3 (VHR-H690 GB) Tue. Mar. 14/2000 FEATURES CONTENTS TIMER/CLOCK œ œ œ œ œ œ œ Precautions . . . . . . . . . . . . . . . . . . . . . . . . . . . . . . . . . . . 1 Features . . . . . . . . . . . . . . . . . . . . . . . . . . . . . . . . . . . . . 2 Accessories. . . . . . . . . . . . . . . . . . . . . . . . . . . . . . . . . . .
SC4H/CA3 (VHR-H690 GB) Tue. Mar.
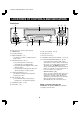
SC4H/CA3 (VHR-H690 GB) Tue. Mar. 14/2000 LOCATIONS OF CONTROLS AND INDICATORS Front Panel 1 2 3 4 5 hPAUSE/STILL POWER c f REW VIDEO AV INPUT L-AUDIO-R aREC PLAY bSTOP/iEJECT REC. LIST CHANNEL I e FF H G F 98 7 6 Reference pages are shown in square brackets. 1 POWER button 2 Cassette loading slot 3 REW (rewind) button [31] 9 F G H I This button is used both for rewind and reverse picture search.
SC4H/CA3 (VHR-H690 GB) Tue. Mar. 14/2000 LOCATIONS OF CONTROLS AND INDICATORS Indicator Panel 1 2 C AM VCR REC 1 Operation Icons (see below). 2 VCR indicator 3 4 Use the TV/VCR button on the remote control to turn this indicator ON or OFF.
SC4H/CA3 (VHR-H690 GB) Tue. Mar. 14/2000 LOCATIONS OF CONTROLS AND INDICATORS Back Panel 1 2 3 IN OUT VHF/UHF FROM ANT. VIDEO L IN TO TV AUDIO R OUT AC IN 654 1 AC power input 2 Rear-panel AUDIO/VIDEO input jacks 4 VHF/UHF antenna output jack 5 VIDEO output jack (yellow) 6 AUDIO output jacks (Red for right and white for left) Connect the audio and video outputs from an external unit (i.e. a video camera, second VCR) to these jacks.
SC4H/CA3 (VHR-H690 GB) Tue. Mar. 14/2000 MULTIBRAND UNIVERSAL REMOTE CONTROL This universal remote control will operate the basic functions of TVs and cable (CATV) converters/decoders, when the brand matches one of those shown on pages 8 and 9. Reference pages are shown in square brackets.
SC4H/CA3 (VHR-H690 GB) Tue. Mar. 14/2000 MULTIBRAND UNIVERSAL REMOTE CONTROL Battery Installation and Operation Setting the remote control code 1 Install the two supplied AA batteries as shown. 2 Aim the remote control at the VCR and press the The multibrand universal remote control can operate the basic functions of TVs and cable (CATV) converters/decoders made by the manufacturers listed below. desired buttons to operate.
SC4H/CA3 (VHR-H690 GB) Tue. Mar. 14/2000 MULTIBRAND UNIVERSAL REMOTE CONTROL For cable (CATV) converter/decoder or DSS (Digital Satellite System) receiver operation Cable converter/decoder brands STARGATE SYLVANIA TEKNIKA TELECAPTION TELEVIEW TEXSCAN TOCOM UNIKA UNIVERSAL VIDEOWAY VIEWSTAR ZENITH 1 In the chart, find the code corresponding to your brand of cable converter/decoder or DSS receiver. 2 While holding down the CATV/DSS button, press 2 number buttons (0 – 9) to enter the code.
SC4H/CA3 (VHR-H690 GB) Tue. Mar. 14/2000 BASIC ANTENNA/CABLE CONNECTIONS Antenna VCR (Back panel) 75 ohm antenna cable TV (Back panel) VHF/UHF ANTENNA IN VHF/UHF FROM ANT. or IN 1 AC Wall outlet TO TV OUT AC IN CABLE TV 3 (supplied) 4 1 Connect an antenna (or a cable TV system) to the 2 NOTES: VCR. œ If you have a cable converter connected to your TV, see “ALTERNATIVE CABLE TV CONNECTIONS”, next page. 2 Connect the VCR to the TV with the 75 ohm coaxial cable (supplied).
SC4H/CA3 (VHR-H690 GB) Tue. Mar. 14/2000 ALTERNATIVE CABLE TV CONNECTIONS Your local cable TV company will advise you of the channels available in your area. Your VCR can receive all unscrambled cable channels without the use of an external converter. If you wish to view and record scrambled cable channels, you must connect a converter/decoder as described below. We recommend that you consult your cable TV company to make sure that the cable is properly connected.
SC4H/CA3 (VHR-H690 GB) Tue. Mar. 14/2000 ALTERNATIVE CABLE TV CONNECTIONS Cable converter/decoder output channel setup 1 Be sure the cable connections are correct. 8 Press the ù (or û) button to select the Cable box (See page 11.) option. 2 Turn on the TV, VCR and cable converter/decoder. 3 Set the TV to channel 3 or 4. 4 Press the VCR button on the remote control to select 9 Press the > (or <) button to set your cable converter/decoder output channel.
SC4H/CA3 (VHR-H690 GB) Tue. Mar. 14/2000 AUDIO/VIDEO CONNECTIONS Stereo Connections Connecting your VCR to your stereo TV through audio/video jacks usually provides better picture and sound quality. It also enables you to play back stereo broadcast programs in stereo. When you have a stereo monitor TV Stereo monitor TV (Back panel) VCR (Back panel) OUT VHF/UHF ANTENNA IN VHF/UHF FROM ANT.
SC4H/CA3 (VHR-H690 GB) Tue. Mar. 14/2000 INITIAL SETUP 5 Press the OK button to save the RF output channel When you are setting up the VCR for the first time, or after the power has failed for more than 1 hour, follow the steps below. This AUTO SETUP operation automatically sets the RF output channel, enters all available channels in your area into the VCR tuner memory and sets the VCR internal clock. setting. The “RF-03 (or RF-04)” display on the indicator panel will change to the clock display.
SC4H/CA3 (VHR-H690 GB) Tue. Mar. 14/2000 INITIAL SETUP Manual Erase To modify the RF output channel setting after the Auto setup is completed You can eliminate unwanted channels or channels with weak or scrambled signals from the memorized channel sequence. 1 With the VCR turned off, press the SET button for 1 Select the channel you want to erase. 2 Press the CLEAR button for about 2 seconds. about 3 seconds or more.
SC4H/CA3 (VHR-H690 GB) Tue. Mar. 14/2000 MULTIFUNCTION ON-SCREEN DISPLAYS Various displays appear, superimposed over the screen image, indicating the operation mode and features in use. Operation mode 1 Press the DISPLAY button on the remote control. MTS mode Program title Channel/AV QTR end time p Status display The status display appears.
SC4H/CA3 (VHR-H690 GB) Tue. Mar. 14/2000 ON-SCREEN MENU Your new VCR is designed with user-friendly on-screen menus to help you operate its many features. Color-coded menus prompt you step-by-step through operations by highlighting the sections awaiting your entries. Main Menu Options Reference pages are shown in square brackets. Timer program [35 – 37] œ Select this to program, check or cancel a timer recording setting. Displaying the On-Screen Menus VCR setup [18] 1 Turn on the power (TV and VCR).
SC4H/CA3 (VHR-H690 GB) Tue. Mar. 14/2000 ON-SCREEN MENU VCR Setup Menu Options Displaying the VCR Setup Menus Reference pages are shown in square brackets. Before starting CATV/TV [21] œ Turn on the power (TV and VCR). œ Indicate whether you subscribe to cable TV or use antenna. œ Set the TV to channel 3 or 4. œ Press the VCR button on the remote control to select the VCR operation mode. Cable box [12, step 9] œ If you use a cable converter/decoder (cable box), set the output channel.
SC4H/CA3 (VHR-H690 GB) Tue. Mar. 14/2000 SETTING THE CLOCK Generally, during the initial setup, your VCR will automatically set the clock by detecting a channel that is transmitting the XDS (Extended Data Services) signal. However, if the XDS signal necessary for Automatic Clock Setting was poor or unavailable at the time, Automatic Clock Setting may not have been possible. Automatic Clock Adjustment 1 Press the MENU button. The main MENU appears.
SC4H/CA3 (VHR-H690 GB) Tue. Mar. 14/2000 SETTING THE CLOCK Manual Clock Setting Standard/Daylight Time Adjustment 1 Follow the steps in Before starting. 2 Press the MENU button. The clock time can be easily changed to daylight saving time (by adding one hour) or standard time (by subtracting one hour). The main MENU appears. 1 Press the MENU button. If the clock has not yet been set, the Clock set menu appears. The main MENU appears.
SC4H/CA3 (VHR-H690 GB) Tue. Mar. 14/2000 CHANGING THE MENU LANGUAGE 1 Press the MENU button. English, Spanish or French can be selected by the user. The main MENU appears. Before starting 2 Press the ù (or û) button to select the Language œ Turn on the power (TV and VCR). select option, then press the OK button. œ Set the TV to channel 3 or 4. 3 Press the ù (or û) button to select the language of œ Press the VCR button on the remote control to select the VCR operation mode.
SC4H/CA3 (VHR-H690 GB) Tue. Mar. 14/2000 VIEWING TV ONLY You do not need to disconnect the VCR from the TV in order to watch a TV program without recording it. 1 Turn off the VCR. 2 Turn on the TV and set it to the channel you want to watch. PLAYING A RENTAL TAPE When you load a cassette with the safety tab removed, the VCR starts playing it automatically. Before starting BASIC OPERATION œ Turn on the TV. œ Set the TV to channel 3 or 4. This VCR features full automatic playback and rewind.
SC4H/CA3 (VHR-H690 GB) Tue. Mar. 14/2000 NORMAL PLAYBACK Manual Picture Control Before starting 1 Press the DPC button during playback. œ Turn on the power (TV and VCR). The DPC (picture control) screen appears. œ Set the TV to channel 3 or 4. 2 Press the DPC button to set the picture control. œ Load a cassette. Auto: Automatic picture control. Manual: Manual picture control. œ Select the desired audio output mode. (See “AUDIO OUTPUT MODE” on page 30.
SC4H/CA3 (VHR-H690 GB) Tue. Mar. 14/2000 TRACKING CONTROL Tracking Control Adjustments TAPES WITH Hi-Fi SOUND When you play a tape that was not recorded on this VCR, some noise may appear in the picture due to incorrect head-to-tape tracking. When a tape with Hi-Fi sound is played, the L and R indicators must be on for Hi-Fi sound to be heard. Watch the L and R indicators on the indicator panel while pressing the CH/TRACK l or j button (or CHANNEL on the front panel).
SC4H/CA3 (VHR-H690 GB) Tue. Mar. 14/2000 RECORDING Before starting Rec. List Super Feature The Rec. List Super feature lets you keep track of all recordings you make on this VCR. The information automatically includes the channel number, date and start time. In addition you have an option to add the program type to the information list. See page 27 for more detailed instructions on the Rec. List Super feature. œ Turn on the power (TV and VCR). œ Set the TV to channel 3 or 4.
SC4H/CA3 (VHR-H690 GB) Tue. Mar. 14/2000 RECORDING Smart Speed Record Function When the Smart Speed Record function is set, the VCR automatically calculates the remaining time left on the tape during recording. If there is not enough time left for the program to be recorded, the VCR switches the recording speed from SP (standard play) to SLP (super long play) to enable the entire program to fit onto the remaining tape.
SC4H/CA3 (VHR-H690 GB) Tue. Mar. 14/2000 Rec. List SUPER 5 Press the STOP button, if the desired recording is Rec. List (Recording Contents List) Super listed. 6 Press the ù (or û) button to set the desired recording, Every time a recording is made with this VCR, the channel number, date and start time information is automatically recorded on the tape. When you call up the Rec. List super menu, the VCR scans the information on the tape and displays it on screen.
SC4H/CA3 (VHR-H690 GB) Tue. Mar. 14/2000 Rec. List SUPER Entering the Program Type NOTES: To have the program type included in the Rec. List super menu, you must enter the program type before proceeding to step 1 of “RECORDING” on page 25. œ To enter the selected program type, press the SET button within 10 seconds after selecting a program type. œ Program types set manually have priority over automatic settings. œ The clock must be set before the program type can be selected.
SC4H/CA3 (VHR-H690 GB) Tue. Mar. 14/2000 VHS Hi-Fi AUDIO AND MTS BROADCASTS VHS Hi-Fi VCRs record and play back two kinds of audio tracks: Hi-Fi stereo tracks (left and right) and a normal (linear) audio track. MTS MODE SELECTION To watch and/or record a stereo or SAP broadcast, set the MTS mode as follows. œ The Hi-Fi tracks contain two separate signals (for example, the left and right channels of a stereo program or the main and second SAP* signals). 1 Follow the “Before starting” steps on page 18.
SC4H/CA3 (VHR-H690 GB) Tue. Mar. 14/2000 AUDIO OUTPUT MODE 4 Press the ù (or û) button to select the Audio out Use the VCR setup menu to select the desired audio output mode when playing a tape or viewing a television broadcast. option, then press the > (or <) button to select the desired mode, as indicated by the “z”. NOTE: Audio output mode selection is not required when playing back a tape recorded in mono or viewing a mono TV program.
SC4H/CA3 (VHR-H690 GB) Tue. Mar. 14/2000 SPECIAL PLAYBACK Picture Search (Forward and Reverse) Endless Playback 1 Press the FF or REW button during normal playback. This function will play back a tape to the end, rewind it and then replay and rewind over and over until you stop it. The picture plays forward or backward rapidly. 1 In the stop or playback mode, press and hold the 2 Press the PLAY button to resume normal playback.
SC4H/CA3 (VHR-H690 GB) Tue. Mar. 14/2000 ZERO SEARCH Use the zero search function to go back to the beginning of a program immediately after you have recorded it. NOTES: œ The tape counter indicates tape elapsed time in hours, minutes and seconds. 1 Press the DISPLAY button. The status display appears. œ When you eject a cassette, the tape counter resets to 0:00:00. 2 Press the RESET button. œ The tape counter does not operate when a blank tape or a blank portion of a tape is played.
SC4H/CA3 (VHR-H690 GB) Tue. Mar. 14/2000 VCR Plus+® PROGRAMMING SYSTEM 5 Check the channel number displayed on the screen. You can easily program a timer recording by entering the PlusCode® programming number (3 to 8 digits) published in your TV Guide® , CATV guide or local newspaper. For the channel numbers that appear highlighted (gray background instead of green), continue the programming until step F, and the channel will be memorized.
SC4H/CA3 (VHR-H690 GB) Tue. Mar. 14/2000 ® VCR Plus+ PROGRAMMING SYSTEM VCR Plus+ PROGRAMMING SYSTEM NOTES: œ If the programmed recording falls on a Saturday or a Sunday, the Daily recording mode will not be possible. œ If you subscribe to cable television, and your cable company changes the channel assignments in your area, it may be necessary to correct some channel numbers as described in item 5 on page 33.
SC4H/CA3 (VHR-H690 GB) Tue. Mar. 14/2000 PROGRAM TIMER RECORDING Each time the > button is pressed, a different recording mode (Daily – Weekly – Once) is selected. The Program Timer switches your VCR on and off to record a TV program at a preset time. On any occasion, you can preset a maximum of 8 programs to be recorded during the next 1-year period, including the ones programmed with the VCR Plus+ system. See “VCR Plus+® PROGRAMMING SYSTEM” on page 33. Set the start and end time.
SC4H/CA3 (VHR-H690 GB) Tue. Mar. 14/2000 PROGRAM TIMER RECORDING Checking the Program Timer Setting a Program Timer Recording Using the Buttons on the VCR 1 Turn on the power (TV and VCR). 2 Set the TV to channel 3 or 4. 3 Press the MENU button. If the remote control does not operate or is not available you can use the buttons on the VCR front panel to set a program timer recording. The main MENU appears. NOTE: Eject the cassette tape, before proceeding with the steps below. 4 Press the OK button.
SC4H/CA3 (VHR-H690 GB) Tue. Mar. 14/2000 PROGRAM TIMER RECORDING Using Timer Recording for Several Programs If two or more programmed recording times overlap on the same day, the VCR will not begin recording a new program until the previous program has ended (as shown below). Program Recording Order 7:00PM 8:00PM 9:00PM 10:00PM Program These portions will not be recorded TIMER SETTING NOTES: œ If the programmed recording falls on a Saturday or a Sunday, the Daily recording mode will not be possible.
SC4H/CA3 (VHR-H690 GB) Tue. Mar. 14/2000 QUICK TIMER RECORDING (QTR) As the name suggests, the QTR feature provides a quick and simple way to set the timer to record. A QTR setting overrides Program Timer settings. NOTES: œ The end time can be advanced for a total of up to 24 hours. œ The clock must be set before Quick Timer Recording can be performed. œ Recording ends if the end of the tape is reached.
SC4H/CA3 (VHR-H690 GB) Tue. Mar. 14/2000 CHILD LOCK With the Child Lock function on, the picture is blanked and the sound muted, virtually blocking the ability to view a videotape or TV program received through the VCR tuner. NOTES: œ Even when the child lock function is activated, timer recording and other functions can still operate normally.
SC4H/CA3 (VHR-H690 GB) Tue. Mar. 14/2000 COPYING A TAPE You can copy recordings (such as home videos) from one tape to another using two VCRs. Audio connection cable (not supplied) TV Video connection cable (not supplied) OUT IN VIDEO VIDEO L L AUDIO AUDIO R R VCR 1: To play back 1 2 3 4 5 TO TV OUT VCR 2: To record 6 Press the TV/VCR button on VCR 2 to select the Connect the VCRs as shown. VCR mode. Insert the recorded cassette into VCR 1. 7 Place VCR 2 in the record/pause mode.
SC4H/CA3 (VHR-H690 GB) Tue. Mar. 14/2000 TROUBLESHOOTING GUIDE If you have followed the instructions in this manual and still have difficulty operating your VCR, check the steps below before getting help from a factory-authorized service center. SYMPTOM POSSIBLE CAUSE CORRECTIVE ACTION No power. œ The power cord is not connected. œ Connect the power cord to the AC power input socket, then to an AC wall outlet. œ The power is not on. œ Turn the power on.
SC4H/CA3 (VHR-H690 GB) Tue. Mar. 14/2000 SPECIFICATIONS General Specifications Television system NTSC standard system Recording system Rotary helical scan system Number of heads 4, Double azimuth video 2, Audio FM Format VHS standard Tape width 1/2 inch Tape speed SP : 33.35 mm/sec. (1.31″/sec.) LP : 16.67 mm/sec. (0.65″/sec.) ..... (playback only) SLP : 11.12 mm/sec. (0.43″/sec.
SC4H/CA3 (VHR-H690 GB) Tue. Mar. 14/2000 SANYO Canada Inc. 1AC6P1P2259– –A SC4H/CA3 (0400KP-SJC) 300 Applewood Crescent Concord, Ontario L4K 5C7 Issue No. 1 Copyright SANYO, 2000 All rights reserved.