
Instruction Manual


English 96
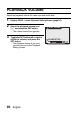
DISPLAYING THE CALENDAR
Photos that were captured as calendar shots can be viewed in a calendar-
format schedule.
Previously captured images can also be entered in the calendar, and images
can be removed from the calendar as desired (page 97).
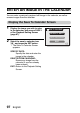
1 Make a calendar shot (page 77).
2 Display a still image (page 35), and
toggle the SET button down.
h The calendar appears.
h You can press the MENU button to
return to the Playback Screen.
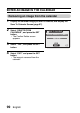
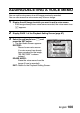
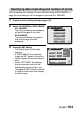
3 Toggle the SET button up, down, left
and right to select the desired date,
and press the SET button.
h The image that was entered for the
selected date is displayed full-
screen.
h Toggle the SET button to the left or
right to display the previous or next
image that was entered in the
calendar.
h Toggle the SET button down to
display the calendar.
h When the MENU button is pressed,
the Save To Calender Screen
(page 97) appears.
CAUTION
If the calendar does not appear...
i The calendar will not appear in step 1 if no image has been entered in the
schedule. Follow the procedure to make a calendar shot (page 77), or
enter an image in the calendar (page 97), and then display the calendar.
30
23
16
2
31
24
10
3
25
18
4
26
19
12
5
27
20
13
6
28
21
14
7
29
22
15
1
3
MAR. 2006 06.12.25
SUN MON TUE WED THU FRI SAT
9
8
11
17