
Instruction Manual


English 64
DATE IMPRINT
You can choose to have the date the image was captured imprinted on the
image.
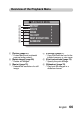
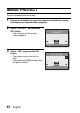
1 Display the Recording Menu (page 53).
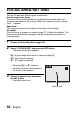
2 Select “INSERT DATE ON IMAGE”, and press the SET button.
h The date imprint menu appears.
ON: The date of the capture is imprinted on the image.
OFF: The date of the capture is not imprinted on the image.
3 Press the [n] or [o] button to select the desired setting, and press
the SET button.
h The date imprint mode is set, and you are returned to the Recording
Menu.
HINT
About the capture date and date imprinting
i When an image is edited, the date of the image file changes to the date
and time the image was edited. However, the imprinted capture date
remains unchanged.
Is the sequential shots speed slow?
i When the date imprint mode is set to “ON”, the sequential shots speed
may become slower.
If the imprinted date is shown as [- - - - .- - .- -] …
i The date and time settings have not yet been completed. Set the camera
to the correct date and time (page 16).