
Operation Manual


25 English
DATE AND TIME SETTING
h If “DISP OFF” is selected, the date the image was captured is not
shown during playback.
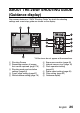
4 Press the SET button.
8 Select “EXIT”, and press the SET button.
h The date and time setting is completed, and you are returned to the
Option Screen.
h To return to the Shooting Screen, press the MENU button.
HINT
i Under normal conditions, while the battery pack is being replaced, an
internal battery will maintain the date and time settings. However, there is a
small chance the settings may be lost. (The backup will last for about 7
days.) It is recommended to check that the date and time settings are still
correct after replacing the battery pack and before shooting or recording of
any type (follow steps 1 and 4).
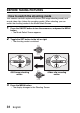
To correct the date and time settings
i After steps 1 and 4, select the line of the setting that you want to change,
press the SET button, and follow the steps in the respective paragraphs
above to change the setting.