
Installation Manual


53
The Sapling Company, Inc.
670 Louis Drive
Warminster, PA 18974
USA
P. (+1) 215.322.6063
F. (+1) 215.322.8498
www.sapling-inc.com
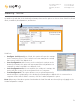
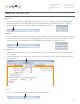
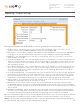
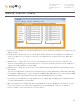
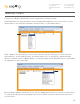
sbdconfig - Display Settings
Clicking on the Display Settings tab will allow a user to program the following settings:
1. Display Format - Allows the user to select how the time is displayed on the clock. There are two
options: 12 hour format (3:00AM/3:00PM) or 24 hour format (3:00/15:00).
2. Date Format - Sets the date to display in either American style: MM:DD:YY or European style: DD:MM:YY.
For 4 digit clocks, the date will display in either American style: MM:DD or European style: DD:MM.
3. Brightness - Sets the brightness level that the clock will display. There are four levels to choose from:
High, Medium, Low or Off.
4. Seconds Time Displayed* - The clock will display the time for the number of seconds entered in the box.
After the selected amount of time passes, the clock will change to show Date or Temperature. If a time
of 0 is selected, the clock will not display the time. If Date and Temp Displayed are set to 0, the clock
will only display the time.
5. Seconds Date Displayed* - The clock will display the date for the number of seconds entered in the box.
After the selected amount of time passes, the clock will change to show the Time or Temperature. If a
time of 0 is selected, the clock will not display the date. If Time and Temp Displayed are set to 0, the
clock will only display the date.
6. Seconds Temp Displayed* - If a temperature sensor was installed on the clock, the clock will display the
temperature for the number of seconds entered in the box. After the selected amount of time passes,
the clock will change to show the Time or Date. If a time of 0 is selected, the clock will not display the
temperature. If Time and Date Displayed are set to 0, the clock will only display the temperature.
7. Display Temp In - If a temperature sensor was installed on the clock, this option allows a user to select
whether the temperature appears in Fahrenheit or Celsius.
8. Blink Alerts (911, Fire, Bell) - When checked, this option will enable the emergency alert messages
programmed with the master clock to blink when activated (see the specific master clock user manual
for more information). Leaving the message unchecked will result in the message being sent in text that
does not blink.
9. Blink Other Text Displays - When checked, this option will enable any other messages programmed with
the master clock to blink when activated (see the specific master clock user manual for more information).
Leaving the message unchecked will result in the message being sent in text that does not blink.
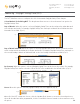
Once all of the Display Settings are chosen, click the ‘Update Clock’ button to store the selected options or, when all
the tabs have been programmed, click the ‘Load Clock’ button located on the menu bar to store all options.
*Note: If the Time, Date, and Temp Displayed are ALL set to 0, the display will turn completely blank. Will turn on
for count down/up, and off again once the counting has been cleared.
1
3
2
7
9
5
6
4
8