
User Manual


/ 3
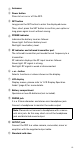
①
Antennas
②
Power button
Press to turn on or off the RX9.
③
SET button
Long press the SET button to enter the displayed menu.
Then, short press the SET button to confirm your option or
long press again to exit without saving.
④
POWER indicator
Indicates the battery level as follows:
Green light: Sufficient battery level.
Red light: Low battery level.
⑤
RF indicator and infrared transmitter port
The infrared transmitter port sends the set frequency to a
transmitter.
RF indicator displays the RF input level as follows:
Green light: RF signal is strong.
Red light: RF signal is weak or disconnected.
⑥
+ or – button
Selects functions or values shown on the display.
⑦
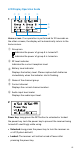
LCD display
Display menus, please refer to "LCD Display Operation
Guide" (page 5) for more details.
⑧
Battery compartment
Operates on two AA batteries (not included).
⑨
PHONE jack
It is a 3.5mm diameter and stereo mini headphone jack.
Connect a headphone to monitor the audio output.
Note: Please do not connect a headphone with a mona-
ural mini jack. As this may short-circuit the headphone
jack and distorted sound output.
⑩
OUTPUT jack
Connect the RX9 to a video camera, camcorder, mixer or
amplifier with the supplied output cable.
⑪
Standard cold shoe