
User manual


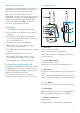

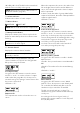
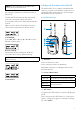
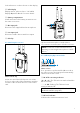

Table Of Contents

3
cover according to the indicating arrow to open
the battery compartment.
Install a battery properly and the battery will be
locked automatically. Slide the switch to close
the battery compartment.
Remove a battery:
Slide the switch on the battery compartment
cover according to the indicating arrow to open
the battery compartment. Slide the battery
locking unit to release the battery.
⑦
PHONE jack
3.5mm stereo mini headphone jack.
Connect a headphone to monitor the audio
output.
⑧
LINE out jack
Connect the RX to a video camera, camcorder,
mixer or amplifier with the supplied output
cable.
⑨
Standard mount cold shoe
⑩
Belt clip
3.2 Attaching Accessories
Connect the supplied cable to the Line out
Plug the supplied 3.5mm cable into the LINE
OUT. For a secure connection, rotate clockwise
to lock the connector.
①
Attach the shoe mount adapter
Please attach the belt clip upside-down before
attaching the shoe mount adapter.
②
Push the bottom of the belt clip to make
some space between the belt clip and the
receiver.
③
Align the belt clip with the two vertical
grooves on the shoe mount adapter and insert
the adapter in the direction of the arrow. Push
the shoe mount adapter in fully until the belt clip
fits into the horizontal groove on the adapter
holds.
3.3 LCD Display Operation Guide
Home screen
If no operation is performed for 20 seconds on
the other screens, the display will automatically
return to the home screen.
①
RX & TX connecting indicator
"———": The RX hasn't been matched with a TX in
this group.
"A"or"B"or"C" flashing: The RX has been
matched but hasn't been connected with the TX
in this group.