98648-002-63 Sartorius Basic Electronic Analytical and precision Balances Installation and Operating Instructions
BA 210 S, BA 160 P, BA 110 S 2
BA 310 S, BA 310 P 3
BA 110 4
BA 210 5
BA 4100 S, BA 3100 P, BA 2100 S, BA 610; BA 6100, BA 4100, BA 2100 6
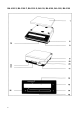
1 Weighing pan 12 Weight display 2 Compensating ring (depends on type of model) 13 CAL key 3 Pan support (depends on type of model) 14 Print key (for data output) 4 Protective ring (depends on type of model) 15 Tare control 5 Protective bushing (depends on type of model) 16 ON/OFF key 6 Weighing chamber base plate (depends on type of model) 17 Data interface 7 Locking ring (depends on type of model) 18 AC jack 8 Leveling foot (depends on type of model) 19 Manufacturer’s label (on bottom of ba
Contents Page Warranty Storage and Shipping Conditions Equipment Supplied Installation Instructions Ambient Conditions Startup Mounting the Analytical Draft Shield Chamber Connecting the Balance to AC Power Voltage Selection Safety Precautions Connecting Electronic Devices (Peripherals) Information on Weighing Electro statically Charged Samples Leveling the Balance Using the Level Indicator How to Operate the Balance 9 9 Page ————————————————————— Special Functions/Operating Parameters: 10 11 12 13 15 1
With this Sartorius Balance, you have acquired a high-quality electronic weighing instrument that will ease your daily work load. Please read these installation and operating instructions carefully before operating your new balance. Warranty Do not miss out on the benefits of our full warranty. Please complete the warranty registration card, indicating the date of installation, and return the card to your Sartorius dealer. Storage and Shipping Conditions Allowable storage temperature: -40 °C ...
Equipment Supplied BA 210 S, BA 160 P, BA 110 S, BA 61 BA 310 S, BA 310 P BA 110, BA 4100 S, BA 3100 P, BA 2100 S, BA 610, BA 210, BA 6100, BA 4100, BA 2100 — Balance — Balance — Balance — AC adapter — AC adapter — AC adapter — Weighing pan — Weighing pan — Weighing pan — Weighing pan — Pan support — Pan support — Glass cylinder of the round draft shield — Draft shield lid — Draft shield base plate — Pan support — Balance with analytical draft shield chamber — AC adapter — Protective ring
Installation Instructions Ambient Conditions The Sartorius Basic Balance is designed to provide reliable weighing results under normal conditions in the laboratory and in industry.
Startup Mounting the Analytical Draft Shield Chamber on the BA 210 S, BA 160 P, BA 110 S and BA 61 - Remove plastic, adhesive Strips and foam packaging - When you handle the draft shield chamber, make sure it is always in an upright position Mounting the Draft Shield - Place the draft shield on the balance Take the base plate out of the weighing chamber Align the draft shield Position the locking ring (7) in the weighing chamber and turn it clockwise until it locks in place Installing the Weighing Cha
Installing Components in the Weighing Chamber Install the components in the following order: - protective bushing (5) - protective ring (4) - pan support (3) - compensating ring (2) - weighing pan (1) Starting Up the BA 310 S and BA 310 P - Place the draft shield base plate (22) on the balance and turn it clockwise until it locks in place Install the following parts on the balance in this order: - pan support (3) - weighing pan (1) - glass cylinder of the round draft shield (21) - draft shield lid (20)
Starting Up the BA 4100 S, BA 3100 P, BA 2100 S, BA 610, BA 6100, BA 4100 and BA 2100 Place the weighing pan (1) on the balance Connecting the Balance to AC Power Your balance is energized by an AC adapter. Make sure the voltage rating printed on this unit is identical to your local line voltage. lf the voltage rating specified on the AC adapter or plug design does not match the rating or Standard you use, please contact your Sartorius dealer or Office.
Plug the cord of the AC adapter into the jack on the balance. Now plug the AC adapter into a wall outlet. Voltage Selection You can select the voltage only if you use our portable power supply (69 71172) that has a European-type plug (rounded prongs). Safety Precautions The power supply or AC adapter rated to Class 2 can be plugged into a wall outlet without taking any additional safety precautions. The pole of the output voltage is connected to the balance housing which can be grounded for Operation.
Information on Weighing Electro statically Charged Samples lf you are using a balance with a 0.1 mg readability and electro statically charged glass or plastic Containers with a diameter larger than the weighing pan, you should utilize our antistatic pan (Ø 130 mm - see "Accessories") instead of the Standard weighing pan.
How to Operate the Balance After you have initially plugged your balance into a wall outlet (or after a relatively long power outage), allow for at least 30 minutes' warmup The weight display shows the following messages for your information: { (OFF) The balance was disconnected from AC power (power failure or outage for longer than approx 3 seconds, reconnection to AC power after the balance was unplugged).
Weighing Turning the Display On and Off (Standby Mode) Press the ON/OFF key (16) to turn the display on or off. Self-Test After the balance is turned on, an automatic self-test of the scale's electronic circuitry is performed. This self-test ends with the readout "0.0 g/0.00 g/0.000 g or 0.0000 g" depending on the balance model. Taring For exact weight determination, press the tare control (15) to zero the weight display. You can tare within the entire weighing range of the balance.
Calibration During calibration, the balance is adapted to changes in ambient conditions. Calibrate your new balance at the point of use – after warmup and before the first measurement. Recalibrate your balance each time you move it to a different location and whenever ambient conditions (especially the temperature) change considerably. Unload the weighing pan and tare. When you obtain a zero readout, press the CAL key (13). The calibration routine is started and the calibration weight in grams is displayed.
Data Interface lf you wish to document your weighing data with the Sartorius Data Printer, connect the printer's interface connector to the interface port (17) on the balance. You do not need to change any settings! To do this, remove the protective cap from the data interface port.
Below-Balance Weighing A port for below-balance weighing is available on the bottom of the balance (not on models BA 160 P, BA110 S, BA61, BA110, BA 210 or BA 2100). To fasten an attachment or hanger, open the below-balance port by removing the two screws on the bottom of the balance and detach the closing plate. Now you can attach a sample using a Suspension wire, for example.
Balance Operating Menu The balance operating menu enables you to adapt the balance to your requirements. At the factory, we have set the codes for the balance operating program so that you normally will not need to make any changes. lf you have special operating conditions, change the codes in the balance operating program to meet your individual requirements. The factory settings in the balance operating program are marked with "*".
Weight Units You can select any of the following weight units: Grams Kilograms Symbol g kg Code 1 7 2 1 7 3 Carats Pounds Ounces Troy ounces Hong Kong taels Singapore taels Taiwanese taels Grains Pennyweights Milligrams Parts per pound Chinese taels Mommes Austrian carats Tola Baht Mesghal ct lb oz ozt tl tl tl GN dwt mg o tl m k t b m 1 1 1 1 1 1 1 1 1 1 1 1 1 1 1 1 1 Changes * 7 4 7 5 7 6 7 7 7 8 7 9 7 10 7 11 7 12 7 13 7 14 7 15 7 16 7 17 7 18 7 19 7 20 Some unit symbols printed on hard copy or o
Additional functions: Beep Tone (Acoustic Signal) If you desire, you can turn off the beep tone – also called an acoustic signal. Acoustic signal ON OFF Code 8 2 1 8 2 2 Changes * Universal Switch An external switch can be connected via the interface port – you can change the setting in the menu code to alter the function of this switch Funktionen Print Tare Code 8 4 1 8 4 2 Changes * Power-On Mode Depending on the your operating requirements, you can change the power-on mode of your balance.
Utilities for Printouts or Data Transfer: Sartorius Balances come Standard with an interface. You can plug a Sartorius Printer or a Computer into this interface port to print data on hard copy or transfer them to your Computer. Moreover, you can choose to Output data from your balance to this on-line device either automatically or by pressing the print key on the balance. The balance operating menu lets you define the various parameters for data Output.
Changing Settings in the Balance Operating Menu Select the appropriate code to change settings for certain functions.
- press the CAL key until "8" appears - key until the third digit of the code appears (here, press the the current code setting always appears) - use the CAL key to change the right-hand number to "2" - confirm the code setting You must press the tare control (15) to confirm the code you have just set (this is indicated by "o" after the code).
In the balance operating program, each code setting is indicated by "o" behind the last number. When you access the menu of the balance operating program and move to the right-hand number, the current code setting is displayed. This makes it easy to check the codes you have set.
Troubleshooting Guide Problem ... No segments appear in the weight display (12)? The weight display shows "H"? Weight display shows "L" or "Err 54"? Weight display briefly displays "Err 02"? The special message " " does not go out in the weight display The weight readout changes constantly The display shows "Lo Accu" or a weight flashes in the display? The weight readout is obviously wrong Causes ...
Care and Maintenance Cleaning Before cleaning the balance, unplug the AC adapter from the wall outlet. Please do no use any aggressive cleaning agents (solvents or similar agents). Instead, use a piece of cloth wet with a mild detergent. Make sure that no liquid enters the balance housing. After cleaning, wipe down the balance with a soft, dry piece of cloth.
The duration and number of measurements should be determined by a qualified Sartorius service technician according to the particular ambient and operational conditions for the AC adapter.
Accessories (Options) Data printer with date/time and statistics functions YDP 02-0DV1 Print speed approx. lines/sec.
External Battery Pack, YRB02Z can be recharged using the AC adapter (time it takes to Charge a completely discharged battery pack: 15 hrs); see "Specifications" regarding hours of Operation. The balance automatically "recognizes" that it is being powered by a battery pack. When utilizing the battery pack, use the ON/OFF key (16) to turn the balance on and off (if the code 8 6 4 is set in the balance operating menu, you cannot turn the balance off using the ON/OFF key).
“Balance Reader” applications kit including Software for collecting data that are transmitted by your Sartorius Balance/Scale to a commercially available personal Computer. These data are read into spreadsheets and stored. The stored spreadsheets can be further processed using Standard Software available on the market (Excel, Lotus 1 -2-3, etc.).
Specifications Model BA 210 S Weighing range structure BA 160 P BA 110 S BA 61 SuperRange PolyRange SuperRange g mg 210 0,0001 110 0,0001 61 0,0001 Tare range (by subtraction) Reproducibility (standard deviation) Linearity g g -210 ≤±0,0001 -110 ≤±0,0001 -61 ≤±0,0001 g ≤±0,0002 ≤±0,0002 ≤±0,0002 Response time (typical) Adaption to ambient conditions and application requirements Display update (depends on the filter level selected Allowable ambient temperature range g ≤ 2,5 30/60/110
Specifications Model BA 310 S Weighing range structure BA 310 P BA 110 SuperRange PolyRange Weighing range/capacity g 310 60/120/310 110 Readability mg 0,001 0,001/0,002/0,005 0,0001 Tare range (by subtraction) Reproducibility (standard deviation) Linearity g -310 -310 -110 g g ≤±0,001 ≤±0,002 ≤±0,001/0,001/0,003 ≤±0,002/0,002/0,005 ≤±0,001 ≤±0,001 Response time (typical) Adaption to ambient conditions and application requirements Display update (depends on the filter level selecte
Specifications Model BA 4100 S Weighing range structure BA 3100 P BA 2100 S BA 610 SuperRange PolyRange SuperRange Weighing range/capacity g 4100 600/1200/3100 2100 610 Readability mg 0,01 0,01/0,02/0,05 0,01 0,01 Tare range (by subtraction) Reproducibility (standard deviation) Linearity g -4100 -3100 -2100 -610 g g ≤±0,01 ≤±0,02 ≤±0,01/0,01/0,03 ≤±0,02/0,02/0,05 ≤±0,01 ≤±0,02 ≤±0,005 ≤±0,01 Response time (typical) Adaption to ambient conditions and application requirements D
Specifications Model BA 210 Weighing range/capacity g 210 BA 6100 6100 BA 4100 BA 2100 4100 2100 Weighing range/capacity mg 0,01 0,1 0,1 0,1 Tare range (by subtraction) Reproducibility (standard deviation) Linearity g -210 -6100 -4100 -2100 g g ≤±0,005 ≤±0,01 ≤±0,05 ≤±0,1 ≤±0,05 ≤±0,1 ≤±0,05 ≤±0,1 ← ≤ 1 → Response time (typical) Adaption to ambient conditions and application requirements Display update (depends on the filter level selected Allowable ambie
Dimensions (Scale Drawings) Note: All dimensions are given in millimeters.
Dimensions (Scale Drawings) Note: All dimensions are given in millimeters.
Dimensions (Scale Drawings) Note: All dimensions are given in millimeters.
Sartorius AG B P T 37070 Göttingen Weender Landstraße 94–108, 37075 Göttingen (0551) 308-0, F (0551) 308-3289 Internet: http://www.sartorius.com Copyright by Sartorius AG, Göttingen, Deutschland. All rights reserved. No part of this publication may be printed or translated in any form or by any means without the prior written permission of Sartorius AG. Sartorius AG reserves the right to make change to the technology, features, specification and design of the equipment without notice.