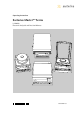
Operating Instructions Sartorius Masterpro Series LA Models Electronic Analytical and Precision Balances 98648-007-59
Intended Use The Masterpro Series from Sartorius offers precision balances for measurement of mass (weight). The balances in this series have capacities ranging from 0.1 mg to 64 kg. A broad range of special performance features make the Masterpro balances ideal for use as measuring and test equipment in ISO or GLP quality management systems.
Safety Precautions Operating Design This balance has been constructed in accordance with the European Directives as well as international regulations and standards for operation of electrical equipment, electromagnetic compatibility, and stipulated safety requirements. Improper use or handling, however, can result in damage and/or injury. When cleaning your balance, make sure that no liquid enters the balance housing; use only a slightly moistened cloth to clean the balance.
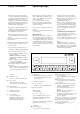
Operating Design Function Keys (Soft Keys) The current function of soft keys is indicated in the bottom line of the display (footer). Texts (abbreviations) or symbols can be displayed. Operation Display for Weights and Calculated Values This display is subdivided into 9 areas.
Tare Memory, Calculated Values: The symbols displayed here indicate when there is a value in one of the tare memories or when the value shown is a result of calculation rather than direct measurement. Display for Menu Parameter Settings (Setup) This display is divided into three sections.
Data Output Your Masterpro balance is equipped with an interface port for connecting your choice of the following: – Printer – Peripheral device (e.g., computer) – Universal remote control switch Printer You can configure the print functions to meet your individual requirements by selecting the corresponding menu code.
Getting Started Storage and Shipping Conditions – Do not expose the balance to extreme temperatures, jolts, impacts, vibration or moisture. Unpacking the Balance ● After unpacking the balance, check it immediately for any visible damage as a result of rough handling during shipment. $ If this is the case, proceed as directed in the chapter entitled “Care and Maintenance,” under the section on “Safety Inspection.
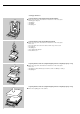
Setting up the Balance ● – – – – Preparing Balances with Analytical Draft Shield Chambers Place the components listed below on the balance in the order given: Bushing (pan adapter) Shield plate Shield disk Weighing pan ● – – – – – – Preparing Balances with a Round Glass Draft Shield Place the components listed below on the balance in the order given: Dust cover Protective disk; turn counter-clockwise until it stops and is secure Pan support Weighing pan Glass draft shield cylinder Draft shield cover ● –
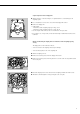
Separate Operation of the Display Unit ● Turn the balance on its side and lay it on a padded surface to avoid damage to the weighing system ● Use a screwdriver to remove the 2 screws from the display unit retainer ● Remove the display unit > Cable lengths – LA balances with a weighing capacity <12 kg: 55 cm – LA balances with a weighing capacity >12 kg: 80 cm $ See the chapter entitled “Accessories” for information on longer cables $ If you wish to use a longer cable, it must be installed by an authorized S
Connecting the Balance to AC Power ● Check the voltage rating and the plug design – If they do not match the rating or standard you use, contact your Sartorius office or dealer Use only – Original Sartorius AC adapters – AC adapters with a registered approval rating from a national testing laboratory $ To use a main feeder cable from the ceiling or to mount a CEE plug, you will have to make arrangements $ See the chapter entitled “Accessories” for information on using an IP65-protected industrial AC adapter
Fastening an Antitheft Locking Device: Balances with a Weighing Capacity <12 kg To fasten an antitheft locking device, use the lug located on the rear panel of the balance. ● Secure the balance at the place of installation, e.g., with a chain or a lock.
Configuration Configuring the Balance for Use in Legal Metrology Set the menu access switch as described below to configure the following functions for use of the balance in legal metrology: Purpose You can configure the balance to meet individual requirements by entering user data and setting parameters in the Setup program.
Navigating in the Setup Menu (Examples): Example: Adapting the balance to “Extreme vibration” Step Press key(s) (or follow instructions) 1. Select Setup menu H 2. Confirm “Balance/scale functions” O soft key 3. Select menu item “Adapt filter” and confirm q, then O soft key 4. Select menu item “Extreme vibration” q soft key 5. Confirm menu item “Extreme vibration” l soft key 6. If required, select further menu items oqQO soft keys 7.
Example: Entering date and time Step Press key(s) (or follow instructions) 1. Select Setup menu; select “Device parameters“ H, then q soft key and O soft key 2. Set clock press q repeatedly, then press O 3. Enter the time 11.12 .30 4. Set the time according to your local clock l soft key 5. Enter the date 13.03 .30 6. Store the date l soft key 7. Enter other data, if desired oqQO soft keys 8.
Configuration Setting the Balance Functions (BAL.FUNC.) Purpose This menu item enables you to configure the balance functions, i.e., to meet individual requirements by selecting predefined parameters in the Setup menu. You can block access to the menu by assigning a password.
Balance Functions (Overview) ο factory setting √ user-defined setting(s) ing ett s y tor Fac Setup Balance functions Calibration | Adjustment ing ett s y tor Fac Cal | isoTST key function External calibration | adjustment** with factory-defined calibration weight External calibration | adjustment**; user-defined weight Internal calibration | adjustment Cal key blocked reproTEST ο Selection mode for cal.
g tin set y r to Fac Setup – Balance functions Weight unit 1 ο Grams | g Kilograms | kg* Carats | ct Pounds | lb* Ounces | oz* Troy ounces | ozt* Hong Kong taels | tlh* Singapore taels | tls* Taiwanese taels | tlt* Grains | GN* Pennyweights | dwt* Milligrams | mg Parts per pound | lb* Chinese taels | tlc* Momme | mom* Austrian carats | K* Tola | tol* Baht | bat* Mesghal | MS* Display accuracy 1 ο All digits Fewer for weight change Last digit off* Tare | zero with power on* ο On Off Factory settings:
Setting the Device Parameters (DEVICE) Purpose This menu item enables you to configure the balance to meet individual requirements by selecting predefined menu parameters in the Setup menu. You can block access to the menu by assigning a password. Preparation Display available device parameters § Select the Setup menu: press H > SETUP is displayed: Entering or Changing a Password – Let’s assume that a password with 8 characters max.
§ New password: Enter the numbers and/or letters for the new password (8 characters max.) If “none" is displayed, this means no password has been assigned to delete the user password: Press .
Device Parameters (Overview) ο factory setting √ user-defined setting Setup – Device parameters Password: User ID: Clock Interfaces ing ett s y tor Fac ing ett s y tor Fac g tin set y r to Fac ing ett s y tor Fac None Enter 8 characters max. None Enter 20 characters max. Time: Enter hh.mm.ss Date: Enter dd.mm.yy or mm.dd.yy (01.01.
ing ett s y tor Fac Setup – Device parameters Interfaces Display Keys Extra functions Function: external switch ο Print key Tare key Calibration key F1 function key (Right soft key) Clear function key c F2 function key (2nd soft key from the right) Bar code scanner/PC keyboard Function: control ports Input ο Output Contrast Select contrast (0 to 4): Background ο White Black Backlighting ο On Auto. off after 4 min.
Setting the Application Parameters (Application) Purpose This menu item enables you to configure the balance, i.e., adapt the balance to your individual requirements by selecting from a list of parameter options in a menu. You can block access to this menu by assigning a password. Features The simple weighing function is available at all times. You can select one from each of the following application groups. This means a number of combinations are possible.
Application Parameters (Overview) ο factory settings √ user-defined setting(s) ing ett s y tor Fac ing ett s y tor Fac Setup – Application parameters Application 1 (Basic settings) ο Off (weighing only) Toggle wt.
g tin set y r to Fac Setup – Application parameters Application 1 (Basic settings) Counting Percent weighing Animal weighing (averaging) Accuracy – Average piece weight calculation (resolution) ο Display accuracy + 1 decimal place + 2 decimal places Average piece weight updating Off Manual ο Automatic Weight storage accuracy (resolution) ο Display accuracy + 1 decimal places + 2 decimal places Decimal places for readout in percent None 1 decimal place ο 2 decimal places 3 decimal places 4 decima
g tin set y r to Fac Setup – Application parameters Application 1 (Basic settings) Calculation Decimal places in calculated result None 1 decimal place ο 2 decimal places 3 decimal places 4 decimal places 5 decimal places 6 decimal places Density Method Density of liquid ο Buoyancy Displacement Pycnometer Liquid causing buoyancy ο Water Ethanol User-definable Decimal places for disp. of vol.
g tin set y r to Fac g tin set y r to Fac Setup – Application parameters Application 1 (Basic settings) Differential weighing Air buoyancy correction* Generate printout None ο Automatic after backweighing Auto. after initial weigh. and backweighing Automatic after tare-, initialand backweigh. Include sample ID in text line ο No Yes Wg.
g tin set y r to Fac g tin set y r to Fac Setup – Application parameters Application 3 (Data records) ο Off Totalizing Formulation Automatic storage ο Off On, first value at stability On, last value at stability On, value bet.
g tin set y r to Fac g tin set y r to Fac Setup – Application parameters Application 3 (Data records) Statistics Automatic storage o Off On, first value at stability On, last value at stability On, value 70% – 130% at stability Minimum load for automatic storage None 10 digits o 20 digits 50 digits 100 digits 200 digits 500 digits 1000 digits Source of data for automatic storage o Application 1 Application 2 Evaluated values o Net Calculated Net + calculated Evaluation mode, MR function o Inte
g tin set y r to Fac Setup – Application parameters Extra Functions F4 key Extra Functions F5 key ο Off 2nd tare memory Identification codes (IDs) Container tare weight ο No Yes Automatic printout Net value Tare/preset tare ο Off Printout Automatic, if configured Once after pressing p if configured ο Each time the print key p is pressed Once for M+ function (application 3 memory) Display o Text display Bargraph Print in GLP Header o Off On Manual storage in app.
Selecting the Printout Function (PRINTOUT) Purpose This menu item enables you to configure the printout to meet your individual requirements by selecting predefined menu parameters in the Setup menu. Printouts of weights and other measured or calculated values and IDs enable you to document your data. You can select the particular data you wish to print. To prevent changes to your settings, you can block access to the menu by assigning a password.
Configuration Printout Parameters (Overview) ο factory setting √ user-defined setting ing ett s y tor Fac ing ett s y tor Fac Setup Printout Applicationdefined output Stability parameter Without stability1) ο With stability Print on request, then tare ο Off On Auto print upon initialization (of the application) ο Off All values Only main values Configured printout Automatic output of displayed value 3) Output to interface port See separate chapter starting on the next page FlexPrint ο Off O
Printout Configuration Purpose This menu item enables you to configure individual printout formats. With the formulation, totalizing and statistics application, you can also define the values to be included on the total printout when the MR key is pressed. Under “Setup > Printout > Applicationdefined output > Configured printout”, you can configure individual, component or total data records that contain the items in each application that are available for printouts.
Example: Configure an Individual Printout for Counting Application to Include Dotted Line, Date/Time, Piece Count and Net Weight Settings (changes in the factory settings required for this example): Setup: Application parameters: Application 1: Counting Exit the Setup menu: press the oo soft key Then call Setup again: Printout: Application-defined output: Configured printout Step Press key(s) (or follow instructions) 1. Select Setup menu, then “Printout” H, then q repeatedly and O soft key 2.
Device Information Purpose This menu item enables you to have information displayed about the specific balance (“device”), as well as “FlexPrint” information. Displaying Device Information § Select the Setup menu: press the H key > “SETUP” is displayed: § Select “Info”: Repeatedly press the q soft key, then press the O soft key > Device information is displayed: SETUP INFO Version no.: Bal. ver. no.: Model: Serial no.
Operation Basic Weighing Function Purpose The basic weighing function is always accessible and can be used alone or in combination with an application program (Toggle between Weight Units, Counting, Weighing in Percent, etc.).
Additional Functions In addition to the functions: – alphanumeric input Calibration ● Press Cal Important Note Concerning Verified Balances of Accuracy Class k: > See the section on “Calibration/Adjustment” for further instructions. To avoid measuring errors, the respective air density must be allowed for.
Example W2 Enter “ABC123” as sample ID Note: – The sample ID generally applies to one weighing operation only – The ID is deleted after data output Step Key (or instruction) Display/Output d= 0.01g 100% A Max4200 g 0% Initial status (balance unloaded) (ID can also be entered while balance is loaded) F S 000 g H aL sS T Cal 1. Select alphabetic input a d= 0.01g 100% A Max4200 g 0% OOO F S H aL sS T ABCDEFGHIJKLMNOPQRSTUVWXYZ/=-?:#*"&U 2.
Device Parameters Universal Remote Switch You can connect an external universal remote switch (foot switch) to one of the two serial ports. Then you can assign one of the following functions to be performed when the switch is activated: Password You can enter a password to block access to the operating menu and to the functions for ID code input and exact calibration weight input. For details, see “Setting the Device Parameters” in the chapter entitled “Configuration”.
Display You can configure the display for your individual needs. MP8 Interface Emulation Keys You can assign different functions to the c key for deleting input and applications. Purpose With the MP8 interface emulation function, you can connect peripheral devices of the MP8 generation that have separate AC power supplies (such as the 73822... Data Control terminal, a YFC..., or a YDI 50 Z Data Input dedicated keyboard, for example) to your LA balance.
Calibration/Adjustment Purpose Calibration is the determination of the difference between the weight readout and the true weight (mass) of a sample. Calibration does not entail making any changes within the balance. Adjustment is the correction of this difference between the measured value displayed and the true weight (mass) of the sample, or the reduction of the difference to an allowable level within maximum permissible error limits.
Preparation ● Select the balance function for “calibration/adjustment”: press H ● To select the Balance/scale functions: press the O soft key ● Select Calibration/adjustment: press the O soft key Calibration/ adjustment CAL key function Ext. cal./adj.: default wt. Ext. cal./adj.: user-defined wt. Internal cal.
Preparation Example: Set the parameters for calibration and adjustment; e.g., with manual calibration/adjustment, isoCAL off Step Press key(s) (or follow instructions) Display/Output 1. Switch on the balance, if not already on e Sartorius logo and self-test Max6200 g 0% F S d= 0.01g 100% A 000 g aH L sS T Cal 2. Select the Setup menu H 3. Select “Balance/scale functions” O soft key 4. Select “Calibration/adjustment” O soft key 5.
Step Press key(s) (or follow instructions) 9. Confirm calibration and adjustment sequence O soft key Display/Output o = last setting selected 10. Select other settings, if desired and confirm (e.g., Calibration with manual adjustment) q and l soft keys 11. Exit Cal./adjustment sequence o soft key 12. Select isoCAL function q soft key and confirm O soft key o = last setting selected 13. Select other settings, if desired and confirm (e.g.
Selecting the Calibration/ Adjustment Parameter The setting Selection mode must be selected in the Setup menu under “Balance functions: Calibration/adjustment: CAL key function” (factory setting). After pressing the Cal soft key, you can choose from among the following settings by pressing the Select soft key: ● Start the desired routine: Press the Cal soft key again – External calibration/adjustment with the preset calibration weight: Ext. cal./adj.; factory-def. wt.
Internal Calibration/Adjustment First set either Internal cal./ adjustment or Selection mode (factory setting) in the Setup menu under “Balance functions: Calibration/adjustment: CAL key function.” Inside the balance housing is a built-in motorized calibration weight.
External Calibration/Adjustment* with a User-Defined Calibration Weight First set either Ext. cal./adj.;user-defined wt. or Selection mode (fac- tory setting) in the Setup menu under “Balance functions: Calibration/adjustment: CAL key function.” You can define a weight for calibration/ adjustment. External calibration/adjustment must be performed with weights that are traceable to a national standard and that have error limits which are at least 1/3 of the required tolerance of the display accuracy.
isoCAL: Automatic Calibration and Adjustment First set either On and reset the application or On without resetting the app. (factory setting) in the Setup menu under “Balance functions: Calibration/adjustment: CAL key function”. The “isoCAL” display automatically begins flashing if the ambient temperature changes in relation to the temperature at the time of the last calibration/ adjustment, or after a defined time interval has elapsed. The balance is telling you that it wants to adjust itself.
Block Printout You can have the results of a calibration/ adjustment procedure printed out. You can configure whether the printout is generated as soon as the procedure is completed, or whether a number of calibration/ adjustment procedures (up to 50) are collected for a block printout. -------------------13.05.1997 09:17 SARTORIUS Mod. LA4200S Ser. no. 70419914 Ver. no. 01-35-18 ID -------------------- GLP header Loading Stored Data: Data for the block printout are stored in battery-backed memory.
Application Programs Soft Key Functions Start Start application program Preparation Balances used as legal measuring instruments: grams and kilograms are the only weight units available Weigh. Toggle to basic weighing functions Using Verified Balances as Legal Measuring Instruments in the EU*: All application programs can be selected on balances verified for use in legal metrology.
Additional Functions In addition to the functions for: – alphanumeric input, Calibration/Adjustment ● Press the Cal soft key Turning Off the Balance ● Press e > See “Calibration/Adjustment” for further instructions > The balance shuts off – taring (not during alphanumeric input), – printing (NUM print; S ID), you can also access the following functions from this application: Toggling to the Next Application ● Press D > See the section on the corresponding application program for further instructions S
Counting A Purpose With the Counting program you can determine the number of pieces of approximately equal weight. You can use this application program in combination with a program chosen from Application 2 (checkweighing, time-controlled functions) and one from Application3 (totalizing, formulation, statistics) as well as with the extra functions.
Preparation To calculate a piece count, the average weight of one piece must be known. This average piece weight can be entered into the Counting program in one of three ways: – Enter the average piece weight using the numeric keys and store it; – The last reference sample quantity entered is loaded and displayed when you turn on the balance.
Practical Example Determining an Unknown Piece Count; Weighing in the Preset Reference Sample Quantity Settings (changes in the factory settings required for this example): Setup: App: Application 1: Counting: Average piece weight updating: Manual Setup: Printout: Application-defined output: Auto print upon initialization: All values Step Key (or instruction) Display/Output 1. Delete previous setting if necessary c Max4200 g 2.
Weighing in Percent B Purpose This application program allows you to obtain weight readouts in percent which are in proportion to a reference weight. Available Features – Reference percentage “pRef” loaded from long-term memory when you turn on the balance Alternatively, you can have the value displayed as a difference in percent between the weight on the balance and the reference weight, or as a special ratio1 or ratio2.
Preparation To calculate a value in percent, the reference percentage must be known. This value can be entered into the weighing-in-percent program in one of three ways: Additional Functions In addition to the functions for: – alphanumeric input, – The last reference percentage entered is loaded and displayed when you turn on the balance.
Examples Weighing in Percent with Reference Weight Taken From Weight on Balance Settings (changes in the factory settings required for this example): Setup: App: Application 1: Weighing in percent Setup: App: Printout: Application-defined output: Auto print upon initialization: All values Step Key (or instruction) 1. Delete previous setting if necessary c 2. Prepare a container for the parts Place the empty container on the balance 3. Tare the balance t 4.
Animal Weighing C Purpose Use this program to determine the weights of unstable samples (e.g., live animals) or to determine weights under unstable ambient conditions. In this program, the balance calculates the weight as the average of a defined number of individual weighing operations. These weighing operations are also known as “subweighing operations.
Preparation ● Turn on the balance: Press e Additional Functions In addition to the functions for: > Sartorius logo is displayed – alphanumeric input, ● Select the Animal weighing application in the Setup menu: Press H – taring (not during alphanumeric input), § Select Application parameters: press the q soft key 2 +, then the O soft key once – printing, § Select Application 1 (basic settings): press the O soft key § Select Animal weigh.: Q or q soft key repeatedly § Confirm Animal weigh.
Practical Example Determining Animal Weight With Automatic Start of 20 Subweighing Operations for Averaging; Automatic Printout of the Number of Subweighing Operations and of the Animal Weight Settings (changes in the factory settings required for this example): Setup: App: Application 1: Animal weighing: Animal activity: Active Setup: App: Application 1: Animal weighing: Printout: Average and calculated values Setup: App: Printout: Auto print upon initialization: All values Step Key (or instruction) 1.
Step Key (or instruction) Display/Output After 20 subweighing operations the arithmetic average (xNet) is display (mDef: no. of subweighs Mul: calculation factor xNet: arithm. average, net value xRes: calculated value) mDef Mul xNet xRes 8. Unload the balance Remove animal from cage 9. If desired, weigh next animal Place animal in cage Next weighing series begins automatically 60 + + 20 1 69.72 g 69.
Calculation D Purpose With this application program you can calculate a weight value using an algebraic equation. This can be used, for example, to determine the gsm weight (grams per square meter) of paper. You can use the “Calculation” application in combination with a program chosen from Application 2 (checkweighing, time-controlled functions) and one from Application 3 (totalizing, formulation, statistics) as well as the extra functions.
Practical Example Calculate the gsm weight of paper: determine the gsm of a sheet of A4 paper with the dimensions 0.210 m + 0.297 m = 0.06237 m2. The gsm weight is a product of the division of the weight by the surface area. Settings (changes in the factory settings required for this example): Setup: App: Application 1: Calculation Step Key (or instruction) 1. Turn on the balance and configure the settings as indicated above e 2. Delete previous setting if necessary c 3. Tare the balance t 4.
Density Determination Purpose With this application you can determine the density and volume of solid, pasty, liquid or powdered samples. You can use the “Density Determination” application in combination with a program chosen from Application 2 (e.g., checkweighing, timer functions) and one from Application 3 (totalizing, formulation, statistics) as well as the extra functions.
Buoyancy: Equations Used to Determine Density: Rho = (Wa x (Rhofl – LA)) ÷ ((Wa – Wfl) x Corr) + LA For the buoyancy method, a factor of 0.99983 (factory setting) is used to allow for the buoyancy caused by the bars of the sample holder of the YDK 01 (LP) Density Determination Kit.
Preparation ● Turn on the balance: Press e Additional Functions In addition to the functions for: > Sartorius logo is displayed – alphanumeric input, ● Select the Density application in the Setup menu: Press H – taring (not during alphanumeric input), ● Select the Application parameters: press the q soft key 2+, then the O soft key once – printing, ● Select Application 1 (basic settings): press the O soft key ● Select Density: press the Q or q soft key, repeatedly, if necessary ● Confirm Density: pr
Practical Example Buoyancy: Determine the Density of Samples of a Solid Using the Buoyancy Method. Reference Liquid: Water. Settings (changes in the factory settings required for this example): Setup: App: Application 1: Density Step Key (or instruction) 1. Delete previously stored values if necessary c 2. Change configurations, if necessary Param. soft key 3. Position the sample holder (immersed) 4. Tare the balance t 5.
Practical Example Displacement: Determine the Density of Samples of a Solid Using the Displacement Method. Reference Liquid: Ethylene glycol. Temperature: 23°C (73.4 °F). Set the density at 20°C (68°F) to 1.113 g/cm2 and the volume expansion coefficient at 20°C (68°F) to 0.00064 grd–1.
Differential Weighing Purpose This application enables you to compare samples before and after a given treatment (such as drying or ashing) and determine the difference in weight.
1. Individual Weighing Tare weight, initial weight and backweight are measured in that order. 3. Combined Weighing The tare and initial weight, in that order, of each sample is measured first, then the backweight of each sample is measured. Tare 1 Init.wt. 1 Sample Init.wt. 1 Tare 2 Backwt. 1 2. Consecutive Individual Weighing Several individual weighing routines (see above) are performed in series. Backwt. 1 Autosave values: No Minimum load for autosave: Backwt. 1 Init.wt. 2 Backwt.
Printout for Differential Weighing The following printout is generated: Generating Printouts Automatically The configured backweighing printout is generated automatically after backweighing, if one of the following settings is selected Setup: Application 1: Differential weighing: Generate printout: Backweighing Printout (Example) Automatic after backweighing Auto after init.weigh + backweigh Auto after tare-, init- +backweigh.
Preparation ● Turn on the balance: press e 1) Setting can only be changed when the application is first run and when the Wg. seq key option is set to “No” 2) The last value with the stability symbol is saved only during initial sample weighing. Tare and backweights are saved as the “first value at stability.” This menu option enables you to perform filling functions during initial weighing.
Equations Backweight in %: backweight / initial weight · 100% Loss in weight: backweight – initial weight Loss in %: (backweight – initial weight) / initial weight · 100% Calculated loss: (backweight – initial weight) · factor Ratio 1 in %: (initial weight – backweight) / backweight · 100% Ratio 2 in %: initial weight / backweight · 100% Direct Selection of Lot/Sample/Value When the measured values are displayed, you can enter numbers and letters to: – change the lot and sample directly (display
List Function for Differential Weighing The list function has 4 display pages: one each for lots, samples, values and results. LOTS: 792 1 1 122 1 AB05 20 CH0001 10 CH01234 2 oo DeleteCreate Q Smpl.avail. Sample T Sample T,N Samples T,N,R1 Samples T,N Samples T,N,R1 q Sample SMPL: avail.792 Lot: CH0001 Sample 1: T,N,R(1) Sample 2: T,N,R(1) Sample 3: T,N Sample 4: T,N Sample 5: T,N oo Delete o Q q CX87 CX88 + + + Q Smpl:2 20.74 g 80.48 % 5.03 g 19.52 % 24.
Selecting Display Pages in the List Function for Differential Weighing Lot [alphanum] + Lot Display page for lots oo Samples Create Create lot Yes/No Rename lot Delete Delete lot o Delete Omit [numeric] + Samples Delete sample Include Display page for samples oo (Omit) Omit sample Yes/No Include sample Values o o Result [numeric] + Values oo Display page for values Display page for results Values Result 74 oo
View and Print Display Pages You can use the manual mode to print display pages (for lots, samples, values and results).
Practical Examples Combined weighing; create lot, determine the difference in weight between initial weights and backweights of three samples (with autoprint of the formatted backweighing record) Settings: factory settings Step Key (or instruction) Display/Output 1. Turn on the balance/scale, if necessary e Max 6200 g 0% F S d= 0.01g 100% A 003 g aH L sS T DIFF.WEIGHING: Combined weigh. Cal ChargeWFolge Start 2. Tare the balance/scale, if necessary t d= 0.
Step Key (or instruction) Display/Output 11. Save initial weight value Ini.wt soft key Max 6200 g 0% Remove the filled container F S d= 0.01g 100% A 000 g COMB.WGH: CH0001 #2 avail. Cal Lot Wg.seqOBackw 12. Measure the 2nd tare weight Place 2nd empty container on balance/scale Max 6200 g 0% F S aH L dS zzT Tare d= 0.01g 100% A 7330 g aH L dS COMB.WGH: CH0001 #2 avail. ZZT Cal Lot Wg.seqOBackw Tare 13. Save tare value Tare soft key Remove the empty container Max 6200 g 0% F S d= 0.
Step Key (or instruction) Display/Output 22. Save the 1st backweight is defined (the value to be displayed on the display page for results; in this case: backweighed residue in %) Place 1st container on balance/scale Backw. soft key Max 6200 g 0% 7928 % aH L dS COMB.WGH: CH0001 #1 OResidueo ZZT Cal Lot Wg.seq OTare Result -------------------17.11.1998 12:49:23 Lot CH0001 Sample 1 T1 + 72.07 g N1 + 24.52 g R (1)+ 19.44 g R + 79.28 % D 5.08 g D 20.72 % Ratio1+ 26.13 % Ratio2+ 126.
Checkweighing H Purpose This program is used to check whether a sample corresponds to a pre-set target value or is within a specific tolerance range. In addition to the display in the measured value line, the results are shown on the bar graph and can also be routed through the interface port via control lines for further electronic processing. You can use the “Checkweighing” application in combination with a program chosen from Application 1 (e.g.
Preparation The checkweighing program often requires a target value for comparison with the current value. This target has a tolerance range, which is defined by absolute weight values. The tolerance range is defined as either an absolute value or a percentage with upper and lower limits. Percentage values can be symmetric or asymmetric to the target value. These values can be entered either by storing weights on the balance or by key input.
Additional Functions In addition to the functions for: Preparation ● Turn on the balance: Press e – alphanumeric input, (not during initialization), > Sartorius logo is displayed ● Select the Checkweighing application in the Setup menu: Press H – taring (not during alphanumeric input) § Select Application 2: Press the q soft key and then the O soft key ● Select the Application parameters: press the q soft key 2 +, then the O soft key – printing, you can also access the following functions from this app
Practical Example Checkweighing samples of 170 g, with an allowable tolerance of –5 g and +10 g. Printout of upper and lower tolerance limits. Weighed values are printed out automatically when stability is reached and weight value is within the control range. Settings (changes in the factory settings required for this example): Setup: App: Application 2: Checkweighing: Automatic printout of OK values: Yes Step Key (or instruction) 1. Turn on the balance and configure the settings as indicated above e 2.
Step 9. Key (or instruction) Enter value for upper limit (170 g + 10 g) and store 10. Weigh sample (in this case 169.48 g) Display/Output 180 l soft key Setp Min Max + + + 170.00 g 165.00 g 180.00 g N + 169.48 g Place sample in container If the weight value had been too low, the display would have shown the following: 11. In this case, switch to net value display (here: 163.28 g) Net soft key 12.
Time-Controlled Functions K Purpose With this application program, you can configure the balance to perform certain functions (e.g., automatic printout of values, store value in totalization memory) at a given time or after a set interval. You can use the “Time-Controlled Functions“ application in combination with a program chosen from Application 1 (e.g., counting, weighing in percent) and one from Application 3 (e.g., totalizing, formulation).
Preparation ● Turn on the balance: Press e Additional Functions In addition to the functions for: > Sartorius logo is displayed – alphanumeric input, ● Select the “Time-controlled functions” application in the Setup menu: Press H – taring (not during alphanumeric input), – printing, ● Select the Application parameters: press the q key 2 x, then the O soft key ● Select Application 2 (control functions): press the q soft key, then the O soft key you can also access the following functions from this app
Practical Example Document the amount of evaporation of a sample with defined surface, temperature and air pressure at preset intervals of 1 minute, 30 seconds. Settings (changes in the factory settings required for this example): Setup: App: Application 2: Time-controlled functions Setup: Balance functions: Taring: Without stability Setup: Print in weighing mode: Manual/auto print mode: Manual without stability Step Key (or instruction) 1.
Totalizing L Purpose This application program acts as a cumulative memory function. You can use the “Totalizing” application in combination with a program chosen from Application 1 (e.g., counting, weighing in percent) and one from Application 2 (checkweighing, timecontrolled functions) as well as with the extra functions. Available Features – Totalization of weight values and calculated values – Optional automatic storage of measured values Storage of measured value is indicated by Uu.
Preparation ● Turn on the balance: Press e Additional Functions In addition to the functions for: > Sartorius logo is displayed – alphanumeric input, ● Select the Totalizing application program in the Setup menu: Press H – taring (not during alphanumeric input), ● Anwendungsparameter wählen: 2 x Softkey q , Softkey O drücken – printing, ● Select the Application parameters: press the q soft key 2 +, then the O soft key ● Select Totalizing: press the Q or the q soft key you can also access the follow
Practical Example Totalize counted pieces Settings (changes in the factory settings required for this example): Setup: App: Application 1: Counting Setup: App: Application 3: Totalizing: Evaluated values: Net + calculated Setup: App: Application 3: Totalizing: Evaluation mode, MR function: Final evaluation, display + print Step Key (or instruction) 1. Turn on the balance and configure the settings as indicated above e 2. Delete old totalization data, if necessary c 3. Tare the balance t 4.
Step 9. Key (or instruction) Store piece count Display/Output M+ soft key -------------------16.01.1997 11:06 n + 1 N + 1764.45 g Qnt + 50 pcs 10. Unload the balance Remove parts from the balance 11. Place another load of parts on the balance (e.g., 60 pcs) Place parts on the balance 12. Add piece count to stored total M+ soft key n N Qnt + + + 2 2117.34 g 60 pcs 13. Repeat steps 10 and 11 as required 14.
Formulation M Purpose With this application program you can add weight values and calculated values to a totalization memory as components of a formula. You can use the “Formulation” application in combination with a program chosen from Application 1 (except Recalculation) and one from Application 2 (checkweighing, timecontrolled functions) as well as with the extra functions.
Preparation ● Turn on the balance: Press e Additional Functions In addition to the functions for: – alphanumeric input, > Sartorius logo is displayed – taring (not during alphanumeric input), ● Select the Formulation application program in the Setup menu: Press H – printing, ● Select Application parameters: press the q soft key 2 +, then the O soft key once ● Select Application 3 (data records): press the q soft key 2 +, then the O soft key once you can also access the following functions from this appli
Practical Example Weighing in Components Settings (changes in the factory settings required for this example): Setup: App: Application 3: Formulation: Automatic storage: On, first value at stability Setup: App: Application 3: Formulation: Minimum load for automatic storage: 100 digits Setup: App: Application 3: Formulation: Evaluation mode, MR function: Final evaluation, print Step Key (or instruction) 1. Turn on the balance and configure the settings as indicated above e 2.
Statistics N Purpose With this application program you can have weight values and calculated values totalized and statistically evaluated.
Preparation ● Turn on the balance: Press e Additional Functions In addition to the functions for: – alphanumeric input, > Sartorius logo is displayed – taring (not during alphanumeric input), ● Select the Statistics application program in the Setup menu: Press H ● Select Application parameters: press the q soft key 2 +, then the O soft key once ● Select Application 3 (data records): press the q soft key 2 +, then the O soft key once ● Select Statistics: press the Q or the q soft key ● Select Statistics: p
Practical Example Totalize counted pieces and print out statistics Settings (changes in the factory settings required for this example): Setup: App: Application 1: Counting: Average piece weight updating: Manual Setup: App: Application 3: Statistics: Evaluated values: Calculated Setup: App: Application 3: Statistics: Evaluation mode, MR function: Final evaluation, display + print Step Key (or instruction) 1. Turn on the balance and configure the settings as indicated above e 2.
Step 9. Key (or instruction) Store piece count Display/Output M+ soft key -------------------16.01.1997 11:06 n + 1 Qnt + 35 pcs 10. Unload the balance Remove parts from the balance 11. Place another load of parts on the balance (e.g., 29 pcs) Place parts on the balance 12. Add piece count to stored total M+ soft key n Qnt + 2 29 pcs 13. Repeat steps 11 and 12 as required 14.
Additional Functions Second Tare Memory (Preset Tare) Purpose With this function you can store the weight currently on the balance as a tare weight, or use the numeric keys to enter a number for a preset tare weight. You can use “Extra Functions” in combination with a program from Application 1 (e.g., counting, weighing in percent), one from Application 2 (checkweighing, time-controlled functions) and one from Application 3 (totalizing, formulation, statistics) as well as with the extra functions.
Practical Example Determine the Contents of Bottles: Bottle weight = 400 g. Settings (changes in the factory settings required for this example): Setup: App: Extra function(F4): 2nd tare memory: Automatic printout: Tare/preset tare Step Key (or instruction) 1. If necessary: turn on the balance and enter the settings given above e 2. Enter bottle weight (here: 400 g) 400 3. Store tare value PT1 soft key Display/Output s PT1 4. Determine content weight of bottles (here: contents = 650 g) + 400.
Individual Identification Codes (ID) Purpose With this function you can assign identifiers to values for documentation and printouts. You can use this extra function in combination with a program from Application 1 (e.g., counting, weighing in percent), one from Application 2 (checkweighing, time-controlled functions) and one from Application 3 (totalizing, formulation, statistics) as well as with the other extra functions.
Preparation ● Turn on the balance: Press e > Sartorius logo is displayed ● Select Extra function (F4) or Extra function (F5) in the Setup menu: Press H ● Select Application parameters: press the q soft key 2 x, then the O soft key once ● Select Extra function(F4) or Extra function(F5): press the q soft key 3 x (or 4 x), then the O soft key once ● Select Identification codes ● Confirm Identification Identification codes Printout ο = factory setting codes Automatic, if configured Once after pressi
Example Include company address and sample lot number on the printout. Each ID line begins with the name. Print this ID for each net value. Settings (changes in the factory settings required for this example): Setup: Application parameters: Extra function (F4): Identification codes Setup: Input: ID1: Company Setup: Input: ID2: Location Setup: Input: ID3: Street Setup: Input: ID4: Lot Step Press key(s) (or follow instructions) 1. If necessary, turn on the balance e 2.
Step Key (or instruction) 7. Repeat steps 5 and 6 for: ID2: LOCATION ID3: STREET ID4: LOT 8. Save settings, exit the Setup menu and select input mode for ID values oo soft key twice ID soft key 9. Enter name of company (here: Sartorius) a ... See also page 37 10. Confirm Display/Output a, l soft key 11. Repeat steps 9 and 10 for LOCATION: GOETTINGEN STREET: WEENDER LANDSTRASSE LOT: 15 12. Place the first sample on the balance (here: 210.53 g) Place load on balance 13.
Saving Values Manually (M+) Purpose With this function you can load weight values and calculation results directly from Application 1 (e.g., counting, weighing in percent) or Application 2 (checkweighing, time-controlled functions) into Application 3 (totalizing, formulation, statistics). Available Features – You can assign this function to the fourth or fifth soft key (from the right), i.e.
Product Data Memory Purpose With this function you can enter, store and load data records for initialization of applications, including user-defined data. – Error messages are displayed in the text line in plain English. Soft Key Functions ProDat Toggle to product data display – Press the Delete soft key to delete a data record. Delete Delete selected data record Load You can use this extra function in combination with a program from Application 1 (e.g.
Practical Example Create a New Base Data Record for Initializing the Checkweighing Program, Including: Target Value, Minimum, Maximum Settings (changes in the factory settings required for this example): Setup: App: Extra function (F4): Product data memory Setup: App: Application 2: Checkweighing Step Key (or instruction) 1. If necessary: turn on the balance and enter the settings given above e 2. In the Checkweighing application, toggle to the input mode for target, minimum and maximum values Param.
SQmin Function Purpose To display the allowable minimum sample quantity “SQmin” in accordance with the United States Pharmacopeia (USP). According to USP guidelines, the uncertainty of measurement may not exeed 0.1 % of the sample quantity when substances are weighed with the highest degree of accuracy for volume determination. This additional function ensures that weight results lie within defined tolerance limits corresponding to the requirements of your quality assurance system.
Example Determining the weights of samples while monitoring the minimum sample quantity (here: SQmin: 30 mg) Presettings (different from the factory settings): Setup: Application parameters: Additional function (F4): SQmin Step Press key(s) (or follow instructions) 1. Switch on the balance if necessary and enter the presettings as shown above e 2. Place the container into which the sample will be filled onto the weighing pan and tare the balance t 3.
DKD Uncertainty of Measurement Purpose Display of the dynamic uncertainty of measurement in conformance with the specifications listed on the DKD Calibration Certificate. Preparation § Turn on the balance: press e > The Sartorius logo is displayed § In the Setup menu, select “Extra functions (F4)” or “Extra functions (F5)”: press H Features After Technical Service has prepared the balance: – A service technician performs on-site DKD calibration of your balance to determine its uncertainty of measurement.
Example Perform a weighing procedure with the “DKD uncertainty of measurement” application Settings: Setup: Application parameters: Extra function (F4): DKD uncertainty of measurement: Display: PA (process accuracy) Setup: Application parameters: Extra function (F4): DKD uncertainty of measurement: Print: PA (process accuracy) Setup: Application parameters: Extra function (F4): DKD uncertainty of measurement: Display: Input: 3.
Combining Applications The following table summarizes the possibilities for combination of the application programs described here. Each line stands for one combination. The weighing function is generally available, and does not have to be combined with a calculating function.
Examples of Application Combinations Checkweighing with statistical evaluation You want to check a piece count, and have the results that lie within the tolerance range statistically evaluated and printed as a ISO/GLP-compliant record.
Step Key (or instruction) 6. Enter target, minimum and maximum values (here: target: 10 pcs; minimum: 7 pcs; maximum: 12 pcs) Param. soft key 1 0, l soft key 7, l soft key 12 7. Store input l soft key 8. Determine first unknown quantity Place uncounted parts on the balance 9. Toggle to Statistics D 10. Initialize automatic storage M+ soft key 11.
Data Output Functions There are 3 options for data output: – Output to the display and control unit – Output to a printer (generate a printout) – Output to a peripheral device (e.g., computer) via the interface port Output to the Display and Control Unit The display is divided into 9 sections.
1250é 35 =W*18.3*0.9 g pcs Measured Value Line This line shows: – The current weight value (bordered values are invalid in legal metrology) – Calculated values (e.g., piece count) – User input (e.g., lot number, equation) Weight Unit Display This section shows: – The current weight unit (e.g., kg) – Designation of other values (e.g., “pcs”) Tare Memory, Calculated Value This section shows: s1 a s2 (ABCD HK LMN S T COUNTING: nRef = 10 pcs Ref.wt.
Printouts Purpose This function enables you to print out weights, other measured values and IDs. You can format the printout to meet different requirements.
ISO/GLP-compliant Printout/Record You can have the parameters pertaining to weighing conditions printed before (GLP header) and after (GLP footer) the values from the weighing series. These parameters include: – Date – Time at the beginning of a weighing series – Balance manufacturer – Balance model – Model serial number – Software version – Lot number (weighing series no.
Interface Description Purpose Your Masterpro balance comes equipped with an interface port for connection to a computer or other peripheral devices. You can use an on-line computer to change, start and/or monitor the functions of the balance and the application programs. The interface port also has four control lines for the over/under checkweighing program. You can also connect a hand switch or foot switch.
Line Format (Data Output Format) You can output the values displayed in the measured value line and the weight unit with or without a data ID code Output Format With 16 Characters Example: Without data ID code The following characters can be output, depending on the characters displayed on the balance: + 253 pcs Example: With data ID code Qnt + 253 pcs Configure this parameter in the Setup menu (Setup: Printout: Line format).
Data output example: + 1255.7 g Position 1 2 3 4 5 + * * * 1 Position 1: Position 2: Position 3–10: Position 11: Position 12–14: Position 15: Position 16: 6 2 7 5 8 5 9 . 10 7 11 * 12 g 13 * 14 15 16 * CR LF Plus or minus sign or space Space Weight with a decimal point; leading zeros = space Space Unit symbol or space Carriage return Line feed Data Output With ID Code When data with an ID code is output, the ID code consisting of 6 characters precedes the data with the 16-character format.
Data Input Format You can connect a computer to your balance to send commands via the balance interface port to control balance functions and applications. The commands sent are control commands and may have different formats; e.g., control commands can have up to 26 characters. Each character must be transmitted according to the settings configured in the Setup menu for data transmission.
Synchronization During data communication between the balance and an on-line device (computer), messages consisting of ASCII characters are transmitted via the interface. For error-free data communication, the parameters for baud rate, parity, handshake mode and character format must be the same for both units. You can set these parameters in the Setup menu so that they match those of the on-line device. You can also define parameters in the balance to make data output dependent on various conditions.
Pin Assignment Chart Female Interface Connector: 25-position D-Submini, DB25S, with screw lock hardware for cable gland Male Connector Used: (please use connectors with the same specifications): 25-pin D-Submini, DB25S, with integrated shielded cable clamp assembly (Amp type 826 985-1C) and fastening screws (Amp type 164 868-1) Pin Assignment Chart: Pin 1: Signal Ground Pin 2: Data Output (TxD) Pin 3: Data Input (RxD) Pin 4: Signal Return (TxD/RxD) Pin 5: Clear to Send (CTS) Pin 6: Internally Connected Pi
Cabling Diagram – Diagram for interfacing a computer or different peripheral devices to the balance using the RS-232/V24 standard and cables up to 15 m (50 ft.
Error Codes and Messages Error codes and messages are displayed in the main display or text line for 2 seconds. The program then returns automatically to the previous status. Display No segments appear on the display H L or Err 54 Err 01 O Display range Err 02 Cal. n. possible Err 03 Cal./adj. interrupt Err 06 Int. wt. defective Err 07 Function blocked Err 08* oO zero range Err 09* o 0 not allowed Err 10 Tare fct. blocked Err 11 Tare2 blocked Err 12 Tare2 O Max. Err 17 Adj.-wt. O Max.
Display/Problem Cause Interface handshake interrupted Print fct. blocked (XOFF, CTS) Ref.wt. too light Error in storing reference weight (with the counting or weighingin-percent application) Cannot update Reference updating not possible (with the counting application) Not a number xxxxx Too low Input wrong (with any application proxxxxx Too high gram), e.g., alphabetic input not allowed Too many char.
Error Code/Message Displayed Differential weighing: Cause SAMPLE: Confirm delete/ omit “SAMPLE: delete/omit” prompt on display page for samples SAMPLE: Include “SAMPLE: include” prompt on display page for samples Cannot store File manager: – Not possible to save data – No available memory Cannot load File manager: – Not possible to load data – Memory capacity limit reached Only 30 backweighs An attempt was made to save a possible 31st backweighing operation LOT: already exists Lot already exists on the d
Care and Maintenance Service Regular servicing by a Sartorius technician will extend the service life of your balance and ensure its continued weighing accuracy. Sartorius can offer you service contracts, with your choice of regular maintenance intervals ranging from 1 month to 2 years. The optimum maintenance interval depends on the operating conditions at the place of installation and on the individual tolerance requirements.
Overview General View of the Balances LA310S (-0CE), LA230S (-0CE), LA230P (-0CE), LA120S (-0CE) -0CE identifies the precision scales as verified for legal metrology in the EU* 1 2 3 4 5 6 18 7 8 17 9 16 10 10 15 14 11 12 13 Pos. Designation 1 2 3 4 5 6 7 8 9 10 Order No.
General Views of the Balances LA1200S (-0CE), LA620S (-0CE), LA220S (-0CE), LA620P (-0CE), LA5200D, LA3200D, LA2000P -0CE identifies the precision scales as verified for legal metrology in the EU* 1 2 3 4 5 6 7 19 8 9 18 17 10 11 11 16 15 12 13 14 No. 1 2 3 4 5 6 7 8 9 10 Designation Order no.
General Views of the Balances LA8200S (-0CE), LA8200P (-0CE), LA6200S (-0CE), LA4200S (-0CE), LA2200S (-0CE), LA820 (-0CE), LA420, LA2200P (-0CE), LA5200P (-0CE), LA12000S (-0CE), LA6200 (-0CE), LA4200, LA2200 (-0CE), LA12000P (-0CE) -0CE identifies the precision scales as verified for legal metrology in the EU* 1 2 3 4 4 5 17 6 7 4 8 16 15 9 9 14 13 10 11 12 No.
General Views of the Balances LA64001S, LA34001S, LA16001S, LA34001P, LA34000 -0CE identifies the precision scales as verified for legal metrology in the EU* 1 14 2 2 3 13 12 4 2 11 5 5 10 9 6 7 8 No. Designation 1 Weighing pan LA64001S, LA34001S, LA16001S, LA34001P, LA34000: 2 3 4 5 6 7 Leveling foot Display and control unit Level indicator Tare key Function keys Print key Order no. for replacement 69 LC0107 Available on request 69 LC0093 No.
Specifications Standard Models General Specifications AC power source/power requirements Frequency Allowable ambient operating temperature Operating temperature range Adaptation to ambient conditions Display update (depends on the filter level selected) Power consumption Hours of operation with fully charged YRB 06 Z external battery pack, approx. Selectable weight units Selectable application programs Built-in interface AC adapter, 230 or 115 V, +15% ... – 20% 48 – 60 Hz 0 ... +40 °C (273 ...
Model Readability Weighing capacity Tare range (subtractive) Repeatability (standard deviation) Linearity Sensitivity drift within +10 ... +30 °C Response time (average) External calibration weight (of at least accuracy class...) Other allowable external calibration weights (of at least accuracy class...) Pan size Dimensions (W + D + H) Net weight, approx.
Model Readability Weighing capacity Tare range (subtractive) Repeatability (standard deviation) Linearity Sensitivity drift within +10 ... +30 °C Response time (average) External calibration weight (of at least accuracy class...) Other allowable external calibration weights (of at least accuracy class...) Pan size Dimensions (W + D + H) Net weight, approx.
Model Readability Weighing capacity Tare range (subtractive) Repeatability (standard deviation) Linearity Sensitivity drift within +10 ... +30 °C Response time (average) External calibration weight (of at least accuracy class...) Other allowable external calibration weights (of at least accuracy class...) Pan size Dimensions (W + D + H) Net weight, approx.
Models Verified by the Manufacturer, with EC Type Approval General Specifications AC power source/power requirements Frequency Adaptation to ambient conditions Power consumption Hours of operation with fully charged YRB 06 Z external battery pack, approx. Selectable application programs AC adapter, 230 or 115 V, +15% ...
Model Type Accuracy class* Scale interval, d* Maximum weighing capacity, Max* Verification scale interval, e* Minimum capacity, Min* Tare range (subtractive) Application range according to CD* Response time (average) Allowable operating temperature range Selectable weight units External calibration weight value (of at least accuracy class...) Pan size Dimensions (W + D + H) Net weight, approx.
Model Type Accuracy class* Scale interval, d* LA820-0CE LA2200P-0CE LA5200P-0CE LA12000S-0CE LA6200-0CE isoTEST in conjunction with BD BF K K K K K g 0.01 0.01/0.02/ 0.01/0.02/ 0.1 0.1 0.05 0.05/0.1 Maximum weighing capacity, Max* g 820 400/800/ 1,200/2,400/ 12,000 6,200 2,200 3,800/5,200 Verification scale interval, e* g 0.1 0.1 0.1 1 1 Minimum capacity, Min* g 0.5 0.5 0.5 5 5 Tare range (subtractive) ≤ 100% of the max. weighing capacity Application range according to CD* g 0.5 – 820 0.5 – 2,200 0.
Accessories (Options) Order No. Data printer, suitable for use in legal metrology; with date, time, statistics and transaction counter functions YDP03-0CE Paper rolls, for YDP03-0CE; 5 units, each with 50 m 6906937 Ink ribbon cartridge, for YDP03-0CE 6906918 External rechargeable battery pack, with battery level indicator SartoConnect data transfer software; with RS-232C standard cable; for direct input of weighing data into an application program (e.g.
Declarations of Conformity The C Mark on Sartorius Equipment In 1985, the Council of the European Community approved a resolution concerning a new approach to the technical harmonization and standardization of national regulations. The organization for monitoring compliance with the directives and standards concerning the C marking is governed in the individual EU Member States through the implementation of the EC Directives adopted by the respective national laws.
Index Accessories (options) Acoustic signal Additional functions Animal weighing Antitheft device Application filter Application programs Applications menu Applications, combining Applications, configuring Auto print functions Auto start application with power-on Auto zero Page 140 39 98 57 11 16 49 22 112 22 31 EC type-approval certificate Emulation MP8 interface Enter/change password Equipment supplied Error codes and messages External calibration Factory settings Page 143 39 18 9 125 46 FlexPrint Fo
Entering the General Password Enter/Change Password ● Select the Setup menu: Press M ● Select the password setting function: Press the q soft key repeatedly until > SETUP SELECTION is displayed > Enter password: is displayed, together with the current password setting ● Select the user input function: Press the Input soft key > The password prompt is displayed: ● Define a new password: Enter letters/numbers for the new password (8 characters max.) To delete the current password: press .
Sartorius AG Weender Landstrasse 94–108 37075 Goettingen, Germany Phone +49.551.308.0 Fax +49.551.308.3289 www.sartorius.com Copyright by Sartorius AG, Goettingen, Germany. All rights reserved. No part of this publication may be reprinted or translated in any form or by any means without the prior written permission of Sartorius AG. The status of the information, specifications and illustrations in this manual is indicated by the date given below.