98648-006-26 Getting Started Sartorius Master pro Series LP Models Electronic Precision Balances Operating Instructions 1
Intended Use Contents The Masterpro Series from Sartorius offers precision balances with capacities ranging from 1 to 34 kg. A broad range of special performance features make the Masterpro balances ideal for use as measuring and test equipment in ISO or GLP quality management systems. These features include: Intended Use .............................
Operating Design Getting Started Operating Design Keys Display The balances in the Masterpro Series consist of a weighing cell and a display and control unit. In addition to the choice of power supply (via AC adapter or external rechargeable battery pack), your balance also has an interface port for connecting a printer, computer or universal remote control switch. The functions used most often are assigned to their own specific keys.
To enter numbers: Press the 1 2 … 0 . keys Additional information is displayed in the text line. See the chapter entitled “Configuring the Balance” for a detailed description of all parameter settings.
Getting Started Getting Started Warranty Do not miss out on the benefits of our full warranty. Complete the warranty registration card, indicating the date of installation, and return the card to your Sartorius office or dealer. Storage and Shipping Conditions Allowable storage temperature: 0 °C …+40 °C (+32°F …+104°F) The packaging has been designed to ensure that the balance will not be damaged even if it is dropped from a height of 80 centimeters (about 31 inches).
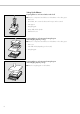
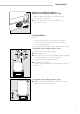
Setting Up the Balance Preparing Balances with a Round Glass Draft Shield ● Place the components listed below on the balance in the order given: – Dust cover – Shield disk; turn counter-clockwise until it stops and is secured – Pan support – Weighing pan – Glass draft shield cylinder – Draft shield cover Preparing Balances with a Rectangular Weighing Pan and a Weighing Capacity ≤ 12 kg ● Place the components listed below on the balance in the order given: – Dust cover – Pan draft shield (depending on the m
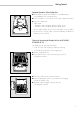
Getting Started Separate Operation of the Display Unit ● Turn the balance upside down and lay it on a padded surface to avoid damage to the weighing system.
Connecting the Balance to AC Power ● Check the voltage rating and the plug design – If they do not match the rating or standard you use, contact your Sartorius office or dealer Use only – Original Sartorius AC adapters – AC adapters with a registered approval rating from a national testing laboratory k To use a main feeder cable from the ceiling or to mount a CEE plug, you will have to make arrangements inside your facilities to have this equipment installed k See the “Accessories” for information on using
Getting Started Fastening an Antitheft Locking Device: Balances with a Weighing Capacity of 12 kg To fasten an antitheft locking device, use the lug located on the rear panel of the balance. ● Secure the balance at the place of installation, e.g., with a chain or a lock.
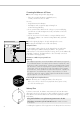
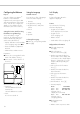
Configuring the Balance Setting the Language ’Info’ Display Purpose Available Features Purpose You can choose from 5 languages for the information display: To have information about the equipment displayed. Masterpro You can configure your balance to meet individual requirements by entering user data and setting parameters in the Setup menu. You can also configure the display to show balance-specific information (such as the serial no.).
Configuring the Balance Entering User Data (Input) Factory Settings Enter/Change Password Purpose Password: No designation To display, input or change user data. You can block access to these data by assigning a password. If no password has been assigned, anyone can access the “Setup: Input” and “Setup: Menu” functions without entering a password.
Practical Example Enter “Workstation 234” as Balance ID; Display and Print Other User Data Step Key (or instruction) 1. Select Setup menu, then Input; Display balance workstation ID (in this example: no ID number exists) see Preparation 2. Enter the first letter of the balance workstation ID a Display/Output 13th through 20th digits of ID displayed z(- a -)b 3. Set the letter “W” y repeatedly, until the W is in the middle 4. Enter the next letter of the balance workstation ID a 5.
Configuring the Balance Step 9. Key (or instruction) Display lot number Y (In this example: 09-10-96/ABC1) 10. Display 5th through 12th digits of lot no. x 11. Display other user data – Weight set no. – Exact calibration weight – Password xyYX 12. Print user data (example) p 13.
Setting Parameters (Menu) Preparation Additional Functions Purpose ● Select the Setup menu: Press M ● Exit the menu: Press M To configure the balance; i.e., adapt the balance to individual requirements by choosing from a list of parameter options in a menu. You can block access to this menu by assigning a password.
Configuring the Balance Practical Example Select the Counting Application Program Step Key (or instruction) 1. Select Setup menu M Display/Output info--menu--input 2. Select Balance Functions group code (Menu) Menu soft key w 3. Select the Application Prog. group Y 4. Confirm Application Program (2nd menu level) X 5. Confirm App. Selection (3rd menu level shows current setting; in this case: weighing) X 6. Select the Counting program YY 7. Confirm selection of Counting program X 8.
Setup Parameters (Overview) o Factory setting √ User setting ** = setting not applicable in balances verified for use in legal metrology ** = not in balance model LP34-0CE 16
Configuring the Balance *** = setting not applicable in balances verified for use in legal metrology *** = not in balance model LP34-0CE *** = for balances of accuracy class K, only calibration (not adjustment) can be performed with a user-defined weight 17
* = setting not applicable in balances verified for use in legal metrology 18
Configuring the Balance l1 l2 e Lev Setup menu for applications l3 e Lev e Lev r to ac see previous pages 5 Interface 51 see previous page 5 2 Parity 522 523 524 7 Print for application 8 Extra functions 9 Balance menu ο ο tem ui en M F 1 to 4 6 Print for weighing g ttin e ys Space Odd Even 5 3 No.
* = not in balance models with a weighing capacity ≥16 kg.
Operating the Balance Operating the Balance Basic Weighing Function Purpose The basic weighing function is always accessible and can be used alone or in combination with an application program (Toggle between Weight Units, Counting, Weighing in Percent, etc.). Below-Balance Weighing Preparation A port for a below-balance weighing hanger is located on the bottom of the balance (for balances with a weighing capacity >12 kg, see the “Accessories” in the chapter entitled “Overview”).
ID for weight value (if desired): ● Select the parameters “Line format” and “For other app./GLP” from the Setup menu: Press M ● Select mode: Press the menu soft key ● Set parameter 7 2 2: See the chapter entitled “Configuring the Balance” ● Exit the Setup menu: Press M you can also access the following functions from the weighing application: – calibration (not during alphanumeric input), – setup, – turning off the balance.
Operating the Balance Example W2 Enter “ABC123” as a sample ID Note: – The sample ID generally applies to one weighing operation only – The ID is deleted after data output Step Key (or instruction) Display/Output Initial status (balance unloaded) (ID can also be entered while balance is loaded) 1. Enter the letter “A” a 2. Select and enter the letter “B” a Softkey B (Key Y) 3. Select and enter the letter “C” a Softkey . . (Key Y Y) 4. Enter the numbers “1,” “2” and “3” 123 5.
Calibration/Adjustment Purpose Calibration is the determination of the difference between the weight readout and the true weight (mass) of a sample. Calibration does not entail making any changes within the balance. Adjustment is the correction of this difference between the measured value displayed and the true weight (mass) of the sample, or the reduction the difference to an allowable level within the maximum permissible error limits.
Operating the Balance Preparation Configure Parameters for Calibration and Adjustment Step Key (or instruction) 1. Turn on the balance e 2. Select the Setup menu M Display/Output info--menu--input 3. Select the Balance Functions menu menu soft key w 4. Set parameters for: – Calibration key function 1 9 – Calibration/adjustment sequence 1 10 – isoCAL self-calibrating and adjustment function 1 15 See the chapter entitled “Setup” 5.
Selecting the Calibration/ Adjustment Parameter The setting 1 9 12 must be selected in the Setup menu. You can configure the balance so that after selecting a calibration procedure by pressing the q key, you can choose among the following calibration/adjustment modes: – External calibration/adjustment with the pre-set weight value (Def. Ext. Adj.) – External calibration with a user-defined weight value (user. ext.adj.) – Internal calibration (int.
Operating the Balance External Calibration/Adjustment* with a User-Defined Weight First set either 1 9 3 or selection mode (1 9 12) in the menu. You can define a weight for calibration/adjustment. External calibration/adjustment must be performed with weights that are traceable to a national standard and that have error limits which are at least 1/3 of the required tolerance of the display accuracy. The balance has a factory-set weight value (see “Specifications”).
Internal Calibration/Adjustment Calibration and Adjustment Sequence The menu code setting 1 9 4 must be selected in the Setup menu. In the Setup menu, you can configure the balance so that: Inside the balance housing is a builtin, motorized calibration weight. – calibration is always followed automatically by adjustment (cal.
Operating the Balance isoCAL: Automatic Calibration and Adjustment Either 1 15 3 or 1 15 5 must be selected in the Setup menu. The “isoCAL” display automatically begins flashing if the ambient temperature has changed in relation to the temperature at the time of the last calibration/adjustment, or after a defined time interval has elapsed. The balance is telling you that it wants to self-calibrate and adjust.
Determination of the Repeatability (reproTEST) Definition Repeatability (reproducibility) is the ability of the balance to display identical readouts when it is loaded several times with the same weight under constant ambient conditions. The standard deviation for a given number of measurements is used to quantify the repeatability. Purpose Preparation The “reproTEST” function automatically calculates the repeatability of results (based on 6 individual measurements).
Operating the Balance Application Programs Using Verified Balances as Legal Measuring Instruments in the EU*: Preparation The following weight units are available in both ranges: Unit Conversion factor Display Printout All application programs can be selected on balances used as legal measuring instruments. Non-metric vales are indicated as follows: Grams 1.00000000000 g g Kilograms 0.00100000000 kg kg Carats** 5.00000000000 ct ct Pounds** 0.00220462260 lb lb Percent =% Ounces** 0.
Additional Functions Calibration/Adjustment In addition to the functions for: ● Press q – alphanumeric input, – taring (not during alphanumeric input), – printing, > See “Calibration/Adjustment” for further instructions you can also access the following functions from this application: – calibration (not during alphanumeric input), – setup, – turning off the balance.
Operating the Balance Counting Z Available Features Factory Settings Purpose – Reference sample quantity “nRef” loaded from long-term memory when you turn on the balance Auto-start application (automatic initialization with reference sample quantity and average piece weight loaded from long-term memory): off (3 10 2) With the Counting program you can determine the number of parts that each have approximately equal weight.
Preparation To calculate a piece count, the average weight of one piece must be known. This average piece weight can be entered into the Counting program in one of three ways: – The last reference sample quantity entered is loaded and displayed when you turn on the balance.
Operating the Balance Practical Example Counting with: Preset Reference Sample Quantity Weighed In (Parameter settings: Counting program: 2 1 4; Print all parameters: 7 1 2) Step Key (or instruction) 1. Select the counting application in the Setup menu see “Preparation” 2. Prepare a container for the parts Place the empty container on the balance Display/Output nref=10 pcs start 3. Tare the balance t nref=10 pcs start 4.
Weighing in Percent L Available Features Factory Settings Purpose – Reference percentage “pRef” loaded from long-term memory when you turn on the balance Auto-start application (automatic initialization with reference percentage and reference weight loaded from long-term memory): off (3 10 2) This application program allows you to obtain weight readouts in percent which are in proportion to a reference weight.
Operating the Balance Preparation To calculate a value in percent, the reference percentage must be known. This value can be entered into the weighing-in-percent program in one of three ways: – The last reference percentage entered is loaded and displayed when you turn on the balance.
Practical Examples Example P1: Weighing in Percent with Reference Weight Taken from Weight on Balance Step Key (or instruction) 1. Select the weighing-in-percent application in the Setup menu see “Preparation” 2. Prepare a container for the parts Place the empty container on the balance 3. Tare the balance t 4. Place the reference weight on the balance (here: 1821.48 g =100%) Place weight equal to reference weight in the container 5.
Operating the Balance Example P2: Weighing in Percent with Reference Weight Entered Using the Numeric Keys Step Key (or instruction) 1. Select the weighing-in-percent application in the Setup menu see “Preparation” 2. Prepare a container for the parts Place the empty container on the balance 3. Tare the balance t 4. Enter the reference weight using the numeric keys (here: 120 g) 120 5. Store the reference weight W100% soft key q 6.
Net-Total Formulation R Purpose With this application program you can weigh in different components up to a defined total. You can also print out the total weight and the individual weights of the components. Available Features – Taring – Weighing different components (maximum: 99 components) from “0” to a defined total component weight – Storing component weights (“Store xx comp.
Operating the Balance Practical Example Weighing in Several Components (Parameter settings: Net-total application program 2 1 6; print all parameters 7 1 2) Step Key (or instruction) 1. Select the net-total application in the Setup menu see “Preparation” 2. Prepare a container for the components Place the empty container on the balance 3. Tare the balance t 4. Add first component Place the first component in the container 5. Store component value 1. comp soft key v 6.
Animal Weighing V Available Features Factory Settings Purpose – Animal weighing started manually or automatically Auto-start application (automatic initialization with automatic start of animal weighing): off (3 10 2) Use this program to determine the weights of unstable samples (e.g., live animals) or to determine weights under unstable ambient conditions. In this program, the balance calculates the weight as the average of a defined number of individual weighing operations.
Operating the Balance Preparation Additional Functions Practical Example ● Turn on the balance: Press e In addition to functions for: See next page > All display segments light up briefly ● Select the animal weighing application in the Setup menu: Press M ● Select menu: Press the menu soft key (w) ● Set parameter 2 1 7: See “Configuring the Balance” ● Exit the Setup menu: Press M Setting Parameters for the Animal Weighing Application k Access the Setup menu: Select Menu ● Set parameters for: – Start
Practical Example Determining Animal Weight with Automatic Start of 20 Subweighing Operations for Averaging; Automatic Printout of the Number of Subweighing Operations and of the Animal Weight Step Key (or instruction) 1. Select the animal weighing application in the Setup menu see “Preparation” 2. Set the following animal weighing parameters in the Setup menu: – Animal activity: Active – Start animal weighing: Automatic – Printout: On: anim.wt.*fact. – Print: All parameters 3.
Operating the Balance Step Key (or instruction) The balance delays starting the subweighing operation until three successive subweights lie within the range defined for an “active” animal When this criterion is met, the subweighing series begins Display/Output M =x20xxxxxxx xxx19 xxx18 xxxx... xxxx1 After 20 subweighing operations (mdef: no. of subweighs) Mul: Calculation factor xnet arithm. average, net value) 8. Unload the balance 9.
Over/Under Checkweighing O Purpose This program is used to check whether a sample corresponds to a pre-set target value or is within a specific tolerance range. In addition to the display in the measured value line, the results are shown on the bar graph and can also be routed through the interface port via control lines for further electronic processing.
Operating the Balance Preparation The checkweighing program requires a target value for comparison to the current value. This target has a tolerance range, which is defined by absolute weight values: upper and lower limits. These limits can be entered either by storing weights on the balance or via key input.
● Turn on the balance: Press e > All display segments light up briefly ● Select the over/under checkweighing application in the Setup menu: Press M ● Select menu: Press the menu soft key (w) ● Set parameter 2 1 8: See “Configuring the Balance” ● Exit the Setup menu: Press M Additional Functions In addition to functions for: – alphanumeric input (not during initialization), – taring (not during alphanumeric input), – printing, you can also access the following functions from this application: – calibration
Operating the Balance Practical Example Checkweighing samples of 170 g, with an allowable tolerance of –5 g and +10 g. Printout of upper and lower tolerance limits. Weighed values printed out automatically when stability is reached and weight is within the control range. Step Key (or instruction) 1. Select the checkweighing application in Setup see “Preparation” Display/Output 2.
9. Store lower limit value min soft key v 10. Enter value for upper limit (170 g + 10 g) 180 11. Store upper limit value max soft key v 12. Weigh sample (in this case 169.48 g) + + + 170.00 g 165.00 g 180.00 g N + 169.48 g Place sample in container If the weight had been too low, the display would have shown the following: 13. In this case, switch to net value display (in this case: 163.28 g) net soft key v 14.
Operating the Balance Recalculation Purpose With this application program you can compensate for over-poured components in formulation. If a component is over-poured when weighing in the individual formulation components, the mixture already poured cannot be used in its current composition. To avoid having to discard the materials weighed, you can adjust the proportions of the formulation to compensate for the over-pour.
Factory Settings Preparation Additional Functions Print application parameters (automatic output of application parameters): off (7 1 1) ● Turn on the balance: Press e In addition to the functions for: > All display segments light up – alphanumeric input, ● Select the Recalculation application in the Setup menu: Press M – taring (not during alphanumeric input), and ● Select menu: Press the menu soft key (w) – printing, Line format: for other apps/GLP (7 2 2) ● Set parameter 2 1 9: see “Configur
Operating the Balance Practical Example When weighing in formulation components, the second component is over-poured. (Parameter settings: Recalculation application: 2 1 9; Print all parameters: 7 1 2) Step Key (or instruction) Display/Output ————————————————————————————————————————————————— 1. Select the recalculation application in the Setup menu see “Preparation” 2. Place container for filling components on the balance Place empty container on the balance 3. Tare t 4.
... or enter the desired value 12.30 comp. sp.id 9. Confirm the new value comp.2 soft key (v) or comp. soft key (w) Comp1 + Comp2 + R.div + 27.08 g 12.42 g 1.00975 The true net value is displayed for 2 seconds store comp.2 Follow-on filling amount for first component is displayed r.div.=1.00975 comp.1 10. Follow-on filling of 1st component Weigh the first component up to 0 and store comp.1 soft key (v) Comp1 + Comp2 + R.div.+ RCom1 + 27.08 g 12.42 g 1.00975 27.
Operating the Balance 14. ... and store (here, e.g., the 6th component) add.6 soft key (v) Comp1 + Comp2 + R.div.+ RCom1 + Comp3 + Comp4 + Comp5 + Comp6 + 27.08 12.42 1.00975 27.34 18.39 31.49 107.50 812.61 g g g g g g g The true net value (of the 6th component) is displayed for 2 seconds actual net. Comp.6 Then the total weight is displayed recal. comp. add.7 15. End the weighing procedure Total weight is printed c Comp1 + Comp2 + R.div.+ RCom1 + Comp3 + Comp4 + Comp5 + Comp6 + Tot.cp+ 27.08 12.
Data Output Functions There are 3 options for data output: – Output to the display/control unit – Output to a printer (generate a printout) – Output to a peripheral device (e.g.
Operating the Balance Weight Unit Display This line shows: kg pcs NET P o – Current weight unit (e.g., kg) – Designation of other units of measure (e.g., piece count) – Operating status (e.g., net weight; printing) – Identification of currently selected menu item Symbol Display This line shows: isoCAL LZVOR – Indicators and warnings (e.g.
Printing a Data Record Available Features Factory Settings Purpose Print manually/automatically: To print the information contained in the measured value line (weight readout, calculated value, numeric entry, alphabetic entry) Print manually/automatically: Printout generated manually (by pressing p) or automatically, depending on stability parameter: Manual after stability (6 1 2) Line format: You can configure a data ID code of up to 6 characters for each of the values printed; this data ID code is p
Operating the Balance Print Manually/Automatically The printout contains the current value in the measured value display (weight readout with weight unit; calculated value; numeric/ alphabetic display) + 1530.000 g + 58.5620 ozt + 253 pcs + 88.23 % + 105.78 o Weight in grams Weight in Troy ounces Piece count Percentage Calculated value ABC123DEF456GH ABC123DEF456GH ABC123DEF456GH + 1530.000 g + 253 pcs + 88.23 % + 2000.
Auto Print You can have the weight readout (or the value displayed in the measured value line) printed automatically; this printout can be generated after a certain number of display updates; you can also configure whether or not the auto-print function is dependent on the stability parameter. The display update frequency depends on both the model of the balance and the current operating state. N S ID Stat Stat Stat + 1530.
Operating the Balance ISO/GLP-compliant Printout/Record You can have the parameters pertaining to the ambient weighing conditions printed before (GLP header) and after (GLP footer) the values of a weighing series. These parameters include: – Date – Time at the beginning of a weighing series – Balance manufacturer – Balance model – Model serial number – Software version – Lot ID (weighing series no.
Interface Description Purpose Your Masterpro balance comes equipped with an interface port for connection to a computer or other peripheral device. You can use an on-line computer to change, start and/or monitor the functions of the balance and the application programs. The interface port also has four data output port lines for the over/under checkweighing program.
Operating the Balance Line Format (Data Output Format) Output Format with 16 Characters You can output the values displayed in the measured value line and the weight unit with or without a data ID code Display segments that are not activated are output as spaces. Characters without a decimal point are output without a decimal point. Example: Without data ID code + 253 pcs Example: With data ID code Qnt + 253 pcs Configure this parameter in the Setup menu under item 7 2.
Unit symbol U1) Data output example: + 1255.7 g Position 1 + 2 * 3 * Position 1: Position 2: Positions 3 – 10: Position 11: Positions 12 – 14: Position 15: Position 16: 4 * 5 1 6 2 7 5 8 5 9 10 11 12 13 14 15 16 .
Operating the Balance Data Input Format You can connect a computer to your balance to send commands via the balance interface port to control balance functions and applications. The commands sent are control commands and may have different formats; e.g., control commands can have up to 26 characters. Each character must be transmitted according to the settings configured in the Setup menu for data transmission.
Synchronization Handshake Transmitting Device: During data communication between the balance and an on-line device (computer), messages consisting of ASCII characters are transmitted via the interface. For error-free data communication, the parameters for baud rate, parity, handshake mode and character format must be the same for both units. The balance interface (Sartorius Balance Interface = SBI) has transmit and receive buffers.
Operating the Balance Activating Data Output You can define the data output parameter so that output is activated either when a print command is received or automatically and synchronous with the balance display or at defined intervals (see application program descriptions and auto print settings). Data Output by Print Command The print command can be transmitted by pressing p or by a software command (Esc P).
Pin Assignment Chart Female Interface Connector: Pin Assignment Chart: 25-position D-Submini, DB25S, with screw lock hardware for cable gland Pin Pin Pin Pin Pin Pin Pin Pin Pin Pin Pin Pin Pin Pin Pin Pin Pin Pin Pin Pin Pin Pin Pin Pin Pin Male Connector Required: (please use connectors with the same specifications) 25-pin D-Submini, DB25S, with integrated shielded cable clamp assembly (Amp type 826 985-1C) and fastening screws (Amp type 164 868-1) *) 1: 2: 3: 4: 5: 6: 7: 8: 9: 10: 11: 12: 13: 14: 1
Operating the Balance Cabling Diagram – Diagram for interfacing a computer or different peripheral device to the balance using the RS-232/V24 standard and cables up to 15 m (50 ft.
Additional Functions Password You can block access to parameter settings in the Setup menu and to the ID-code input function, as well as to the exact calibration weight, by assigning a password. Enter the password by selecting INPUT in the Setup menu. See “Configuring the Balance” for a detailed description.
Operating the Balance Interface Port Input/Output You can connect a checkweighing display and a remote universal switch to the interface port (factory setting). When you connect a remote universal switch, you need to change the following parameters. Undoing All Parameter Changes – Reset Function There is a factory setting for each parameter.
MP8 Interface Emulation Preparation Purpose ● Turn on the balance: Press e With the MP8 interface emulation you can connect peripheral devices of the MP8 generation that have separate AC power supplies, such as the 73822... Data Control terminal, a YFC... Flow Rate Controller, a YDI50Z Data Input dedicated keyboard, etc., to your LP series balance.
Operating Error Codesthe Balance Error Codes Error codes are displayed in the main display or application display for 2 seconds. The program then returns automatically to the previous mode (e.g., weighing).
Display Cause Solution err 30 Interface port for printer output is blocked Contact your local Sartorius Service Center ref.wt. too light Error in storing reference weight (with the counting or weighing-inpercent application) Reference sample updating not possible (with the counting application) Weight too light or there is no sample on the balance no num. value xxxxx too low xxxxx too high Input wrong (for any application program), e.g.
Operating the Balance Care and Maintenance Care and Maintenance Service Replacing the Dust Cover Regular servicing by a Sartorius technician will extend the service life of your balance and ensure its continued weighing accuracy. Sartorius can offer you service contracts, with your choice of regular maintenance intervals ranging from 1 month to 2 years.
Replacement of the Backup Battery Spare backup battery in the display and control unit (soldered to PCB) Type: VL 2020; manufacturer: Panasonic. To be replaced by trained service technicians only. CAUTION: Danger of explosion if battery is incorrectly replaced. Replace only with the same or equivalent type recommended by the manufacturer. Dispose of used batteries according to the manufacturer’s instructions.
Overview Overview General Views of the Balances LP1200S (-0CE), LP620S (-0CE), LP220S (-0CE), LP620P (-0CE), LP3200D No.
General Views of the Balances LP8200S (-0CE), LP8200P (-0CE), LP6200S (-0CE), LP4200S (-0CE), LP2200S (-0CE), LP820 (-0CE), LP420, LP2200P (-0CE), LP5200P (-0CE), LP12000S (-0CE), LP6200 (-0CE), LP4200, LP2200 (-0CE), LP12000P (-0CE) No.
Overview General Views of the Balances LP16000S (-0CE), LP34000P (-0CE), LP34 (-0CE) No. Designation Order no. for spare part No.
Description of the Keys e Key On/off switch Switches the display on/off. The balance remains in the standby mode. M Key Settings for Configuring the Balance v Key Start an Application Further instructions on running the applications when this key is pressed are contained in the chapter entitled “Operating the Balance;” refer to the section pertaining to the particular program.
Overview Menu Structure * = setting cannot be changed in balances used for legal metrology 81
Specifications General Specifications AC power source/power requirements AC adapter, 230 or 115 V, +15%… – 20% Frequency 48 – 60 Hz Allowable ambient operating temperature 0…+40 °C (273…313 K, 32 °F…104 °F) Operating temperature range + 10…+ 30 °C Dust and water protection rating according to EN 60529* IP54 (protected against harmful dust deposits and splashes of water) Adaptation to ambient conditions By selection of 1 of 4 optimized filter levels Display update (depends on the filter level sel
Overview Model LP8200S LP8200P LP6200S LP4200S LP2200S Readability g 0.01 0.01/0.02/0.05 0.01 0.01 0.01 Weighing capacity g 8,200 2,000/4,000/8,200 6,200 4,200 2,200 Tare range (subtractive) g – 8,200 – 8,200 – 6,200 – 4,200 – 2,200 Repeatability (standard deviation) ≤±g 0.01 0.01/0.01/0.03 0.01 0.01 0.01 Linearity ≤±g 0.02 0.02/0.02/0.05 0.02 0.02 0.02 Sensitivity drift within +10…+30 °C ≤±/K 2 • 10–6 Response time (average) s 2 2 1.5 1.5 1.
Model LP34000P LP12000P Readability g 0.1/0.2/0.5 0.1/0.2/0.5 LP34 1 Weighing capacity g 8,000/ 16,000/ 34,000 3,000/6,000/ 12,000 34,000 Tare range (subtractive) g – 34,000 – 12,000 – 34,000 Repeatability (standard deviation) ≤±g 0.1/0.2/0.5 0.1/0.1/0.3 0.5 Linearity ≤±g 0.2/0.2/0.5 0.1/0.2/0.5 1 Sensitivity drift within +10…+30 °C ≤±/K 2 • 10-6 4 • 10-6 2 • 10-6 Response time (average) s 1.
Overview Verified Models with EC Type Approval General Specifications AC power source/power requirements AC adapter, 230 or 115 V, + 15%... –20% Frequency 48 – 60 Hz Dust and water protection rating according to EN 605291) IP54 (protected against harmful dust deposits and splashes of water) Adaptation to ambient conditions By selection of 1 of 4 optimized filter levels Display update 0.1 – 0.
Model LP8200S-0CE LP8200P-0CE LP6200S-0CE Type BD BF BD BF MA BF 200, BD BF MA BF 200, BD BF BA BF 500, BD BF LP4200S-0CE LP2200S-0CE Accuracy class* K K K K K Scale interval d* g 0.01 0.01/0.02/ 0.05 0.01 0.01 0.01 Max. weighing capacity* g 8,200 2,000/4,000/ 8,200 6,200 4,200 2,200 Verification scale interval e* g 0.1 Min. capacity* g 0.5 – 4,200 0.5 – 2,200 0.5 ≤100% of the max. weighing capacity Tare range (subtractive) Application range according to CD* g 0.
Overview Model LP2200-0CE LP34000P-0CE LP34-0CE Type BA BF 500, BD BF BA BF 500, BD BF BB BD 523 LP12000P-0CE BB BD 523 BB BD 523 Accuracy class* K K K K LP16000S-0CE K Scale interval d* g 0.1 0.1/0.2/0.5 0.1 0.1/0.2/0.5 1 Max. weighing capacity* g 2,200 3,000/6,000/ 12,200 16,000 8,000/16,000/ 34,000 34,000 Verification scale interval e* g 0.1 1 1 1 1 Min.
Accessories (Options) Product Order No.
Overview Product Order No. SartoConnect YSC01L data transfer software; with RS-232 standard cable; for direct input of weighing data into an application program (e.g.
Declarations of Conformity The C Mark on Sartorius Equipment In 1985, the Council of the European Community approved a resolution concerning a new approach to the technical harmonization and standardization of national regulations. The organization for monitoring compliance with the directives and standards concerning the C marking is governed in the individual EU Member States through the implementation of the EC Directives adopted by the respective national laws.
Overview “New Installation” Service Subsequent Verifications within the European Countries Initial verification is covered in our “New Installation” service package. In addition to initial verification, this package provides you with a series of important services which will guarantee you optimal results in working with your weighing instrument: The validity of the verification will become void in accordance with the national regulations of the country in which the weighing instrument is used.
Overview 93
Z.14-755 320 34-10.
Overview Index Page Page Accessories Acoustic signal Additional functions Animal weighing Antitheft locking device Application programs Auto print Auto print +/– Automatic calibration and adjustment (isoCAL) Automatic shutoff 88 70 70 42 9 31 60 60 Language setting Leveling the balance Line for metrological data Line format 10 9 56 59 Measured value line Menu items Menu structure (diagram) MP8 interface 56 16 81 72 29 70 Net-total formulation 40 Balance-specific information Basic weighing functi
Appendix Entering the General Password Enter/Change Password Select the Setup menu: M > The soft keys info, menu and input are displayed in the text line Select the user data input function: Press the input soft key (v) > The password prompt is displayed (ENTER PASSW.) Enter the General Password (see below) Press the ENTER PASS. soft key (v) > The last 8 digits of a workstation ID (balance ID no.
Sartorius AG b 37070 Goettingen, Germany p Weender Landstrasse 94–108, 37075 Goettingen, Germany t (+49/551) 308-0, f (+49/551) 308-3289 Internet: http://www.sartorius.com Copyright by Sartorius AG, Goettingen, Germany. All rights reserved. No part of this publication may be reprinted or translated in any form or by any means without the prior written permission of Sartorius AG. The status of the information, specifications and illustrations in this manual is indicated by the date given below.