Operating Instructions Sartorius Moisture Analyzer Model MA37 Electronic Moisture Analyzer 98648-019-93 98648-019-93
Contents Contents User Information. . . . . . . . . . . . . . . . . . . . . . . . . . . . . . . . . . . . . . . . 3 Safety Information. . . . . . . . . . . . . . . . . . . . . . . . . . . . . . . . . . . . . . 4 General View of the Equipment. . . . . . . . . . . . . . . . . . . . . . . . . . 7 Startup. . . . . . . . . . . . . . . . . . . . . . . . . . . . . . . . . . . .
User Information User Information Warning/Danger Symbols Used in these Instructions: These notes identify hazards which have a high probability of resulting in death or serious physical injury if not avoided. These notes identify hazards that can result in moderate or mild injuries if not avoided. These notes identify hazards associated with the risk of material damage.
Safety Information Safety Information Guidelines and General Information – The analyzer complies with EU Directives and standards, among other regulations, for electrical safety and electromagnetic compatibility*. Improper use or handling can, however, result in damage to objects and injury. Any improper use or operation of the analyzer that is not consistent with the instructions will result in forfeiture of all claims under the manufacturer’s warranty.
Safety Information Note the IP protection class of the analyzer! Do not allow liquid penetration. The protection class specifies the suitability of equipment for various environmental conditions (moisture, foreign bodies). Before cleaning the analyzer: Unplug the power supply cable from the socket. Position the power cable so that it cannot touch the hot surfaces of the analyzer and is not a trip hazard. Disconnecting the grounding conductor is prohibited.
Safety Information Personal Protective Equipment When operating the analyzer, suitable protective equipment must be worn in order to minimize dangers to health. – During work, always wear the protective equipment needed for the task at hand. – Follow any instructions posted in the work area pertaining to personal protective equipment. Wear the following personal protective gear during all work: Protective Clothing Wear a laboratory coat.
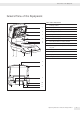
General View of the Equipment General View of the Equipment Item Name and Function 1 Heating module 2 Heating element 3 Disposable sample pan 4 Pan support 5 Sample chamber bottom 6 Locking socket (bayonet) 4 7 Process status light 5 6 8 Unlocking handle for heating module 9 Power socket for country-specific power cable 10 Fastening point for an optional Kensington key lock 11 Leveling feet 12 USB port for mini AB 13 Display and control unit (touch screen) 14 Temperature sensor
Startup Startup Unpacking and Equipment Supplied t Open the packaging, making sure to remove all parts carefully. t After unpacking the analyzer, check it immediately for any external damage. – If you detect any damage, proceed as directed in “Care and Maintenance.” – Save the box and all parts of the packaging for any future transport.
Startup Setting Up the Analyzer t Assemble the parts in the following order: – Pan support – Disposable sample pan – The protective cover over the control panel is pre-assembled at the factory. Compensating for Unevenness of the Setup Surface t Twist the leveling feet until any slight unevenness in the setup surface is rectified and the analyzer is stable. Anti-theft Locking Device – To protect against theft, the analyzer has a fastening point for a security lock if required.
Startup Opening and Closing the Sample Chamber t Open or close the sample chamber by hand. Always open the heating module fully. Power Connection (Power Supply) – Using the wrong power cables may cause fatal electric shock and damage the equipment. – Never plug the power cable into the socket when it is disconnected from the analyzer (danger of electrical shock). – Only connect the analyzer to an AC socket with a protective grounding conductor.
Startup Power Cable Versions Item No. 69 00900 69 00901 69 00902 69 00905 69 71945 69 71972 69 71973 69 71975 69 71976 69 71977 69 71978 69 71979 69 71980 Region/Country Europe/EU (except the UK, Denmark, Italy, and Switzerland) USA, Canada, and Japan South Africa Australia, New Zealand UK Brazil India Israel Italy Argentina China Switzerland Denmark Note: This equipment has been tested and found to comply with the limits for a Class B digital device, pursuant to part 15 of the FCC Rules.
Transporting the Analyzer Transporting the Analyzer Moving the Analyzer in the Lab Avoid shocks and vibrations: t Never lift and carry the analyzer by its heating module. t Hold the analyzer under the housing, lift it up carefully, and carry it to its new location.
Basic Principles Basic Principles Purpose The moisture analyzer can be used for quick and reliable determination of the moisture content of materials of liquid, pasty, and solid substances using the thermogravimetric method. Material The moisture of a sample is often mistakenly equated to its water content. In fact, the moisture of a material includes all of the volatile components which are emitted when the sample is heated, and lead to a reduction in its weight.
Basic Principles The IR rays that do not heat the sample are either reflected from surface of the sample or absorbed unimpeded into the sample. The color and surface characteristics of the sample determine how effective the heating process is. For example, dark substances absorb IR rays more effectively than light substances. How the rays penetrate the sample depends on the permeability of the sample.
Basic Principles Preparation Before drying a sample, you must carry out the following preparations: –– Adjust against the existing measurement system –– Prepare the sample –– Set the drying program parameters Adjusting against an Existing Measurement System A moisture analysis method often replaces another drying method (such as oven drying method) because it is simple to use and requires shorter analysis time.
Basic Principles tt Mix the condensed moisture back in with a sample if necessary. Prepare the sample: tt When crushing a sample, avoid any contact with heat. Heat results in moisture loss. tt Crush the sample using: –– Pestle –– Lab mill If the sample is liquid containing solids, use one of the following tools: –– Glass stirrer –– Spoon –– Magnetic stirrer tt Use an appropriate tool for grinding the sample.
Basic Principles Apply the sample to the sample pan: tt Apply the sample to the sample pan in a thin, even layer (height: 2 to 5 mm, weight: 5 to15 g); otherwise: –– A sample applied unevenly will result in a nonuniform distribution of heat –– A sample will not be dried completely –– The analysis time will be unnecessarily extended –– The sample will burn or a crust/skin will form on its surface as a result of a very thick layer –– The crust makes it difficult or impossible for moisture to escape from the
Basic Principles Gentle drying: For gentle drying, you need to enter the final temperature. The maximum set temperature is 160°C. The target temperature is reached more slowly and the measurement time is extended. Gentle drying is recommended for sensitive samples. T [°C] Standardtrocknung t [s] Standby Temperature Temperature set to defined value when the sample chamber is closed. Heating only occurs when the analyzer is in a measurement cycle.
Basic Principles Starting the Analysis –– After closing the hood: If the initial weight condition is met, the analyzer prompts you to close the hood. The start weight is accepted as soon as the sample chamber is closed and the measurement value is stable. End of Analysis –– Fully automatic: The analysis ends as soon as the weight loss per 24 s is below an automatically detected threshold. Weight Moisture (steam) Autom.
Operating the Moisture Analyzer Operating the Moisture Analyzer Switching the Analyzer On and Off (Standby) Wednesday, 2014-01-08 16:50 Moisture in %M yy The main screen appears after the moisture analyzer has been switched on. –– The default language for the display text is English. –– You can change the language (see “Setting the Language” on page 21).
Operating the Moisture Analyzer Setting the Language The default language for the display text is English. To change the language, proceed as follows: tt Select the menu key at the bottom left of the main screen on the display. Moisture in %M yy The menu is displayed. Standard drying 105 °C Standby temperature Initial weight End Fully automatic Target value - No automatic printout tt Select the i (Setup) button in the menu. Settings yy The Settings window appears.
Operating the Moisture Analyzer Operating Concept This section explains the operating options available to you so that you can familiarize yourself with the moisture analyzer. Operating and Display Elements Sharp or pointed objects (such as ballpoint pens) can damage the device. – The touch screen should only be operated by lightly pressing it using the tips of your fingers. You can also operate the touch screen when wearing lab gloves.
Operating the Moisture Analyzer Menu All settings for the moisture analyzer can be accessed via the menu. tt To access the menu, select the menu key at the bottom left of the display. yy The menu opens.
Operating the Moisture Analyzer Temperature Entering Numbers on the Number Pad 105 °C 1 2 3 4 5 6 7 8 9 You can enter numeric values in the method parameters or system settings (such as the temperature setting for a heating program). A number pad appears on the display, which is always used in the same way. tt To enter numbers, select the desired numbers one after the other. yy The entered numbers appear at the top of the display. tt To correct the last entered number, select p.
Operating the Moisture Analyzer Scrolling in the Display If more than one entry is available, you can scroll up and down through the display to select the desired entry. Settings Date and time Device information Calibration/Adjustment tt To scroll, place your finger on the display and drag it slowly either up or down. yy The entries on the display move in the corresponding direction.
System Settings (Setup Menu) System Settings (Setup Menu) The Settings (Setup) menu contains all basic settings for the moisture analyzer. Opening the Menu and Changing the Settings t Select the menu key on the main screen. Moisture in %M y The menu is displayed. Standard drying 105 °C Standby temperature Initial weight End Fully automatic Target value - No automatic printout t Select the i (Setup) key in the menu. Settings y The Settings menu appears.
System Settings (Setup Menu) List of Available Settings This section contains information about all of the basic settings on the moisture analyzer, which can be defined in the Settings menu. Language The language of the display text can be set here. English is set as the default language on the moisture analyzer (see “Setting the Language” on page 21).
System Settings (Setup Menu) Device Information The manufacturer, model, serial number and software versions of the moisture Device information analyzer are displayed here. Manufacturer: Model: Serial number: Version BAC: Version APC: Version DOC: Sartorius MA37 0034002458 00-53-01.01 CN:1701 01-80-01.05 CN:0000 07-40-03.
System Settings (Setup Menu) Signals Signals The key tones, acoustic signals, and process status light can be switched on and off here. Touch signals Acoustic signal Status light The following settings are available for each signal: – On: The signal is activated. – Off: The signal is deactivated. Display Brightness Display brightness Bright Medium Eco mode The brightness of the display can be set here.
System Settings (Setup Menu) Timeout Standby Temp. Time [h] 2 sorted by date, Timeout standby temp. The timeout for the standby temperature can be set here. t To set the time, select t, enter the desired time and confirm with l (entry in hours from 1 h to 24 h). 1 3 USB port USB port The settings for the data transfer to a peripheral device (such as a PC or printer) can be defined here.
System Settings (Setup Menu) selected): – Decimal point (default setting): The number value is transmitted with a decimal point to the PC program (example: 99.963 g). – Decimal comma: The value is transmitted with a decimal comma to the PC program (example: 99,963 g). Under Keyboard emulation (also available when “PC spreadsheet format” or “PC text format” has been selected): – Universal (Num Lock on) (default setting): Data is sent as special keyboard characters in ASCII format (ALT + number pad).
System Settings (Setup Menu) Service mode/Service access Service access This function is used by the Sartorius Service Center and can only be accessed by authorized service technicians. Access code: xxxxxx Reset All settings can be reset to the factory settings here. t When the security prompt appears, select Yes, reset and confirm with l. The moisture analyzer is reset and restarts.
Moisture Analysis Moisture Analysis Purpose: Accessories: The moisture analyzer can be used to determine the moisture content of liquid, pasty, or solid samples. Depending on the consistency of the sample, one or two filters are recommended in order to distribute the sample optimally in the sample pan. – Liquid sample: Tare one filter with the sample pan, then distribute the sample drop by drop onto the filter.
Moisture Analysis y The menu is displayed. Moisture in %M Standard drying 105 °C Standby temperature Initial weight End Fully automatic Target value - No automatic printout t Select the M button in the menu.
Moisture Analysis t Scroll through the list if necessary and change further parameters. Customize parameters t When you are finished making changes, select o. Initial weight Off Result display Moisture in %M Target value Off Standby temperature Off y The changed method parameters are displayed. Save changes t Select the desired option: – Make further changes: Select <. This takes you back to the list of parameters. – Reject changes: Select NO. – Save changes: Select YES.
Moisture Analysis Place pan and two filters, close hood for taring + 4.000 g t Place an empty sample pan on the analyzer, along with one or two filters if necessary. The number of filters depends on how many filters are set in the parameters for the current method. t Close the hood. D y The moisture analyzer tares automatically. t Open the hood. Open hood 0.000 g D t Place the sample on the sample pan or filter(s). Fill in sample and close hood to start - 0.000 g ; Fill in sample + 1.929 g 2.
Moisture Analysis y The current measurement value and progress are shown on the display during the moisture analysis. 09:41 min 65.00 – If a target value is set, the measurement process is displayed as a bar diagram. The target value is marked and tolerance limits are displayed. – If no target value is set, the measurement process is displayed as a curve diagram. %M 67.50 %M 110 °C Standard Fully automatic 09:41 min + 67.
Moisture Analysis Printing Out the Analysis Report If a lab printer is connected, you can print out the result of the moisture analysis. a t Select a. y The analysis report is printed out. The settings for the analysis report can be configured in the system settings (see section “Printout” in Chapter “System Settings”). Further information and an example of an analysis report can be found in Chapter “ISO/GLP-compliant Printout”.
MA Performance Test MA Performance Test The performance test can be used to check whether the analyzer has a fault or is ready for operation. During a performance test, both the heating unit and the weighing system are tested at the same time. You will need a ReproEasy pad (accessory) in order to carry out a performance test. Starting the Performance Test Calibration/Adjustment t Select “MA performance test.” y The display switches to a view with three heating temperatures.
MA Performance Test Place pan, close hood for taring + 2.500 g t Place a sample pan on the analyzer. t Close the hood. y The moisture analyzer tares automatically. D t Open the hood. Open hood 0.000 g D t Open the packaging of the ReproEasy pad (accessory) and remove the pad. t Remove the protective wrapping. t Affix the pad to the center of the sample pan, sticky side down.
MA Performance Test 00:13 min MA performance test y The display shows the progress of the test and the remaining time. Device is tested with reference sample. Temperature: 70 °C Duration: 05:00 min Performance Test Measurement Not Successfully Completed MA performance test Measurement canceled MA performance test y The message “Measurement canceled” appears. t Select l to confirm. y The display switches back to the menu. If a fault has been detected: y The message “Device is not OK” appears.
Calibration and Adjustment Calibration and Adjustment Background When and How Often During calibration, a calibration weight is used to determine how much the displayed value deviates from the actual measurement value. This deviation is compared against a preset target value. The subsequent adjustment corrects this deviation or reduces the permissible error limits. Calibration and adjustment are combined in one process in the moisture analyzer.
Calibration and Adjustment y The Settings menu appears. Settings t Select Calibration/Adjustment. Language Date and time Device information Calibration/Adjustment Printout Calibration/Adjustment MA performance test Weighing system adjustment t Select Weighing system adjustment. t Select CAL-Extern to calibrate the analyzer using an external calibration weight. Calibration report y The Calibration/Adjustment window appears. t Close the hood and select l to confirm. t The CAL-Extern window appears.
Calibration and Adjustment Viewing the Calibration Report Calibration/Adjustment MA performance test Weighing system adjustment Calibration report Calibration Report t To view the most recent calibration reports: Go to the Calibration/Adjustment menu and select the Calibration report submenu. Here you can select the most recent reports for the MA performance tests or weighing system adjustments and then access the most recent calibration reports, which are sorted by date.
Calibration and Adjustment Weighing The moisture analyzer also has a simple weighing function which can be opened via the system menu. t Select the i (Setup) key in the menu. y The Settings menu appears. Settings Language Date and time Device information Calibration/Adjustment Printout t Go to Calibration/Adjustment and select Weighing system adjustment. Calibration/Adjustment t Select Weighing only. MA performance test Weighing system adjustment Calibration report y The weighing screen appears.
ISO/GLP-compliant Printout ISO/GLP-compliant Printout Features You can have the device information, device ID, and the current date printed before (GLP header) and after (GLP footer) the values from the weighing series.
ISO/GLP-compliant Printout Example of Analysis Report -------------------2014-05-12 09:46 Sartorius Mod. MA37-1 SerNo. 0000037919 BAC: 00-53-01 APC: 01-80-01 DOC: 07-40-03 -------------------Type Standard drying Temperature 40 °C Standby Off Initial weight Off End Fully automatic Result display Moisture in %M Target value Off No. of filters 0 Start time 10:03 Start weight + 4.564 g Measurement time 01:15 min Result 8.16 %M Final weight + 4.
USB Interface USB Interface Communication with Peripheral Devices Purpose: The interface is used to exchange data with connected peripheral devices: Measured values and parameters are sent to a printer or PC. Control commands and data inputs can also be sent to the analyzer from connected devices such as a PC. The USB interface can be used to transmit data via the SBI protocol. The following connections to peripheral devices are possible: Sartorius order no.
USB Interface (1) USB Connection as PC Keyboard without Additional Driver via a PC with Table or Spreadsheet Editor (e.g., Microsoft® Office or OpenOffice) t Connect the moisture analyzer to your PC using the intended USB connection cable. t To open the system settings of the moisture analyzer, select i (Setup) in the menu. Device / Protocol t To open the PC spreadsheet format menu item on the moisture analyzer, go to USB port and select Device/Protocol.
USB Interface – When PC text format is set on the moisture analyzer, e.g. with Microsoft® Excel open t Activate the cursor in the PC application. t Then select a or n on the moisture analyzer for the respective data output.
USB Interface Connection with Sartorius Lab Printer YDP30, YDP40 Printer YDP30, YDP40 Off Printer equipment supplied 2) Mini-A USB Device (Slave) Type-B t Connect the moisture analyzer to the Sartorius printer using the supplied USB connection cable. y The moisture analyzer detects the printer automatically. No settings need to be changed. Connection for 9-pin RS-232 Configuration Printer YDP20-0CE USB-RS 232 SBI Off Sartorius order no.
USB Interface Output Format The characters are printed with the header. No more than 22 characters can be displayed in one line. Longer character sets are printed out on two lines. The printout is set to justified alignment. The following characters and abbreviations are used: Space _ A space is indicated with an underscore: Carriage Return CR Line Feed LF _ A carriage return (or line break) is abbreviated with “CR.” A line feed is abbreviated with “LF.
Error Messages Error Messages Certain events cause a message to appear on the display: 1. Some error messages are displayed for approx. 3 seconds (e.g., CAL-Extern: calibration canceled). 2. Some error messages are displayed until they are acknowledged by pressing a key (e.g., “Incorrect access code” in “Service access”). 3. Information messages are displayed until they are acknowledged by pressing a key.
Error Messages Calibration/Adjustment Error Messages “Weight is too low.” When a weight that is too light is placed during external calibration. “Weight is too high.” When a weight that is too heavy is placed during external calibration. “Not able to save cal. data.” When the memory is full. Information about Analyzer Maintenance “Maintenance interval expired.” When the maintenance date set by the Sartorius Service Center has been exceeded.
Shipping the Analyzer Shipping the Analyzer Please use the original packaging for shipping. You can order packaging from the Sartorius Service Center if necessary. Avoid shocks and vibrations. Prior to shipping, switch the analyzer to standby mode (see page 20) and then pull the plug. t Remove the following parts from the analyzer: – Disposable sample pan – Pan support t Place the analyzer in one side of the packaging.
Shipping the Analyzer t Then put the packaged analyzer into the cardboard box and seal the box.
Care and Maintenance Care and Maintenance Service To ensure its continued weighing accuracy, we recommend performing regular servicing on your analyzer at least once a year. The Sartorius Service Center offers different service contracts for this purpose, which can be individually adapted to suit your needs (see also www.sartorius.com/service). Each service produces a calibration certificate.
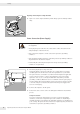
Care and Maintenance Contaminated Equipment: – Health risk from product contamination due to product deposits and the collection of residue with microbial contamination. – Health risk from biological or microbiological substances. – Observe cleaning specifications. – Check the cleaning result closely. Cleaning the Heating Module Danger of Burns: The inner part of the heating module and parts of the sample chamber may be extremely hot. Wait until the heating module has cooled completely.
Care and Maintenance 4) Clean the heating element and temperature sensor with a weak solvent such as ethanol. 5) If necessary, pull the air extractor grate out of the heating module. Then clean the heating module and grate in a dishwasher. 6) Once cleaning is complete, reassemble the heating module and reinstall in the analyzer, following the instructions in reverse order. The heating module must snap into place on the analyzer.
Care and Maintenance 2) Remove the “Locking socket (bayonet)” as in general view and sample chamber bottom from the analyzer and clean in a dishwasher. 3) After cleaning, fix the sample chamber bottom into place again on the analyzer using the “Locking socket (bayonet)” as in general view.
Disposal Disposal The packaging is made of environmentally friendly materials that can be used as secondary raw materials. If you no longer require the packaging, you can dispose of it free of charge in Germany through the VfW dual system (contract number D-59101-2009-1129). Otherwise you should dispose of the material in accordance with the waste disposal regulations that are applicable in your area. The equipment, including accessories and batteries, does not belong in your regular household waste.
Specifications Specifications Dryer Functions MA37-1 Temperature range and settings 40°C–160°C, in increments of 1°C; stand-by temperature selectable from 40–100°C Sample heating Infrared heating using a metal tube heater Heating programs Standard drying, gentle drying Switch-off criterion Optional: – Fully automatic – Semi-automatic mg (1–50 mg/5–300 s) – Semi-automatic % (0.1–5.0%/5–300 s) – Time (2:00–99.59 min.
Accessories Accessories Item Order no. Disposable sample pans, 80 pcs., aluminum, d 90 mm 6965542 Glass-fiber pad for analysis of pasty and fatty samples, hard quality, 80 pcs., d 90 mm 6906940 Glass-fiber pad for analysis of liquid and fatty samples, soft quality, 200 pcs.
Analyzer Dimensions Analyzer Dimensions MA37 All dimensions are given in millimeters 64 Operating Instructions Moisture Analyzer MA37
Declaration of Conformity Declaration of Conformity Operating Instructions Moisture Analyzer MA37 65
Certificate of Compliance Certificate of Compliance 66 Operating Instructions Moisture Analyzer MA37
Certificate of Compliance Operating Instructions Moisture Analyzer MA37 67
Certificate of Compliance 68 Operating Instructions Moisture Analyzer MA37
Sartorius Lab Instruments GmbH & Co. KG Weender Landstrasse 94–108 37075 Goettingen, Germany www.sartorius.com Copyright by Sartorius, Goettingen, Germany. No part of this publication may be reprinted or translated in any form or by any means without prior written permission from Sartorius. All rights reserved by Sartorius in accordance with copyright law. The information and figures contained in these instructions correspond to the version date specified below.