Installation Instructions Sartorius Model PMA600H (PMA.Touch Up) Electronic Paint-mixing Scales uc PMA.
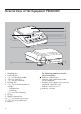
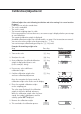
General View of the Equipment PMA600H 1 2 12 11 uc PMA.
Contents Intended Use General View of the Equipment . . . . . . 2 The PMA600H (PMA.Touch Up) is a specially designed portable scale for use in paint-mixing operations. The scale can be battery-operated or connected to the AC adapter. Intended Use . . . . . . . . . . . . . . . . . . . . 3 Warnings and Safety Precautions . . . . . 4 Getting Started . . . . . . . . . . . . . . . . . . 5 If required, Sartorius can supply a data interface for connecting the scale to a PC. Operation . . . . . . . . . . . .
Warnings and Safety Precautions – – – – – – 4 This scale meets the guidelines and standards governing electronic equipment, electromagnetic compatibility and the stipulated safety standards. Improper use or handling can result in property damage and/or personal injury. To prevent damage to the equipment, read these operating instructions thoroughly before using your scale. Keep these instructions in a safe place.
Getting Started § Remove the scale from its packaging. § After unpacking the scale, check it immediately for any visible damage as a result of rough handling during shipment. – – – – – PMA.Touc Equipment Supplied Weighing pan In-use dust cover Scale Calibration weights AC adapter h up Setting Up the Scale Choose a suitable place to set up the scale. Avoid exposure to drafts, heat, moisture and vibration. Make sure to read the instructions carefully before connecting the scale to AC power.
Connection to AC Power The equipment is powered through the AC adapter supplied. !Observe the safety precautions and warnings in this manual. Make sure the voltage rating of the AC adapter matches that of your local line voltage (mains supply). If it does not match your local voltage rating or if the plug design differs from your local standard, contact your Sartorius office or dealer. Use only original Sartorius AC adapters.
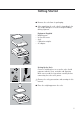
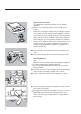
Leveling the PMA.Touch Up R L § Level the PMA.Touch Up each time you set it up R in a new location. Example: The air bubble must move from the lower-right to the center position. L § As shown in the illustration, turn the leveling feet until the air bubble is centered within the circle of the level indicator. > In general, several leveling steps will be necessary. PMA.Touc h up R L Calibration Weights § Turn the tab of the weight compartment and pull out the compartment.
Operation – § § $ $ $ Basic Weighing Functions Features Zeroing/taring the scale: You can zero/tare the scale within the entire weighing range. Preparation Switch on the scale: press the e key If necessary, zero/tare the scale: press the t key Change the menu settings, if necessary: see the chapter entitled “Menu Settings" Load factory settings, if necessary: see “Parameter 9. – 1" in the chapter entitled “Menu Settings," Additional functions: Turning off the scale: press the e key Function Keys PMA.
Calibration/Adjustment Calibrate/adjust the scale following installation and after moving it to a new location. Features: Calibration can only be started when: – The scale is unloaded – The scale is tared – The internal weighing signal is stable If these prerequisites have not been met, an error message is displayed when you attempt to start calibration. The required calibration weight is displayed. Standard calibration weights for selected models: see page 7 for instructions on removal.
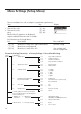
Menu Settings (Setup Menu) You can configure the scale to adapt it to particular requirements. Step Key Display 1. Turn off the scale 2.
Troubleshooting Guide Error messages are displayed for approximately 2 seconds, after which the program automatically returns to the weighing mode.
Care and Maintenance Cleaning ! Unplug the AC adapter from the wall outlet (mains supply). If you have a data cable connected to the interface, unplug it from the scale. ! Do not use caustic agents, concentrated acids or pure alcohol. $ Make sure that no liquid enters the scale housing. $ Clean the scale using either a brush or a soft, dry, lint-free cloth. Storage and Shipping Conditions $ To ensure safe shipment, your scale has been packaged using environmentallyfriendly materials.
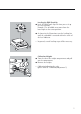
§ Remove the screw and remove the pan support. PMA.Touc h up § Replace the soiled in-use dust cover and ensure that the adhesive points on the new cover properly adhere to the scale's surface. The dust cover must be firmly attached. PMA.Touc Important Note: If the dust cover does not adhere to the scale, weighing results may be distorted. h up § Replace and refasten the pan support. PMA.Touc h up § Position the weighing pan. PMA.
Recycling Information and Instructions on Disposal and Repairs In Germany and many other countries (see www.sartorius.com, Service Download area for details), Sartorius or the organization contracted by us takes care of the proper return and legally compliant disposal of its electrical and electronic equipment on its own. These products may not be placed with the household waste or brought to collection centers run by local public disposal operations – not even by small commercial operators.
Data Interface (Options) Installation § Disconnect the power supply: Unplug the AC adapter from the wall socket (mains). § Turn the balance/scale on its side. ! To avoid damaging the weighing system, do not turn the balance/scale over so that it rests on the weighing pan/load plate. § Push out the panel on the bottom of the balance/scale. § Insert the interface. § Make sure the interface snaps into place. § Guide the cable through the channel/raceway.
Intended Use of YADAP-USB Adapter This USB interface adapter is a solution that enables direct connection of the balance/scale to a computer on the USB (universal serial bus) port. The USB interface is implemented as a virtual serial interface over RS-232 (virtual COM port). For the application program running on the computer, there is no difference whether the serial interface is installed in the PC or enabled in the form of a virtual interface. The interface offers the same capabilities in either case.
Installing the Software Driver § Run the Installation Wizard for the driver. § Open the settings for the USB serial port in Windows®: – START > My Computer > Control Panel – System > Hardware > Device Manager § Follow the instructions that appear. § Open the Connections submenu. § To complete the installation, click on Finish. § Double-click on USB Serial Port. $ The virtual interface is ready for use. § Select Port Settings > Advanced.
Pin Assignment Chart: YADAP-RS 5 1 9 6 Female Interface Connector: 9-contact D-Submini (DB9) with screw lock hardware for cable gland, for direct connection to a computer or an optional Sartorius printer (PC compatible).
Parameter Settings – Interface Port (Overview) Intended Purpose Configuration of the scale and its interface port; i.e., to meet individual requirements by selecting from among predefined parameters in the Setup menu.
Specifications Model Weighing capacity Readability Tare range (subtractive) Max. linearity Stability range Adaptation to ambient conditions Allowable ambient operating temperature range Weighing pan Net weight, approx. Calibration weights, 2 (in the weight compartment) Power consumption (average) Interface port (optional) Format: Parity: Transmission rates Handshake AC power source Frequency Hours of operation, approximate: – Alkaline batteries (8 size AA ) – Fully charged rechargeable batteries.
Accessories In-use dust cover Interface port, installation kit RS-232 interface with cable (2 m) or USB interface with cable (2 m) Carrying case Anti-theft locking device Calibration weights, universal (for weight compartment in scale) (100 g, F1) Weighing pan, square Feet: Set 1 leveling foot with 1 fixed foot Set of covers for : – Battery compartment – Interface port – Weight compartment YDC-02PMA YADAP-RS YADAP-USB Upon request LC-1 69V0007 Upon request Upon request Upon request 21
Sartorius Weighing Technology GmbH Weender Landstrasse 94–108 37075 Goettingen, Germany Phone +49.551.308.0 Fax +49.551.308.3289 www.sartorius.com Copyright by Sartorius, Goettingen, Germany. All rights reserved. No part of this publication may be reprinted or translated in any form or by any means without the prior written permission of Sartorius. The status of the information, specifications and illustrations in this manual is indicated by the date given below.