User Manual Secura®, Quintix®, Practum® Laboratory Balances 98648-019-43
Contents Contents Contents. . . . . . . . . . . . . . . . . . . . . . . . . . . . . . . . . . . . . 2 User Information . . . . . . . . . . . . . . . . . . . . . . . . . . . . . . 3 Safety Instructions . . . . . . . . . . . . . . . . . . . . . . . . . . . . . 5 Intended Use . . . . . . . . . . . . . . . . . . . . . . . . . . . . . . . . . 6 Getting Started . . . . . . . . . . . . . . . . . . . . . . . . . . . . . . . Unpacking and Equipment Supplied . . . . . . . . . . . . . . . .
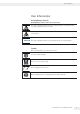
User Information User Information Warning/Danger Symbols Warning/danger symbols used in these instructions: This symbol identifies hazards that have a high probability of resulting in death or serious physical injury if not avoided. This symbol identifies hazards that can result in moderate or mild injuries if not avoided. This symbol identifies hazards associated with the risk of material damage.
User Information The following symbols are used in these instructions: t Indicates a required action y Describes what happens after you have performed a particular step 1. 2. 3. – Perform steps in the specified order: First action Second action … Indicates an item in a list Conventions for this user manual: – The figures in this manual are based on “standard” balances. Some displays and printouts shown in the figures may differ from those of verified balances.
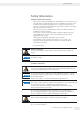
Safety Information Safety Information Guidelines and General Information – The balance complies with EU Directives and standards for electrical safety and electromagnetic compatibility.* Improper use or handling can, however, result in damage and/or injury. Any improper use or operation of the balance, i.e., that is not consistent with the instructions, will result in forfeiture of all claims under the manufacturer's warranty.
Safety Information Hazards during Installation and Operation If glass breaks, there is a risk of injury posed by cuts on glass edges. Lay the cables where they pose no risk of causing someone to trip. Observe the additional safety and danger information in the following chapters. Intended Use This high-resolution balance is designed and intended for use only in laboratories and indoor areas under normal atmospheric conditions.
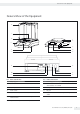
General View of the Equipment General View of the Equipment 13 1 12 1 2 5 3 4 4 3 5 11 6 10 7 9 8 Pos. Name and Function Pos. Name and Function 1 Weighing pan 8 Fastening point for an optional “Kensington” key lock 2 Shield disk 9 Menu access switch: locks various functions and units when balances are verified 3 Leveling feet 10 USB port for mini AB 4 Touch screen 11 DC jack 5 Level indicator (Quintix® and Practum® models) 12 Secura® models with readability of 0.
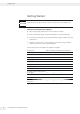
Getting Started Getting Started The balance must be disconnected from the mains power for all assembly work. Unpacking and Equipment Supplied t Open the packaging, making sure to remove all parts carefully. t After unpacking the device, check it immediately for any external damage. y If you detect any damage, proceed as directed in the chapter entitled “Care and maintenance.” y Save the box and all parts of the packaging for any future transport.
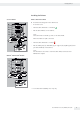
Getting Started Installing the Balance Secura® Models: Balance with Draft Shield t Install the following parts in the order listed: – In-use dust cover – Turn the draft shield lock to “unlocked” – Put the draft shield (1) on the balance. . Note: Use both hands to hold the top struts of the draft shield. Move the side doors right to the back. – Turn the draft shield lock to “locked” .
Getting Started Inserting (or Removing) Glass Panels 1) Holding it by its rear edge, pull the draft shield cover up and remove it. 2) Push the three glass panels into the draft shield guide, all the way to the front. 3) Then replace the draft shield cover. In doing so, the draft shield cover must lock into position.
Getting Started Choosing a Location t Select the right setup location: – Set up the device on a stable, even surface that is not exposed to vibrations (e.g., weighing stone). – Maintain free access to the device at all times.
Getting Started Power Connection (Power Supply) AC Adaptor Assembly Using the wrong power plug adaptors may cause fatal electric shock and damage the equipment. Never insert the power plug adaptor separately from the AC adaptor in the socket (danger of electric shock). t Use the right power plug adaptor for your mains power supply.
Getting Started Removing/Replacing the AC Adaptor t Unlock (1) the AC adaptor and then detach (2) it. Power Connection/Safety Precautions – Only use original Sartorius AC adaptors. The AC adaptor has an IP rating of IP40 in accordance with EN 60529. – Make sure that the voltage rating printed on the manufacturer's ID label is identical to that of your local mains voltage.
Getting Started Leveling The balance must be level to ensure precise weighing results. Leveling the balance compensates for slant or unevenness at the place of installation by twisting the front leveling feet of the balance. The balance needs to be re-leveled and adjusted each time its setup location is changed.
Getting Started Leveling with a Conventional Level Indicator (Quintix® and Practum®) The Quintix® and Practum® models are fitted with a conventional level indicator. This is located to the left of the display. The position of the air bubble in the indicator shows whether or not the balance is correctly leveled. t Twist both of the front leveling feet of the balance to move the air bubble so that it is centered in the circular marking.
Getting Started Below-balance Weighing A port for a below-balance weighing hook is located on the bottom of the balance. Install a draft protection shield. t Lift cover plate out of the bottom of the balance. When doing this, put the balance to one side and not on the weighing pan side. Placing the balance on the weighing pan side may lead to measurement inaccuracies and damage to the balance! t Attach a wire (or similar) to the sample and hang it on the notched hook.
Getting Started Anti-theft Locking Device t A “Kensington” key lock cable can be installed at the fastening point on the back of the balance if required. t The balance can also be secured in place at the installation location with a chain or lock, for example.
Moving the Balance Moving the Balance Moving the Balance over Short Distances in the Lab Avoid glass breakage, shocks, and vibrations: Never lift or carry the balance when holding it by its draft shield! t Hold the balance under the housing, lift it up carefully, and carry it to its new location. The balance needs to be re-leveled and calibrated each time its setup location is changed.
Using the Balance Using the Balance Switching the Balance On/Off (Standby) Max 2100 g d=0.01 g 0.00 y The Leveling screen is displayed first after any model is switched on. Level the balance if necessary. The actual weighing screen is only displayed after confirmation. – – – – When the balance is switched on, the following message appears on the display: Secura®: Level The balance has been leveled (if leveled). Quintix® and Practum®: Level Please check leveling.
Using the Balance Setting the Language The display text is given in English as a default. To change the language, proceed as follows: t In the Weighing screen, select the Menu key at the bottom left of the display. y The menu is displayed. Weighing Statistics Mixing Components t Select the i button (Setup) in the menu. Settings Language y The Settings window appears. t Select Language or the top entry in the list.
Using the Balance Operating Concept This section describes the operational possibilities of your balance. Operating and Display Elements on the Display Sharp or pointed instruments (such as ballpoint pens) can damage the device. – The touch screen should only be operated by lightly touching it with your fingertips. This can be done while wearing laboratory gloves. 1 13 12 11 10 9 Max 220 g LEVEL Net G + d=0.0001 g 41.9765 2 3 4 5 SQmin 3.
Using the Balance The Menu All balance application and settings can be accessed via the balance menu. t To access the menu, select the Menu key located at the bottom left of the display in any application. y The menu appears.
Using the Balance Enter Figures on the Keypad Min + 0000000 g 1 2 3 4 5 6 7 8 9 +/- 0 . C Numerical values can be entered for many applications or system settings (such as a minimum value for the Checkweighing application). A keypad appears on the display, which can be used for this purpose. t To enter numbers or values, touch the corresponding numbers in order. The entered numbers appear at the top of the display. t To correct the most recent number, select k. The number is deleted.
Using the Balance Accessing an Application in the Menu The right-hand side of the display shows available applications for various weighing tasks which can be carried out with the balance. You can scroll up and down through the menu to select the desired application. Weighing Statistics Mixing Components Density Percentage Weighing Mixing Statistics Density t To scroll through the menu, place a finger on the display and drag it slowly up or down.
Using the Balance Statistics (Secura® and Quintix® only; see page 46) Use this application to save weight and calculated values and statistically analyze them. You can save up to 99 components. Components (Secura® and Quintix® only; see page 49) Totalize weight values. You can save up to 99 components that are weighed in various individual containers. Each container can be tared before each component is weighed.
System Settings (Setup Menu) System Settings (Setup Menu) The Settings (Setup menu) contain all basic settings for the balance. Not all functions/settings are available on verified balances. Accessing the Menu and Changing Settings t Select the Menu key in any application. y The menu appears. Weighing Statistics Mixing Components t To access the balance system settings, select i (Setup) in the menu. Settings y The Settings (Setup menu) appear.
System Settings (Setup Menu) List of Available Settings This section contains information on all basic balance settings which can be defined in the Settings menu. Language Set the display language here. English is the default language (see “Setting the Language” on page 20).
System Settings (Setup Menu) Device Information Device information Manufacturer: Model: Serial number: Version BAC: Version APC: Sartorius SECURA2102 0012345678 00-50-02.xx CN:1701 01-70-02.xx CN:6587 The manufacturer, model, serial number, and software version of your balance are displayed here. Calibration/Adjustment Calibration/Adjustment isoCAL Calibration report With Secura® models, it is possible to set how the automatic calibration/adjustment function isoCAL is started.
System Settings (Setup Menu) Safety Level The Secura® models monitor the following at all times: – whether the balance is leveled correctly – whether adjustment is necessary – whether minimum sample quantity requirements are met according to USP.
System Settings (Setup Menu) Ambient conditions menu option: t Choose whether the conditions at the balance location are Stable or Unstable. If Unstable is selected, adverse ambient conditions (drafts, vibrations) are filtered by changing the measurement time for the weight values. Application menu option: t Choose whether the balance will be used for Weighing or Dosing. This setting is used to compensate for load fluctuations on the display.
System Settings (Setup Menu) Printout Printout Printout Manual print Automatic print Configure the settings for printing and data output here. Some of these settings depend on the USB port configuration (see “USB Port” on page 33). Printout menu option: t Define the settings for outputting logs and reports to a connected lab printer. – Manual: The data is printed out when a is selected in the application. – Automatic: The data is printed out automatically.
System Settings (Setup Menu) Identifier (Secura® only) Identifier Set device ID Set additional ID Batch ID function Sample ID function Define identifiers for the printout via the g button and in the ISO/GLP printout here. Under Printout in Manual print, the ISO/GLP printout option must be activated. IDs can be a maximum 14 characters long. Set device ID menu option: The device identification (ID) is printed in the header of the GLP printout.
System Settings (Setup Menu) USB Port USB port Define the settings for data transmission to a peripheral device (e.g. a printer or PC) here. Device / Protocol RS232 Configuration Spreadsheet Keyboard emulation In legal metrology data can be transmitted to a PC and used with an Alibi memory. The balance does not have its own Alibi memory. Connection to a printer or Alibi printer is permitted. Various options are available in the menu depending on the cable and peripheral device connected to the balance.
System Settings (Setup Menu) Additional menu option if “PC spreadsheet format” has been selected: In Spreadsheet menu option: – Decimal markers: – Decimal point (factory setting): The numerical value is copied to the PC program with a decimal point (e.g. 99.963 g). – Decimal comma: The value is copied to the PC program with a decimal comma (e.g. 99,963 g).
System Settings (Setup Menu) 2) Connection with Sartorius lab printer via the supplied printer cable Device / Protocol menu option: t Select the desired setting for connection to the printer. – YDP30 | YDP40: The connected printer is automatically detected and the connection is established. – Off: The connection to the printer is deactivated.
System Settings (Setup Menu) More Settings More settings Additional service functions for the balance can be found here. Set password Set password menu option (Secura® only): Reset settings Secura® models can be password-protected to prevent unauthorized personnel from making changes to the system settings of the balance. When a user password is set, all settings which could change the metrological behavior of the balance are locked. t Select t. t Enter a number as a password.
System Settings (Setup Menu) Lock Menu (Quintix® and Practum®) Use this function to lock or unlock the menu. t Hold down the Menu key for longer than 10 seconds. t Confirm with Lock. Supervisor lock Lock menu? Lock Accessing the menu or unlocking it again: t Hold down the Menu key for longer than 10 seconds. t Then select the required function.
Weighing Weighing Purpose: Use this application to determine the weight of a sample within the device's specific weighing range (see “Specifications”). t Select the Menu key in any application. t Select the Weighing symbol in the menu. y The Weighing application appears. Max 2100 g d=0.01 g 0.00 Zero t Remove the load from the balance. t Select A to zero the balance. All weight values are measured based on this zero point (zeroing within ± 2% of the weighing range around the zero point).
Weighing Mass Unit Conversion Purpose: Configure the weight unit and accuracy of the weight value. Not all units can be selected on balances used for legal metrology. The user can only switch between metric units (milligram, gram, kilogram). t To switch to another unit, select the Unit button on the weighing display. y The Unit / Accuracy menu appears. Unit / Accuracy g All digits on kg Last digit autom. off ct Last digit off lb Reduced by 2 digits The left list contains the available units.
Weighing Conversion Factors for Weight Units The table contains common weight units and their conversion factors in relation to the gram. The balance can work in the following units as and when needed (with verified balances, this is only possible if the local Verification Act permits this): Unit Factor Gram 1.00000000000 g Kilogram 0.00100000000 kg Carat 5.00000000000 ct Pound 0.00220462260 lb Ounce 0.03527396200 oz Troy ounce 0.03215074700 ozt Hong Kong tael 0.
Weighing SQmin Minimum Weighing (Secura® only) Purpose: This function is used to compare the weight value with the defined minimum sample quantity (SQmin = sample quantity minimum). This ensures that weighing results are above the specified minimum weight defined by your quality assurance system. This function is used to observe the minimum weight in order to meet the criteria of the United States Pharmacopeia (USP), for example. SQmin is not the same as the minimum capacity Min in legal metrology.
Weighing Individual Identifiers (Secura® only) Purpose: Prerequisites: You can define identifiers for the following print jobs: – Device identification (ID): printed in header of GLP printout. – Additional ID (A ID): printed in header of GLP printout. – Batch ID (L ID): queried after each GLP head in GLP printout at beginning of measurement. – Sample ID (S ID): for printouts via the g button. This ID is queried before each printout.
Mixing (Secura® and Quintix® only) Mixing (Secura® and Quintix® only) Purpose: Use this application to weigh up to 99 components one after the other for a mixture or formula in one container. The balance is automatically tared after each component is weighed. The weight value of an individual component or the total weight can be displayed as desired. Example: You want to weigh several components of a formula in one container. t Select the Menu key in any application.
Mixing (Secura® and Quintix® only) t Place the first component on the weighing pan. y The weight value is displayed. Max 2100 g Net + d=0.01 g 14.33 Component 1 t To save the component, select v. y The component is saved, and the balance is automatically tared. Max 2100 g Net1 d=0.01 g 0.00 Component 2 END t Place the next component on the weighing pan. t To save the component, select v. t Continue this procedure with additional formula components.
Mixing (Secura® and Quintix® only) Net1 t To view the total weight, select the Net1/Total button on the weighing display. y The total weight is displayed. Max 2100 g Total + d=0.01 g 26.28 Component 3 END Total t To change back to viewing the individual weights of each component, select the Net1/Total button again. t To exit the function, select x. y The total weight is displayed and the application switches back to its original state. Printing Results Prerequisites: Max 2100 g Net + d=0.
Statistics (Secura® and Quintix® only) Statistics (Secura® and Quintix® only) Purpose: Prerequisites: Save weight values and statistically evaluate them. You can save up to 99 components. The values are generated as results: – Number of components – Average – Standard deviation – Variation coefficient – Sum of all values – Lowest value (minimum) – Highest value (maximum) – Spread: Difference between maximum and minimum For printouts, a printer must be connected and configured (see “USB Port” on page 76).
Statistics (Secura® and Quintix® only) t Select D to tare. t Place the first component on the weighing pan. y The weight value is displayed. Max 2100 g Net + d=0.01 g 14.33 Component 1 t To save the component, select v. t Remove the first component from the weighing pan and place the next component on the balance. t To save the component, select v. t Continue this procedure with additional components. y The weight values of the saved components (Comp1, Comp2, etc.
Statistics (Secura® and Quintix® only) y The following values are displayed as an intermediate result: – Number of saved components – Average – Standard deviation – Variation coefficient – Sum of all values – Lowest value (minimum) – Highest value (maximum) – Spread: Difference between maximum and minimum Report Number of components: Average: Standard deviation: Variation coefficient: Total: Minimum: Maximum: Spread: n5 x 13.49 g s 3.60 g sRel 27 % Sum 67.47 g Min 8.47 g Max 18.30 g Diff 9.
Totalizing Components (Secura® and Quintix® only) Totalizing Components (Secura® and Quintix® only) Purpose: Totalize weight values. You can save up to 99 components. This allows you to save components that must be weighed in various containers. Each container can be tared before each component is weighed. Example: You have a formula, the components of which should not be mixed together immediately.
Totalizing Components (Secura® and Quintix® only) t Place the first component on the weighing pan. y The weight value is displayed. Max 2100 g Net + d=0.01 g 14.32 Component 1 t To save the component, select v. t Remove the load from the balance. t Place the container for the second component on the weighing pan. t Select D to tare. t Place the second component on the weighing pan. t To save the component, select v. y The weight value is displayed. Max 2100 g Sum + d=0.01 g 32.
Totalizing Components (Secura® and Quintix® only) t Continue this procedure with additional components. Net t To view the total weight, select the Net button on the weighing display. y The total weight of all saved components is displayed. Max 2100 g Sum + d=0.01 g 51.67 Component 4 END Sum t To switch back to view individual weights, select the Sum button. t To exit the function, select x. y The application returns to its original state. Printing Results Prerequisites: Max 2100 g Net + d=0.
Density Density Purpose: The density of solids can be determined using the buoyancy method. The density is determined using Archimedes' Principle. The upward buoyant force exerted on a body immersed in a fluid is equal to the weight of the fluid the body displaces.
Density Density of liquid 0.9982 g/cm t To change the density of the buoyancy liquid, select the gray button. 3 y The Density settings window appears. Density Density of liquid Accuracy 0.9982 0 0.9980 0.0 0.9978 0.00 t Enter the density of the buoyancy liquid on the left. Select a value or select t, enter the desired value, and confirm with l. t Select the accuracy of the density result on the right. t Select l to confirm. 0.
Density t To save the weight value, select v. t Remove the sample from the weighing pan and place it in the sample holder of the density determination kit using forceps. ! Ensure that the sample is completely submerged in the buoyancy liquid and that no air bubbles have formed on the sample. y The weighing display shows the step Weight in medium. Max 220 g Net + d=0.0001 g 4.4787 Weight in medium END t To save the weight value, select v.
Density Density Values of H2O at Temperature T (in °C) T/°C 0.0 0.1 0.2 0.3 0.4 0.5 0.6 0.7 0.8 0.9 10. 11. 12. 13. 14. 0.99973 0.99963 0.99953 0.99941 0.99927 0.99972 0.99962 0.99951 0.99939 0.99926 0.99971 0.99961 0.99950 0.99938 0.99924 0.99970 0.99960 0.99949 0.99937 0.99923 0.99969 0.99959 0.99948 0.99935 0.99922 0.99968 0.99958 0.99947 0.99934 0.99920 0.99967 0.99957 0.99946 0.99933 0.99919 0.99966 0.99956 0.99944 0.99931 0.99917 0.99965 0.99955 0.99943 0.99930 0.99916 0.99964 0.
Percentage Percentage Purpose: This application is used to determine the percentage share or the percentage difference of the sample related to a reference weight. t Select the Menu key in any application. t Select the Percentage symbol in the menu. Max 2100 g d=0.01 g y The Percentage application appears. The reference percentage is displayed under Reference (e.g., 10.0%). 0.00 Reference 10.0 % Reference 10.0 % t To change the reference percentage, select the gray button.
Percentage t Place the reference sample on the weighing pan. y The weight of the reference sample is displayed. Max 2100 g + d=0.01 g 14.32 Reference 10.0 % t Select w. Max 2100 g % + y The display shows the reference percentage. The weight of the reference sample is displayed under Reference weight. d=0.01 g t Remove the reference sample from the balance. 10.0 Reference weight 14.32 END t Place the unknown sample on the weighing pan.
Percentage % t To view the sample weight, select the % button on the weighing display. y The weight of the sample is displayed. Max 2100 g Net + d=0.01 g 143.28 Reference weight 14.32 END Net t To change back to viewing the percentage, select the Net button again. t Place additional samples on the weighing pan, if any, to calculate their percentages based on the reference sample. t To exit the function, select x. y The application returns to its original state.
Conversion (Secura® and Quintix® only) Conversion (Secura® and Quintix® only) Purpose: Use this application to multiply the weight value by a user-defined factor. Division is also possible if a factor of less than one is selected. The selected factor is saved to protected memory. Example: You want to calculate the weight per unit of a sheet of paper (DIN A4). To do so, proceed as follows: – The weight per unit (e.g., 80 g/m2) can be determined by dividing the weight by the surface.
Conversion (Secura® and Quintix® only) t Place the sample on the weighing pan. Max 2100 g Res + y The weight of the sample is multiplied by the entered factor, and the result is displayed. d=0.01 g 81.4 Factor END 16.03335 t Place additional samples on the weighing pan, if any, to multiply their weights by the entered factor. Res t To view the measured individual weight of the sample, select the Res button on the weighing display. y The individual weight of the sample is displayed.
Unstable Condition Unstable Condition Purpose: Use this application with moving samples (such as live animals) and for weighing in unstable environments. A measurement cycle is automatically carried out with a defined number of measurements for each object to be weighed. The individual measurements are averaged, and this average is displayed as the result. t Select the Menu key in any application. t Select the Unstable condition symbol in the menu.
Unstable Condition t Place the animal in the container. t If the start of measurement is set to Manual, select w. If the start of measurement is set to Auto, the measurement begins as soon as the individual weight values fall within the preset fluctuation range/instability. Max 2100 g + y The specified number of measurements is carried out. The average is calculated and displayed. d=0.01 g 349.21 Measurements END 5 t To view the current weight value, select the \ button on the weighing display.
Checkweighing Checkweighing Purpose: Use this application to check whether a weight value falls within the specified tolerances. This application also makes it easy to fill sample materials to a specified target weight. t Select the Menu key in any application. t Select the Checkweighing symbol in the menu. Max 2100 g d=0.01 g y The Checkweighing application appears. The set thresholds are displayed under Min and Max. 0.00 Min Max 0.00 g 0.00 g Min Max 0.00 g 0.
Checkweighing t Select D to tare. t Select w. t Place the sample on the weighing pan. Max 2100 g G + y The weight value is displayed. The colored bar indicates whether the weight value falls within the thresholds: – Yellow: The weight value is too low. – Green: The weight value is OK and falls within the specified range. – Red: The weight value is too high. d=0.01 g 193.19 Min Max 190.00 g 195.
Peak Hold Peak Hold Purpose: Use this application to calculate the maximum weight value of a sample (peak value). The value remains on the display for five seconds after the sample has been removed from the balance. Example: Use for measuring release force during an experiment, or use when a load is so big that the balance display is hidden from view during weighing. t Select the Menu key in any application. t Select the Peak hold symbol in the menu. y The Peak hold application appears.
Peak Hold Max 2100 g Hold + y The maximum measured weight value is displayed and kept as long as the sample remains on the balance. d=0.01 g 44.80 Apply END Hold t To display the current weight value, select the Hold button on the weighing display. y The current weight value is displayed. G t To change back to viewing the peak hold (max. value), select the G or possibly Net button again. t Remove the sample from the weighing pan.
Counting Counting Purpose: Use this application to determine the number of parts of approximately equal weight. The weight of a counted reference sample is calculated and then the objects with an unknown piece count are weighed. The balance displays the number of parts and the piece weight. Minimize counting errors: – Ensure that the weight of individual parts is evenly distributed. – Larger reference piece counts lead to a higher degree of accuracy. – Switch on Auto Reference Updating.
Counting t Select D to tare. t Place the set number of reference samples on the weighing pan. y The weight value is displayed. Max 2100 g + d=0.01 g 1.83 Reference 10 pcs t Select w. Max 2100 g y The weighing displays changes and shows the piece count. The average piece weight is shown on the weighing display. “Update automatically” setting: y If the balance is performing the automatic reference sample update, “Update” will display the new average piece weight. d=0.
Counting Qnt t To view the total weight of the sample, select the Qnt button on the weighing display. y The total weight of the sample is displayed. Max 2100 g Net + d=0.01 g 4.95 Piece weight 0.1834 END Net t To change back to viewing the piece count, select the Net button again. t To exit the function, select x. y The application returns to its original state. There is an online animation for this application.
Calibration and Adjustment Calibration and Adjustment Background During calibration, a calibration weight is used to determine how much the displayed value deviates from the actual measurement value. This deviation is compared to a specified desired value. Adjustment eliminates this deviation or reduces the permissible error limits. For Secura®, Quintix®, and Practum® models, calibration and adjustment are combined as one process. The balance is automatically adjusted after each calibration.
Calibration and Adjustment Calibration/Adjustment using an Internal Calibration Weight (Secura® and Quintix® only) The balance is fitted with an internal calibration weight in the housing. This calibration weight is automatically placed on the balance by a motor during internal calibration and adjustment. t Ensure that the balance is stable and the weighing pan is empty. t Select A to zero the balance. t Select the Menu key at the bottom left of the display in the current application. y The menu appears.
Calibration and Adjustment Calibration/Adjustment using an External Calibration Weight An external calibration weight is required for this function. Please note the tolerance of the calibration weight being used. In verified balances with accuracy class K, external calibration/adjustment is locked when the balances are used for legal metrology. Secura® and Quintix®: In verified balances with accuracy class k, external adjustment can only be accessed when the access switch is open.
Calibration and Adjustment Automatic Calibration/Adjustment with isoCAL Fully automatic calibration/adjustment ensures that the balance is automatically calibrated and adjusted when predefined time intervals or temperature values are exceeded. This function varies in different models: – Secura®: isoCAL is automatically carried out based on time or temperature, and each time the balance is leveled. This function can be switched off via the system settings (see “Calibration/Adjustment” on page 28).
ISO/GLP-compliant Printout ISO/GLP-compliant Printout Characteristics The device information, ID, and the current date can be printed before (GLP header) and after (GLP footer) the values from the weighing series. The following data is printed out: GLP Header: – Date/time at the start of a weighing series – Balance manufacturer – Balance model – Model serial number – Balance software version number (BAC) – Display software version number (APC) – Two identification numbers (ID and A ID) with max.
ISO/GLP-compliant Printout y The ISO/GLP printout can have the following lines (configuration using date/time “DD-MMM-YYYY” and “12h AM/PM”): -------------------09-Nov-2013 02:50 pm Sartorius Mod. Secura 5101 SerNo. 0027400115 BAC: 00-51-01 APC: 01-70-02 ID Device 1234 A ID Inv.-Nr. 11 -------------------L ID CH01 09-Nov-2013 02:50 pm S ID Tablette 4321 N + 10.9 g T + )5.6 g G# + 16.
USB Port USB Port Communication with Peripheral Devices Purpose: The interface is used to exchange data with connected peripheral devices: Measured values and calculated values can be output to a printer, PC, or second display; conversely, control commands and data inputs can be sent via connected devices (e.g., PC). The protocols SBI and xBPI can be transmitted via the USB port.
USB Port Direct Transfer of Data (PC) Prerequisites: – PC with operating system Windows 7, Vista, XP, or 2000 – USB connection cable “A to Mini B” from PC to balance, Sartorius order no. YCC04-D09 In legal metrology data can be transmitted to a PC and used with an Alibi memory. The balance does not have its own Alibi memory, Connection to a printer or Alibi printer is permitted. PC-SBI PC-xBPI PC spreadsheet format PC text format Off Sartorius order no.
USB Port y With the “PC spreadsheet format” setting on the balance, Microsoft Excel 2010 has the following display for the “Gross/ Tare/Net” example y With the “PC text format” on the balance, Microsoft Word 2010 has the following display for the “Gross/Tare/Net” example Additional Data Transmission Settings on the PC These settings are no longer required as of software version “APC 01-70-02.13” (from October 2013 onwards).
USB Port t Configure how Microsoft Excel treats numbers: In Excel, go to File – Options – Advanced – Editing options and set the following separators: – Decimal separator: Period – Thousand separator: Empty (none) t Configure the typographical quotation marks for OpenOffice Calc: In Calc, go to Tools – Autocorrect Options – Custom Quotes and set the following “Simple quotes”: – At the beginning of a word: empty space (U+200F) – At the end of a word: “ ‚ ” y The following displays appear after data is tra
USB Port – PC text format set on balance and Microsoft Word 2010 (example): Gross/Tare/Net (2) USB Connection: PC-SBI and PC-xBPI Operating Mode To use the balance as a slave device for the protocols PC-SBI and PC-xBPI, first install a USB driver on the connected PC. This driver can be located in the “Driver” folder on the balance. The balance is then operated via a virtual, serial interface (COM port).
USB Port t To install the installation program for the USB driver on the PC: Click on the appropriate removable data carrier (in this case, the E: drive) and then click on the Driver folder. t To select the Windows version: Click on the appropriate version of the PC. t Start the installation program InstallDriver.exe. t Follow the instructions from the installation program. y Function test: – Once the driver is installed, operating modes PC-SBI and PC-xBPI are available.
USB Port Connecting with Sartorius Lab Printer YDP30, YDP40 Printer YDP30, YDP40 Printer equipment supplied 2) Mini-A Off Device (Slave) Type-B t Connect the balance to the Sartorius printer using the supplied USB connection cable. y The balance detects the printer automatically. No settings need to be changed. Connections for RS-232 Configuration “9-Pin” Printer YDP 20-0CE Second display YRD03Z USB-RS 232 SBI USB-RS 232 xBPI Sartorius order no.
USB Port Interface Specification Data Output The data output can be activated either manually when a print command is received, automatically synchronized with the display, or at defined intervals (see application programs and autoprint settings). Data Output by Print Command Automatic Data Output The print command can be transmitted by pressing a or by a software command (Esc P). In autoprint mode, data is output to the data interface port without an extra print command.
USB Port Special Outputs Position 1 2 3 4 5 6 7 8 9 10 11 12 13 14 15 16 * * * * * * – – * * * * * * CR LF or * * * * * * L o w * * * * * CR LF or * * * * * * H i g h * * * * CR LF * –– Low High Space Final readout Underweight Overload Cal.Ext. Cal.Int.
USB Port Data Output Format with 22 Characters When data is output in this format, ID codes with six characters will precede data. These characters identify the subsequent value. Normal Operation 1 2 3 4 5 6 7 8 9 10 11 12 13 14 15 16 17 18 19 20 21 22 K K K K K K + A A A A A A A A A * E E E CR LF * * * * * * - . . . . . . . . .
USB Port Data Input Interface Commands (Commands) The computer connected via the data interface can send control commands to the balance to control its functions.
USB Port Overview of Interface Commands (Commands) Format Command Action/Function Comments 1 ESC P Print Corresp. to menu, with/ without stability 1 ESC T Tare or zero 1 ESC K Filter “Very stable conditions” 1 ESC L Filter “Stable conditions” Corresp. to menu setting “stable” 1 ESC M Filter “Unstable conditions” Corresp.
Status Messages Status Messages Messages appear on the display when certain events occur: – Info messages are displayed for two seconds. The program then returns automatically to its original state. – Error messages are displayed until they are acknowledged with a key. Key Fadeout To avoid operating errors, only the available functions/keys according to the weighing situation are shown.
Status Messages Calibration/Adjustment Error Messages “The balance needs to perform eCheck!” when eCheck is required. “The balance needs to be adjusted!” when isoCAL is required. “The balance needs to be leveled!” when leveling is required. “Weight is too light!” when a weight that is too light is placed on the balance during external calibration. “Weight is too heavy!” when a weight that is too heavy is placed on the balance during external calibration.
Transporting the Balance Transporting the Balance Please use the original packaging for shipping. Packaging can be ordered through the Sartorius Service Center if required. Avoid glass breakage, shocks, and vibrations: Never lift or carry the balance when holding it by its draft shield! Prior to shipping, switch the balance to standby mode (see page 93) and then pull the plug.
Transporting the Balance t Turn the draft shield lock to “unlocked.” t Next, remove the draft shield from the balance. t Insert the bottom part of the packaging into the box.
Transporting the Balance t Put packing pads over the glass panels. t Insert the AC adaptor from the cardboard box into the packing pad. t Put the top part of the packaging over the device parts. t Next, put the packaged balance into the cardboard box and seal the box.
Care and Maintenance Care and Maintenance Service To ensure the continued accuracy of your balance, we recommend scheduling regular servicing at least once a year. Sartorius Service offers different service contracts with maintenance intervals that are tailored to your needs (see www.sartorius.com/service). A calibration certificate should be issued as part of every maintenance session.
Care and Maintenance Do not clean the following parts with acetone or aggressive cleaning agents: control panel, mains plug, data interface, labels, verified seal, or any other plastic parts. t Wipe the balance with a soft, dry cloth after cleaning. Contaminated Equipment: – Health risks from product contamination due to product deposits and the collection of residue with microbial contaminations. – Health risk from biological or microbiological substances. – Observe cleaning specifications.
Care and Maintenance C) Remove the front and rear glass: 4) Lift the frame cover. 5) Pull the frame cover out. t Remove the Torx key up from the draft shield under the cover. 6) Turn the key approx. two times to loosen the Torx screws.
Care and Maintenance 7) Pull out the draft shield frame from the side of the guide and remove the draft shield frame by pulling up. 8) Pull out the front and rear glass panels (upwards).
Care and Maintenance Assembling the Draft Shield t Place the front and rear glass panels back into the guide. t Center the draft shield frame in the guide. t Press the draft shield frame down against the stop and secure it again with both Torx screws. t Assemble the rest of the components in reverse order: See Chapter “Getting Started – Installing the Balance.
Disposal Disposal The packaging consists of environmentally friendly materials that can serve as secondary raw materials. If the packaging is no longer required, it can be disposed of in Germany at no charge via the dual system of the company VfW (contract number D-59101-2009-1129). Otherwise, dispose of the material according to the applicable local regulations for waste disposal. The device, including accessories and batteries, should not be disposed of as household waste.
Specifications Specifications General Data AC Adaptor Sartorius AC adaptor module 6971790 with interchangeable country-specific plug-in AC adaptors Primary 100 – 240 V~, –10% / +10%, 50 – 60 Hz, 0.2 A Secondary 15 V DC, ± 5%, 530 mA (max.) / 8 Watt (max.): 0 to +40°C and 15 V DC, ± 5%, 330 mA (max.) / 5 Watt (max.
Specifications Model-specific Data Secura® Model 224 124 613 513 313 213 6102 5102 3102 2102 1102 612 Weighing capacity g 220 120 610 510 310 210 6100 5100 3100 2100 1100 610 Readability mg 0.1 0.1 1 1 1 1 10 10 10 10 10 10 Repeatability (standard deviation) mg 0.1 0.1 1 1 1 1 10 10 10 10 10 10 Linearity mg 0.2 0.2 2 2 2 2 20 20 20 20 20 20 Min. initial weight according to USP, typical g 0.12 0.12 1.5 1.5 1.5 1.
Specifications Quintix® Model 612 412 6101 5101 2101 6100 5100 410 6100 5100 2100 6100 5100 100 100 100 1000 1000 Weighing capacity g 610 Readability mg 10 Repeatability (standard deviation) mg 10 10 100 100 100 500 500 Linearity mg 30 30 300 300 300 1000 1000 Sensitivity drift between +10 to +30°C ± ppm/K 4 4 8 8 8 8 8 Typical stabilization time s 1.5 1.5 1.5 1.5 1.
Specifications Model-specific Data Verified Models with Country-specific Type Approval Certificate Secura® 224-1x 1) Model 124-1x 1) 613-1x 1) 513-1x 1) 313-1x 1) 213-1x 1) 6102-1x 1) 5102-1x 1) 3102-1x 1) Accuracy class k k K K K K K K K Type 2) SQP-A SQP-A SQP-B SQP-B SQP-B SQP-B SQP-C SQP-C SQP-C Max g 220 120 610 510 310 210 6,100 5,100 3,100 Scale interval d mg 0.1 0.
Specifications Quintix® 224-1x 1) Model 124-1x 1) 64-1x 1) 613-1x 1) 513-1x 1) 313-1x 1) 213-1x 1) 6102-1x 1) 5102-1x 1) Accuracy class k k k K K K K K K Type 2) SQP-A SQP-A SQP-A SQP-B SQP-B SQP-B SQP-B SQP-C SQP-C Max g 220 120 60 610 510 310 210 6,100 5,100 Scale interval d mg 0.1 0.1 0.1 1 1 1 1 10 10 Verification scale interval e mg 1 1 1 10 10 10 10 100 100 Min mg 10 10 10 20 20 20 20 500 500 Tare (subtractive) < 100% of max.
Specifications Practum® 224-1x 1) Model 124-1x 1) 64-1x 1) 613-1x 1) 513-1x 1) 313-1x 1) 213-1x 1) 3102-1x 1) 2102-1x 1) Accuracy class k k k K K K K K K Type 2) SQP-A SQP-A SQP-A SQP-B SQP-B SQP-B SQP-B SQP-C SQP-C Max g 220 120 60 610 510 310 210 3,100 2,100 Scale interval d mg 0.1 0.1 0.1 1 1 1 1 10 10 Verification scale interval e mg 1 1 1 10 10 10 10 100 100 Min mg 10 10 10 20 20 20 20 500 500 ) 100% of the max.
Accessories (Options) Accessories (Options) General Battery set for standard laboratory balances YRB11Z Draft shield for precision balances YDS01SQP In-use dust cover for analytical balances 6960SE01 In-use dust cover for precision balances 6960SE02 Dust cover for analytical balances with draft shield 6960SE03 Certification of USP minimum sample quantity 84CGNA Printers and Communication Premium GLP laboratory printer – Printer paper for GLP laboratory printer – Continuous labels for GLP labora
Balance Dimensions Balance Dimensions Secura® models with readability of 0.
Balance Dimensions Quintix® and Practum® models with readability of 0.
Balance Dimensions Models with readability of 1 mg All dimensions are given in millimeters 108 User Manual for Secura, Quintix, Practum
Balance Dimensions Models with readability of > 10 mg All dimensions are given in millimeters User Manual for Secura, Quintix, Practum 109
:8 9ZXaVgVi^dc d[ 8dc[dgb^in For verified balances, the conformity declaration supplied with the balance is valid for use in the EEA. Please retain this declaration.
EC Type-approval Certificate User Manual for Secura, Quintix, Practum 111
Plates and Markings 112 User Manual for Secura, Quintix, Practum
Plates and Markings User Manual for Secura, Quintix, Practum 113
Sartorius Lab Instruments GmbH & Co. KG Weender Landstrasse 94–108 37075 Goettingen, Germany www.sartorius.com Copyright by Sartorius, Goettingen, Germany. No part of this publication may be reprinted or translated in any form or by any means without prior written permission from Sartorius. All rights reserved. The status of the information, specifications, and illustrations in this manual is indicated by the date given below.