98647- 001-33 Sartorius YDP 03-0CE Data Printer Operating Instructions 1
Contents Intended Use ..................................................... 4 Safety Precautions ............................................. 5 Installation ........................................................ 6 Operation ......................................................... 9 Printing the Data of the Connected Weighing Instrument ......................... 10 Statistical Evaluation of the Data ......................... 11 Use in Legal Metrology in the EU ........................
Intended Use Model YDP 03-0CE is a data printer designed to receive weighing data from a connected weighing instrument and to print them on plain paper (roll width: 57.5 mm). Text and data are printed with up to 24 characters per line. This data printer is equipped with a real-time clock. After the printer has been configured according to the required settings, it is suitable for use in legal metrology.
Safety Precautions The data printer complies with the EC Directives and Standards for electrical equipment and electromagnetic compatibility. Use only rechargeable AA batteries of the following type: nickel-cadmium UM-3, order no. 69Y03136. Avoid draining the batteries excessively; otherwise, this will reduce their recharging capacity. Used batteries are hazardous waste and must be properly disposed of according to your local hazardous waste disposal regulations.
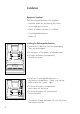
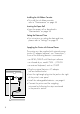
Installation Equipment Supplied The following components are supplied: – Interface cable for connecting the printer to a weighing instrument – Black ink ribbon cassette (is installed) – 4 rechargeable batteries – Paper roll Installing the Rechargeable Batteries • Remove the 4 batteries from the packaging (they are discharged) • Lift the cover of the paper roll compartment • To open the battery compartment, tilt back the cover • Install the 4 rechargeable batteries in the battery compartment.
Connecting the Data Printer to a Weighing Instrument • Connect the interface cable to the printer and the weighing instrument you are using. Secure the connection.
Installing the Ink Ribbon Cassette • To install the ink ribbon cassette, refer to “Maintenance” on page 33 Inserting the Paper Roll • Insert the paper roll as described in “Maintenance” on page 33 Setting the Date and Time • For instructions on setting the date and time, please refer to “Settings” on page 21 Supplying the Printer with External Power The printer must be supplied with external power via an AC adapter (optional, see “Accessories”), if one of the following devices is connected: – an MP8-1/MP8-2
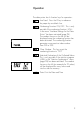
Operation The data printer has 6 function keys for operation: : Line Feed. Press the LF key to advance the paper by one blank line. : Numbering Function ON/OFF. This is only possible if the numbering function ( -p4-) in the menu “Interface Settings for the Data Printer” has been activated (page 24). The readout shown on the left will be displayed once the numbering function has been activated. The numbering function generates a consecutive index number from 001 to 999. : Clear Number.
: Prints the values or reads them into the statistics memory: Prints the data of the connected weighing instrument without statistics With the statistics program (-a3- page 29): Data Transfer in Manual Mode: In this mode, the current data are transferred from the weighing instrument and read into the statistics memory. (The printing function can be turned either on or off). Data Transfer in Automatic Mode: In this mode, printouts are started automatically.
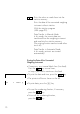
Statistical Evaluation of the Data The printer’s built-in statistics program can process all values that are computed or weighed and transferred from an on-line weighing instrument. To use this function, you must activate the statistics program (-a3-) in the “Statistics Applications” menu (see “Settings”). When the program is activated, the code shown on the right will appear each time (approx. 0.5 sec.) to indicate that a particular value is being read into the statistics memory.
Printing Individual Values All values upon which the statistical evaluation is to be based will be printed out if you set the “Statistics Applications” menu as follows: – Printout of the statistic program values = 1 (-a4-) (Factory setting = 1: all values will be printed) If you now deactivate the numbering function by key, the individual values will not pressing the be printed. They will be read into the statistics memory. The counter on the display will increase by 1 for each value.
Data Transfer and Statistical Evaluation in the Manual Mode Required Printer Configuration You must set the following printer configuration in the “Statistics Applications” menu: – Statistics program = 1 (-a3-) (Factory setting = 1) The symbol shown on the left will be displayed – Data printout = 1 (-a4-) – Data transfer manual/automatic = 0 (-p5-).
If you have deactivated the automatic taring function (-a2-): 123456789012345678901234 001: 002: 003: + + + 123.6 117.8 119.
Data Transfer and Statistical Evaluation in the Automatic Mode Data Transfer The first value transferred must be greater than 30 scale intervals of the weighing instrument’s display (e.g., > 3.0 g, if the weighing instrument displays decigrams). The weighing instrument must display a stability symbol (fluctuation > 1 scale interval). The first value read into the statistics memory is used as the reference value for the statistics.
Recording and Evaluating Data key to clear the statistics memory • Press the prior to initial data transfer > Any previous values remaining will be evaluated first, then you will obtain a printout of the statistics. The statistics will be deleted. • Place the first sample on the weighing pan • To activate data transfer, press the p key > The readout shown on the left will appear > “STAT” will be displayed for approx. 0.5 sec.
123456789012345678901234 n x s srel x min max Diff 12-DEC-95 12 99.8 3.55 3.57 1203.4 96.0 103.2 7.2 g g % g g g g 16:02:11 • To record consecutive weighing operations, follow the steps mentioned above.
123456789012345678901234 SARTORIUS Model BP6100 S/N 040240772 Id Date : 22-May-95 Start: 10:25:14 Ser. : 001: + 9.81 g 123456789012345678901234 002: + 10.13 g 123456789012345678901234 n X x min max 12 9.98 120.34 9.60 10.32 End : Name : 18 10:31:56 g g g g > The example on the left shows a printout with an ISO/GLP header, which is only printed in the manual data transfer mode.
Use in Legal Metrology in the EU and the Signatories of the Agreement on the EEA The German Federal Institute of Physics and Metrology (PTB) has issued an independent test certificate, number D09-96.15, for the YDP03-0CE. Based on this certificate, the printer is allowed to be used in legal metrological applications in the EU and the EEA, provided that the printer is operated with weighing instruments verified for such use by an EC or national type-approval certificate.
ISO/GLP-compliant Data Printout To obtain an ISO/GLP*-compliant data printout, the following information must head each data printout of every measurement: 123456789012345678901234 Sartorius Model BP210D S/N 040500046 Id -------------------Date : 30-May-95 Start: 10:05:30 Cal. : Extern Set. : 200.
Settings Setting the Date and Time Select the “Set Date and Time” mode in one of two ways: 1) Turn on the data printer and the weighing instrument When all display segments are lit, • press the key or 2) During operation, • press the key for at least 5 seconds > You will obtain the readout shown on the left, which stands for the hour (HH) You can also exit the “Set Date and Time” mode during any of the following steps: o To exit the mode, press the depending on the menu level key, You can also return to
• To store the setting, press the key > You will obtain a readout as shown in the example on the left.
Configuring an ISO/GLP-compliant Data Printout Select the “Statistics Applications” menu in one of two ways: 1) Turn on the data printer and the weighing instrument When all display segments are lit, • press the key; or 2) During operation, • press the key for at least 5 seconds > You will obtain the readout shown on the left 123456789012345678901234 SARTORIUS Model BP6100 S/N 040240772 Id 564 Date : Start: Ser.
Menu – Interface Settings for the Data Printer You can prevent the settings of this menu from being changed. To do so, enter a four-digit number (PIN number) that others cannot easily guess. If you lose or forget this number, please contact your local Sartorius Service Center for help. When the printer is turned on, all settings are read into the printer’s memory (EEPROM) and subsequently used during the operation.
1. 1stEbene Level 2. 2ndEbene Level 3. 3rdEbene Level beiprinter Druckerstart When is started cO de oder > 5sec. Sek.
Setting Options in the Menu “Interface Settings for the Data Printer” Designation Password Data transmission rate (baud rate) Parity RS-232C handshake Display Factory Setting code baud 1,200 Setting Options pary hand odd 0 100 … 9999 1,200; 2,400; 4,800; 9,600; 19,200 even, odd, 0, 1 0 = hardware, 1 = software Print using Print flush, right-/ left-hand margin Print Decimal points/commas Numbering function on/off Inverse printing -p1-p2- 1 0 0 = no, 1 = yes 0 = right, 1 = left -p3- 0 0 =
Entry of the user-defined text for the 1st and 2nd lines (Vartext1, Vartext2): • You will need a computer (PC) with a BASIC interpreter The following BASIC program is used to transfer text via the interface of a connected computer (PC). The BASIC interpreter already installed on the computer executes this program.
Menu – Settings for Statistics Applications When the printer is turned on, all settings are read into the printer’s memory (EEPROM) and subsequently used during operation. To access the “Statistics Applications” menu, – press the key when you start the printer; or – press the key for more than 5 seconds during operation The , , and keys then have the cursor functions indicated by the corresponding arrows.
Setting Options in the “Statistics Applications” Menu Designation GLP/GMP printout Automatic taring Statistics program Data printout Display Factory Setting -a11 -a20 -a31 -a41 Setting Options 0 0 0 0 = = = = no, 1 = no, 1 = no, 1 = no, 1 = yes yes yes yes Transfer index header for values to the statistics Print VARTEXT1 on statistics printout Print VARTEXT2 on statistics printout Print number of measurements -a5- 0 0 … 50 (details upon request) -s1- 0 0 = no, 1 = yes -s2- 0 0 = no, 1 = yes
Printing a Hard Copy of the Settings • To select the “Interface Settings for the Data Printer” menu, – hold down the p key when you start the printer; or – hold down the p key for more than 5 seconds during printer operation > You will obtain the readout shown on the left • To print the settings, press the p key 123456789012345678901234 Interface Settings Program Vers. 1.
Printing a Hard Copy of the Settings for the “Statistics Applications” Menu • To select the “Statistics Applications” menu, – hold down the the printer; or key when you start – hold down the key for more than 5 seconds during printer operation > You will obtain the readout shown on the left • To print the settings, press the p key 123456789012345678901234 Application Settings Program Vers. 1.09 xx C -----------------------A1:Mode ISO/GLP ON A2:Tare func.
Troubleshooting Guide Error Message Causes Solution err1 flashes Data in printer memory (EEPROM) are wrong (checksum is incorrect) • Press any key err2 flashes err3 flashes The input buffer of the input capacity has been exceeded No control signals for printer > Factory settings are being loaded o Reconfigure the menus for “Printer Interface” and “Statistics Applications” • Turn the weighing instrument off, then back on again • Press any key • Check the rechargeable batteries o Recharge the batter
Maintenance Changing the Paper Roll To operate your data printer, the paper rolls must have the following specifications: (see “Accessories”): – Standard paper roll – Wood-free paper, 60 g – Width: 57.5 ± 0.5 mm – Diameter: 65 mm max. – Core diameter: 8 mm min.
• To align the paper roll, hold it so that you can push both roll holders into the core • Release the roll holders on both sides • To close the paper roll compartment, lower the cover Changing the Ink Ribbon Cassette To operate your data printer, you must use a black ink ribbon cassette, type ERC-22 (see “Accessories”).
Charging the Batteries If the symbol shown on the left lights up: o Charge the batteries by leaving the weighing instrument turned on > The batteries are charged in the standby mode of the weighing instrument > After 28 hours, the printer’s batteries are charged o If the symbol does not go out within 3 hours at the latest, change the batteries (see page 35) Changing the Rechargeable Batteries G Avoid draining the batteries excessively; otherwise, this will reduce their recharging capacity.
Cleaning the Data Printer G When cleaning the data printer, make sure that no liquid enters its housing G Please do not use any aggressive cleaning agents (solvents or similar agents) • Disconnect the power supply by unplugging the interface cable (connecting the weighing instrument) from the rear panel of the printer o If you are using an external power supply, unplug the AC adapter from the electrical outlet (mains supply) • Use cloth moistened with a mild detergent (soap) only to wipe down the printer ho
Accessories Product Order No. Spare paper rolls (box of 5) Ink ribbon cassette AC adapter with specifications rated for Europe U.K.
Electromagnetic Compatibility C Marking The equipment complies with the following Directive: Council Directive 89/336/EEC “Electromagnetic Compatibility (EMC)” Applicable European Standards: Limitation of emissions: EN 50081-1 Residential, commercial and light industry EN 50081-2 Industrial environment Defined immunity to interference: EN 50082-1 Residential, commercial and light industry pr EN 50082-2 Industrial environment Important Note: The operator shall be responsible for any modifications to Sar
Important Information for Connecting Devices of an Older Design Series: If you connect this printer to weighing instruments or devices of an older design series (MP technology), they might exceed the permissible limits designed to provide reasonable protection against harmful radio interference in residential areas (EN55022, Class B). For this reason, please observe the following: Warning! This a Class A device that can cause radio interference in residential areas.
Z.14-755 320 34-10.
Sartorius AG b 37070 Goettingen, Germany p Weender Landstrasse 94–108, 37075 Goettingen, Germany t (551) 308-0, f (551) 308-289 Copyright by Sartorius AG, Goettingen, Germany. All rights reserved. No part of this publication may be reprinted or translated in any form or by any means without the prior written permission of Sartorius AG. The status of the information, specifications and illustrations in this manual is indicated by the date given below.