98648-001-40 Sartorius TS 6100B, TS 12 Electronic Over/Under Scales Installation and Operating Instructions
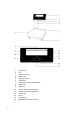
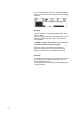
1 Display head 2 Lock 3 Jack for AC power 4 Support arm 5 Weighing platform 6 Leveling foot 7 Analog range indicator/weight display 8 ON/OFF key 9 PRINT key 10 Tare key (for zeroing the display) 11 Test key (full-segment display test) 12 Increase key 13 Set key 14 Decrease key 15 RED/GREEN/YELLOW indicators
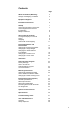
Contents Page About the Product (Warranty) Storage and Shipping Conditions 4 5 Equipment Supplied 6 Installation Instructions 6 Startup Connecting the Scale to AC Power Connecting Electronic Devices (Peripherals) Safety Precautions 7 7 How to Operate the Scale Turning the Display On and Off Taring Weighing Over/Under Checkweighing Product ID Numbers and Product Data Changing the Product ID Number Changing the Target Weight Changing the Scale Divisions in the Display Changing the "Under" Limit Changi
About the Product (Warranty) With this Sartorius Scale you have acquired a high-quality electronic weighing Instrument that will ease your daily workload. Please read these installation and operating instructions carefully before operating your new scale.
Do not miss out on the benefits of our full warranty. Please complete the warranty registration card, indicating the date of installation, and return the card to your Sartorius dealer. Storage and Shipping Conditions Storage temperature: -40°C... +70°C -40°F... 158°F After unpacking the scale, please check it immediately for any visible damage as a result of rough handling during shipment. lf this is the case, proceed as directed in the section entitled "Safety Inspection.
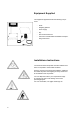
Equipment Supplied The equipment supplied includes the following components: — Scale — Weighing platform — Power supply — Key — Set of brief instructions — Instruction manual entitled "Installation and Operating Instructions" Installations Instructions Your Sartorius Scale will provide accurate readouts even when it is exposed to unfavorable conditions. However, exposure to intensive heat radiation, vibrations and drafts may affect the weighing accuracy and should be avoided äs much as possible.
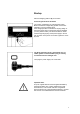
Startup Place the weighing platform (5) on the scale. Connecting the Scale to AC Power The scale is energized by an external power supply. Make sure that the voltage rating printed on this unit is identical to your local voltage rating. lf the voltage specified on the label or the plug design of the power supply does not match the rating or Standard you use, please contact your Sartorius Office or dealer. Insert the right-angle plug of the power supply in the AC jack as shown in the picture on the left.
Connecting Electronic Devices (Peripherals) Make sure to unplug the power supply from the wall outlet or from the scale before you connect or disconnect a peripheral device (printer or PC) to or from the interface port (Option). Safety Precautions The power supply rated to Class 2 (double insulation) can be plugged into a wall outlet without taking any additional safety precautions.
How to Operate the Scale After initially connecting the scale to line power, allow for at least 30 minutes' warmup. Turning the Display On and Off Press the ON/OFF key (8) to turn the display on or off. Self-Test After the scale is turned on, an automatic self-test of the scale's electronic circuitry is performed. During this test, all segments briefly appear in the display (full-segment display test). lt ends with the readout of all set parameters.
The zero symbol (with arrows) ->0<- in the weight display shows that the scale has been exactly tared so the display reads "0". Weighing Place your sample on the weighing platform (5) to determine the weight. Read off the weight indicated in the display (7) as soon as the motion detection symbol "~" above the plus/minus sign disappears. In addition to grams, this scale gives you a variety of other menu-definable weight unit options.
Over/Under Checkweighing Over/under checkweighing allows you to sort and classify products according to preset limits. "Classification" means sorting samples based on their weight into classes with defined weight ranges. RED/GREEN/YELLOW Indicators The RED/GREEN/YELLOW indicators are convenient visual aids. When you weigh the object to be checked, one of these color-coded indicators will light up to indicate the Status of the sample as follows: RED = the sample is underweight GREEN = the sample is o.k.
For example, for a target weight of 100 g, you can choose between — a continuous bar graph that travels from the left to the right (for determination of a sample weight) — a bar graph with a zero point = target weight (for determination of the difference in weight) — and a "traveling marker." The bar graph mentioned above can be shown in the following user-selectable application modes for the weight display.
Continues bar graph code: 9 6 Bar graph with zero point = target weight code: 9 7 Traveling marker code: 9 5 No bar graph Without digital weight readout With net weight readout code: 3 2 code: 3 3 With readout of the difference in weight code: 3 4 X X X X X X X X X digital weight readout only code: 3 1 The resolution of the display scale range depends on the parameter you have selected.
Product ID Numbers and Product Data Retrieving the desired Product ID Number Press the key (8) to turn the scale on. The product ID number that is selected at the moment will be displayed in the lower half of the weight display (7). To retrieve the desired product numbers, use keys (14). and (12) Changing Product Data You can change and store the following for 12 different products: — — — — — the product ID number (1...
How to activate a product data function: Press the key (8) to turn the scale on. Clear the weighing platform. With the scale turned off, hold down the key (13) and (8). briefly press the key key (13). When the readout is displayed, release the Changing the Product ID Number First select the product ID number you wish to assign to a sample. Caution: Please keep in mind that all data stored under this ID number will be deleted if you change the ID number.
Changing the Target Weight The target weight depends on the menu code setting in the scale operating program. You can enter the target weight either by storing the weight of a sample on the platform or by numeric entry.
How to enter a target weight using a sample on the weighing platform: — Clear the weighing platform — — key to tare the scale Press the Place your sample on the platform (if you do not place a sample on the weighing platform, the previous weight will be stored) — Press the key to store the weight. Entering a numeric value for the target weight: Five digits appear in the display - the last digit flashes. key to select the digit you wish to — Press the change.
Changing the Scale Divisions in the Display lf you do not wish to change the tolerance limits, it is not necessary to change the scale divisions (codes 1 1 5, 1 1 1). In this case, the scale will skip the following steps. The user-definable scale divisions in the display allow you to spot off-weights easily. Depending on the expected off-weights of the samples to be checkweighed, you can expand the analog display by selecting a lower number of the scale divisions.
Changing the "Under" Limit Depending on the menu code setting in the scale operating program, you can enter the under limit either by storing the weight of a sample on the platform or by numerical entry.
Changing the “Over” Limit Depending on the menu code setting in the scale operating program, you can enter the over limit in one of two ways: either by storing the weight of a sample on the platform or by a numeric entry (see "Changing the Under Limit").
Calibration This is only possible with an accurate calibration weight: (see "Accessories") Model TS 6100 B TS 12 Calibration weight Order number 5000 g 707213 10000 g 707218 How to activate the calibration function: Insert the in the side of the display head. Unload the weighing platform. With the scale turned off, hold down the key (8). briefly press the Once the readout appears, release the key and key. lf ->0<- does not appear below "DEF," tare the scale.
Then press the i.e.: key - the calibration weight will appear, Center the calibration weight on the weighing platform. lf "+" appears in front of the weight readout, the calibration weight is too light. lf "–" is displayed, the weight is too heavy. The plus/minus sign disappears if the calibration weight is accepted and an acoustic Signal indicates the end of the calibration procedure. The "+" symbol reappears at this time, also.
Scale Operating Program In order to access the scale operating program, you will . need the The scale operating program enables you to change the menu code settings for the weight unit, the individual operating parameters for the scale, the display mode, Update rate and the data output parameter, including the parameter for the application mode.
Factory Settings Code 1—1 7— 2 2—2 8— 2 3—3 9 — 14 4—1 10 — 1 5—5 11 — 3 6—2 12 — 2 How to Access the Scale Operating Program Insert the display head. in the lock located on the side of the With the scale turned off, hold down the key (8).
After the readout appears, release the key. To check a menu code setting, select the desired function group using the or key. Press the key to access a particular function. Now the numeric code for the function will be displayed. The function setting is identified by the symbol "~" that appears after "DEF." Use the keys labeled function. and to select the desired key to confirm the setting; the code will then Use the disappear. Now you can select the next function group.
List of the Programmable menu Code Settings “*” = Factory setting Code 1 1* 12 13 14 15 16 Weight units Grams Kilograms Pounds Ounces Troy ounces grams g kg lb oz ozt «0» lf you change between grams and kilograms, the product weights stored will remain valid, but not if you change the code to other weight units.
Code 51 52 53 54 5 5* 56 57 58 Stability Range 0,25 digit 0,5 digit 1 digit 2 digits 4 digits 8 digits 16 digits 32 digits The motion detection symbol "~" will appear only if a change in weight beyond the defined number of digits is detected.
Code 81 8 2* 83 84 85 86 87 88 89 8 10 8 11 8 12 8 13 8 14 8 15 8 16 Data Output Parameter Single print when key is pressed, regardless of stability Single print when key is pressed and readout is stable Single print when key is pressed and weight readout is stable & within the display range Auto print regardless of stability Auto print when readout is stable Auto print when the weight readout is in the display scale range and stable Single print activated by load when readout is stable Single print activa
Code 91 92 93 94 95 96 97 98 99 9 10 9 11 9 12 9 13 9 14* 9 15 Analog Display/Backlighting Marker Bar graph for sample weight Bar graph for weight difference Not assigned Marker Bar graph for sample weight Bar graph for weight difference Not assigned Marker Bar graph for sample weight Bar graph for weight difference Not assigned Marker Bar graph for sample weight Bar graph for weight difference Code 10 1* 10 2 Product Selection Mode Only with inserted key Without key Code 11 1 Entry Mode for the Target
Mounting Instructions Changing the Display Mounting (Raised Display to Remote Display) — Loosen the cable clamp on the support arm — Remove the retainer bars for the support arm from the display head — Dismount the display head — Remove the three screws from the support arm base plate — Dismount the support arm — Use the retainer bars to fasten the holder to the display head How to Install the Interface Cable The interface cable should be installed only by a certified electrician.
Changing the Scale Housing Cover — Remove the weighing platform — Unscrew the 4 platform support disks — Gently pull the left and right sides of the scale housing cover outward and lift it off — Place a new housing cover on the scale base, making sure that both sides snap in audibly — Refasten the four platform support disks using the screws — Reposition the weighing platform 31
Interface Description (Option) lf you wish to record weight data using the Sartorius Data Printer, just plug the printer connector Mo the interface port of the scale. You do not need to adjust any settings! (You can also interface your scale with a Computer.
Data Output Parameters (Codes 8 1 to 8 16) Data can be transferred to the output port depending on the particular stability state of the weighing system (stability parameter: stable readouts). You can choose to have data transferred regardless of stability or only when the readout is stable. lf you opt to have data transferred only when the weighing system has stabilized, an output command will remain stored until the system has stabilized.
Pin Assignment for the Interface Female Interface Connector: 25-position D-submini DB25S with screw lock hardware for the cable gland Male Connector Required: 25-pin D-submini DB25S with integrated shielded cable clamp assembly (Amp type 826 982-1) and fastening screws (male screws for female screw lock, Amp type 164 868-1) Pin Assignment Designations Pin Pin Pin Pin Pin Pin Pin Pin Pin Pin Pin Pin Pin Pin Pin Pin Pin Pin Pin Pin Pin Pin Pin Pin Pin 1: 2: 3: 4: 5: 6: 7: 8: 9: 10: 11: 12: 13: 14: 15: 16:
Options and Accessories Options Interface (for connecting a data printer or a PC) YDO 01 TS Display holder for benchtop or wall mounting YDH 01 TS Spacer feet for lifting the scale by about 8 cm (3") YAS 01 TS- 00 000 V 001 Spare scale housing cover 69 T 00001 Accessories Data printer with date/time & statistics functions Print speed approx. lines/sec. 1.5 Printer housing (W x D x H) in mm 150x138x43 in inches 5.9x5.4x1.
Specifications Model TS 6100B TS 12 Capacity g 6,100 12,100 Readability g 0.5 1 Tare range (by subtraction) g -6,100 -12,100 Standard deviation g ≤ ± 0.5 ≤±1 Max. linearity g ≤ ± 0.5 ≤±1 Stabilization time (typical) Display Update – when the readout stabilizes (depends on the filter level selected) – when the load changes s 1.1 s 0.1/0.2 s 0.1 Adaptation to application requirements and ambient conditions Stability range d 0.25 ...
Troubleshooting Guide Problem … Causes … No segments appear in the weight display (7) - Check AC power supply - No AC power available - Plug in power supply - The power supply is not plugged in - The weighing platform (5) is not in - Position the platform place Display shows “L” Display shows “H” The weight readout changes constantly Solution - The load exceeds the capacity of - Unload the scale the scale - Unstable ambient conditions - Set up the scale in another area - Too much Vibration or the scal
Care and Maintenance Clearing Wash down the scale with cleaning agents that you commonly use in the food industry. Important Note: Featuring the IP 65 protection rating (approximately equivalent to NEMA 4), the scale is dust-tight and washdown-resistant. See the "Test Mark Award Certificate" issued by the TÜV, the German Association for Technical Inspection.
Sartorius AG B P T 37070 Göttingen Weender Landstraße 94–108, 37075 Göttingen (0551) 308-0, F (0551) 308-3289 Internet: http://www.sartorius.com Copyright by Sartorius AG, Göttingen, Deutschland. All rights reserved. No part of this publication may be printed or translated in any form or by any means without the prior written permission of Sartorius AG. Sartorius AG reserves the right to make change to the technology, features, specification and design of the equipment without notice.