
Specification Sheet


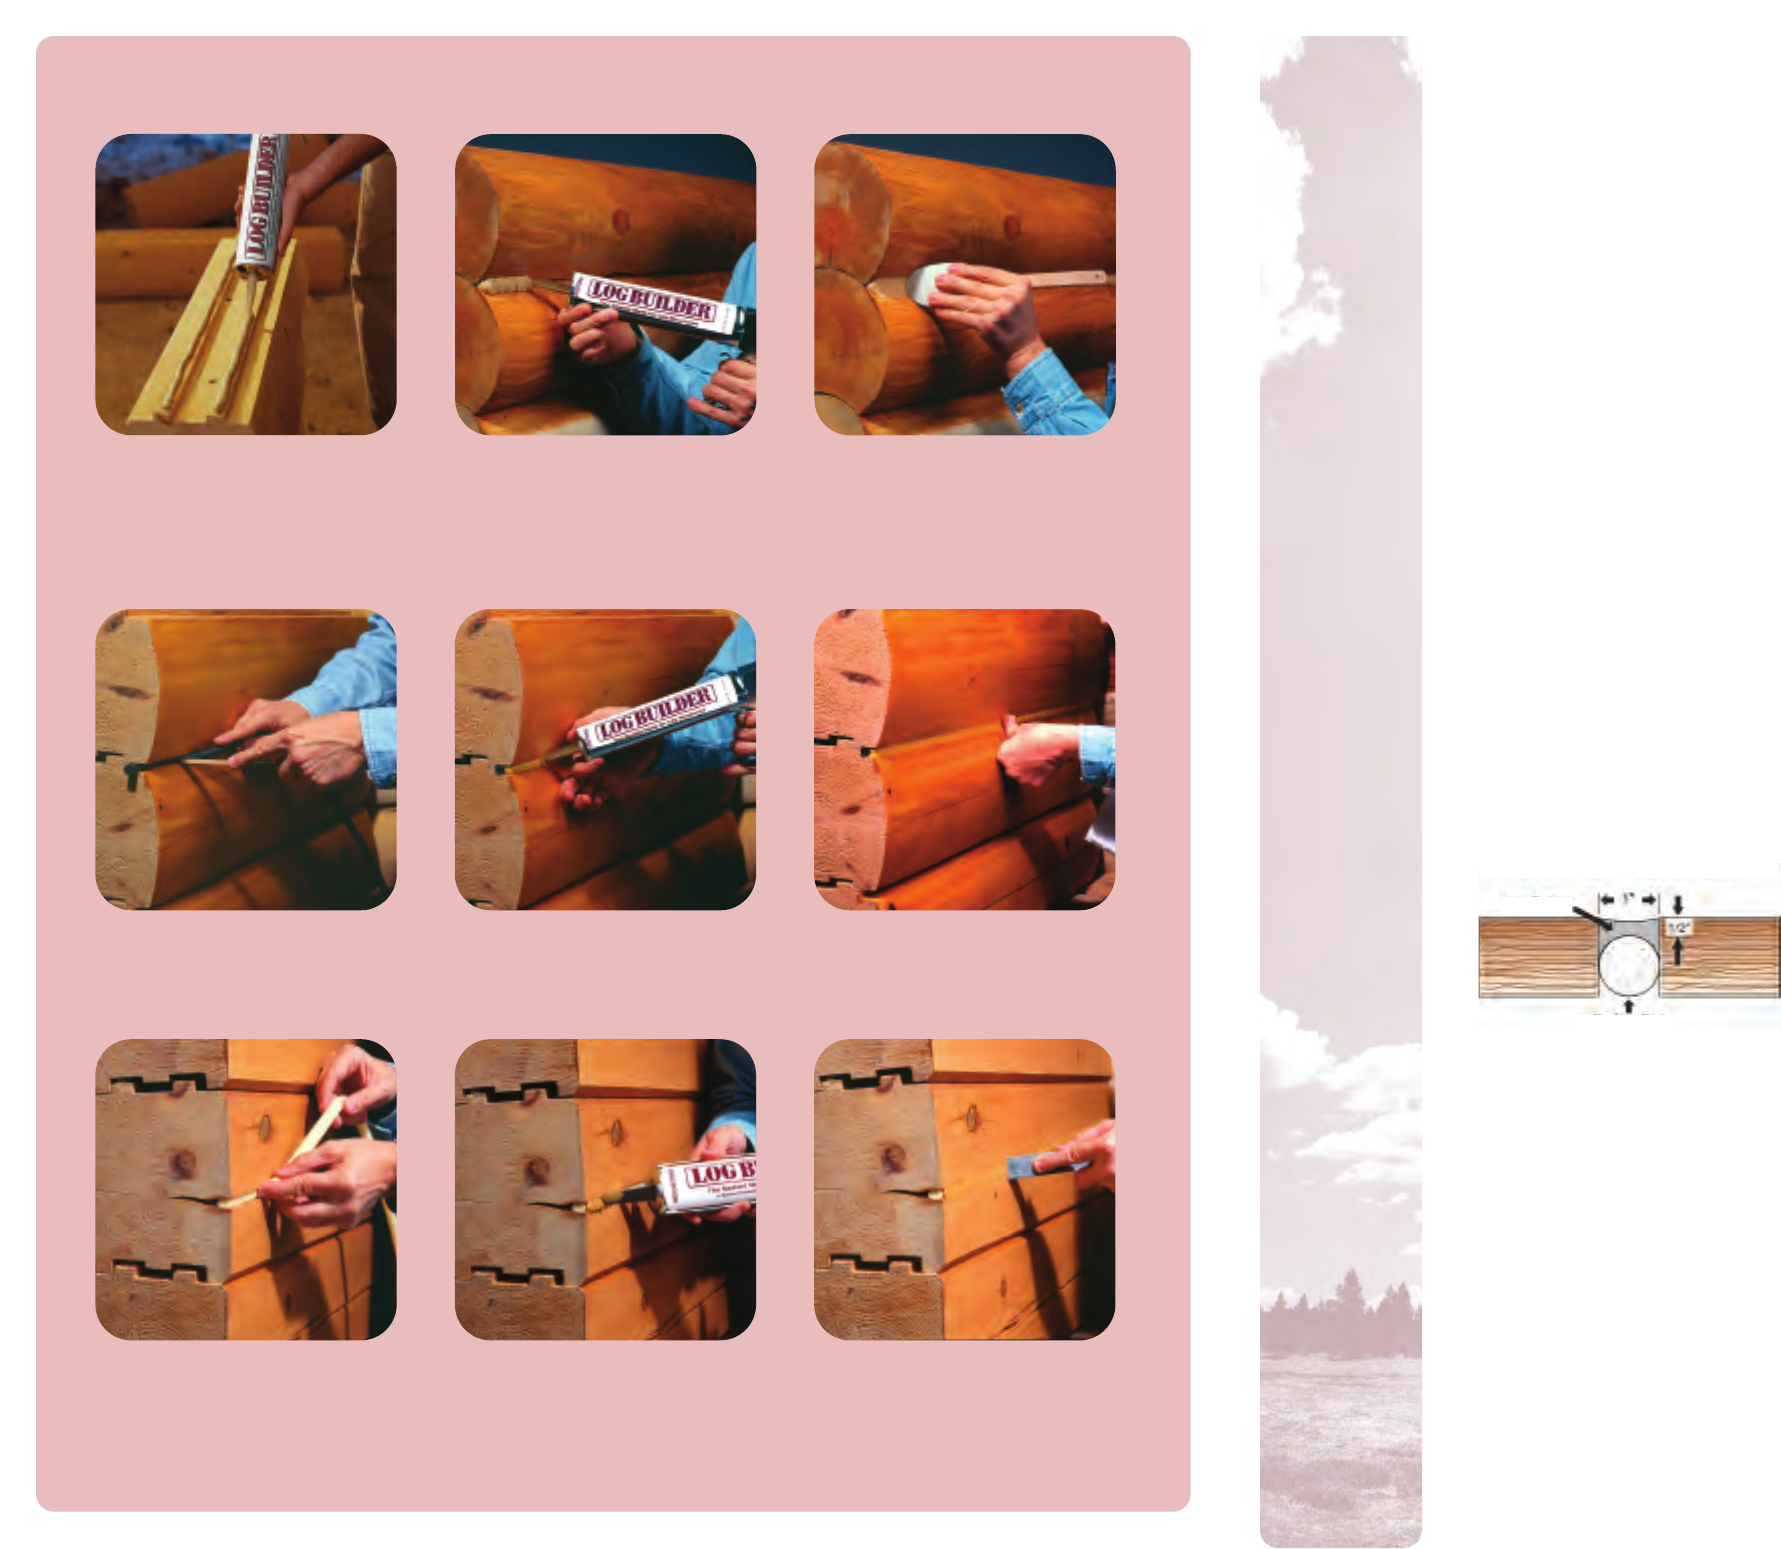
1 – Gun Log Builder into
clean, stained joints.
2 – Tool to ensure a tight seal to the
top and bottom of the caulk line
leaving at least 1/4” depth of
caulk in the center of the joint.*
Apply bead(s) according to the log home
manufacturer’s instructions. Stack the
next log and repeat. Don’t allow
caulk to skin over prior to stacking.
Stacking Application
2 – Gun Log Builder over
the backer rod.
3 – Tool to ensure a tight seal to the
top and bottom of the caulk line.
1 – Install backer rod into the caulk
well of clean, stained logs.
Milled Tongue & Groove Logs with a Caulk Well
Swedish Cope Logs
up moisture), will undergo moderate levels of stress
on sealants applied to them. An occasional log will
randomly and unpredictably twist, shrink or warp in
response to these moisture changes, moving more
than any sealant can possibly handle.
When this extreme movement occurs, it will cause
the sealant to fail either cohesively or adhesively. If
the failure is cohesive (sealant splits apart),
then the repair is performed by simply cleaning the
surfaces of the failed sealant and reapplying more.
If the failure is adhesive (sealant pulls cleanly away
from the substrate), then the sealant usually needs to
be removed and completely redone.
Warranty
Sashco Sealants warrants that Log Builder will
stretch up to 100% of original joint size (± 50%) and
will not pull away or center tear when applied in
accordance to the Log Builder Data Tec (LBR-002).
If you are dissatisfied at any time with Log Builder’s
performance in these areas, return proof of purchase
to Sashco. Limited to product replacement only.
Sashco warrants this product will substantially
meet published specifications on the date of sale. If it
fails to do so, return unused portion with original
sales receipt for replacement or refund, at Sashco’s
sole option. These are purchaser’s sole and exclusive
remedies for any breach of warranty. Purchaser
must determine suitability of product for purchaser’s
specific needs and assumes all risk associated
with its use.
Except as stated above there are no warranties for
this product. The foregoing express warranty is in
lieu of all other
warranties, express or implied,
including without limitation implied warranties of
merchantability or fitness for a particular pur-
pose, which warranties are specifically excluded
and disclaimed. This Limited Warranty gives you
specific legal rights. Y
ou may have other rights which
vary from state to state. Some states do not allow
exclusion of implied warranties in consumer or other
sales, limitations on the duration of implied war-
ranties, or exclusion or limitation of incidental or
consequential damages. Thus, the limitations or
exclusions contained above may not apply to you
depending upon your specific circumstances.
First Aid
EYES: Immediately flush with large quantities
of water for at least 15 minutes. If irritation
persists, see a medical doctor.
SKIN: Wash with soap and water and rinse
thoroughly
. Wash contaminated clothing before use.
INHALATION: Remove to fresh air.
INGESTION: If large quantities are
swallowed, DO NOT INDUCE VOMITING -
seek medical help.
2 3
2 – Gun Log Builder over
the backer rod.
3 – Tool Log Builder.1 – Install backer rod into a clean, stained
check to the appropriate depth. (See
Fundamental Application Guidelines.)
Checks
* NOTE: Use a bond breaker (i.e., backer rod) when significant log movement could occur. When movement is known to be minimal (as with many older homes)
using backer rod is still best, but usually less critical.
Methods of Application
When using 5-gallon pails, Sashco’s patented Snorkler
®
pumping system, grout bags, or bulk loading guns may
be used. Use a caulking gun when using either the 29
oz. or 10.5 oz. cartridges of Log Builder. When using
a cartridge, cut the spout at a 45˚ angle to desired
bead size. Log Builder requires no heating prior to
application but will dispense easier when kept
warm before use.
Tooling
Log Builder should be tooled directly after applica-
tion to ensure good adhesion and a smooth looking
bead. Log Builder may be tooled with ordinary
masonry-type tooling blades, a wetted finger, or a
damp polyethylene foam brush. Work the material
smooth, tooling Log Builder tightly to the surfaces,
keeping a rag handy for clean up.
Checks and Cracks
Logs tend to take on water from rain and snow
through cracks and checks; therefore, it is important to
pay close attention to these openings and prep and seal
them properly. Note: Most small checks should not be
caulked. Only the larger ones (1/4” or larger) should
be sealed with backer rod and caulk.
Joint Design
Joint width should be a minimum of 1/4”, but no
larger than 2”, and 4 times the anticipated joint move-
ment. For example, if you anticipate log movement
of 1/8”, bead
width should
be about 1/2”.
For joints 1”
or more, the
depth should
be 3/8” to
1/2”. The
depth of joints less than 1” wide should be half the
width but no less than 1/4”. (Joint depth, overall,
should be between 1/4” and 1/2”.)
Clean-up & Disposal
Clean excess product off surfaces (before it cures)
with a putty knife and/or a damp rag. Dispose of Log
Builder in accordance with local regulations. Do not
dispose of in drinking water supplies. Water may be
used for cleaning hands, surfaces and equipment.
Solvents are not required for clean-up.
Logs Move!
Occasionally, a small number of logs on any home
may undergo extreme movement. This movement is a
natural part of the logs moisture content adjusting to
their new settings. Most logs, as they dry (or go
through the repeated process of taking on and giving
Conceal
Backer Rod
Proper Joint Design: Depth = 1/2 width