PROGRAMMING AND INSTALLATION MANUAL Keypad LCD (software version 3.
WARNING Due to safety reasons, alarm system should be installed by qualified personnel only. Because alarm system may contain hazardous items, its components should be kept out of reach of unqualified personnel. In order to avoid the risk of electric shock, read carefully this manual before proceeding to installation. Any connections should be made in deenergized state only (i.e. with power supply disconnected). Making any construction changes or unauthorized repairs is prohibited.
CA10 plus LCD Keypad v3.10 LCD keypad with firmware version 3.10 is compatible with CA10plus alarm panel with firmware version 4.7. It's also backwards compatible with CA10plus alarm panels (firmware version 3.0 or newer). The LCD keypad is designed to control the Satel CA10 plus alarm panel. It supports everyday use as well as programming the panel.
Satel CA10 plus - LCD keypad Programming and Installation Manual Keypad description. The keypad displays information on a 2-line LCD display (2x16 characters) with backlight and six additional LED controls. LED controls' functions: • ALARM - signals occurrences of alarms. • TROUBLE - blinks when the panel signals a hardware problem or telephone communication trouble. • PARTITION 1 ÷ PARTITION 4 - partition status signaling: - blinking (while the ALARM control is off) signals exit delay running.
Satel CA10 plus - LCD keypad Programming and Installation Manual LCD keypad installation The keypad is designed to operate indoors in normal humidity. It should be mounted keypad (v.2.xx) pins straight on a flat surface. Attention: The LCD display is fragile. It can be damaged when dropped. D C B A T L RS -232 programmnig port Connecting the keypad. The connections are made as in the case of LED keypad. The panel can operate both with LCD and LED keypads in any configuration.
Satel CA10 plus - LCD keypad Programming and Installation Manual The functions of the other keypad jumpers have been replaced by the options available in the submenu of the LCD keypad service functions (ÆLCD keypad; ÆSettings; ÆOptions). These options have the following descriptions : à Long illumination (T jumper function) – if not selected, the option will set the 40s time, and when selected, it will set the 150s time of waiting for no key depressed (e.g.
Satel CA10 plus - LCD keypad Programming and Installation Manual Service mode After the service mode code, terminated with [#] or [*], is entered, the panel enters the service mode. This is signaled in the keypad by the following message: Service mode Menu: ÇÈÅÆ Press any arrow key to enter multi-level service mode menu which provides easy access to service functions. The functions are grouped by subject. The arrow keys × and Ø scroll the list of the current level of the menu.
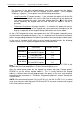
Satel CA10 plus - LCD keypad Programming and Installation Manual SERVICE MODE MENU Basic Options 1. Service code 2. Panel identifier 3. Computer identifier 4. Computer telephone number 5. System Options 6. Global times 7. Counters 123. Counters timers Partitions definition 8. Zones of partition 1 9. Zones of partition 2 10. Zones of partition 3 11. Zones of partition 4 12. Zones displayed on keypad1 13. Zones displayed on keypad2 14. Zones displayed on keypad3 15. Zones displayed on keypad4 16.
Satel CA10 plus - LCD keypad Monitoring Programming and Installation Manual Stations 43. Station 1 telephone number 44. Station 2 telephone number 45. Station 1 transmission format 46. Station 2 transmission format 47. Monitoring options Identifiers 48. Zone events' ID for station 1 49. Partition 1 events' ID for station 1 50. Partition 2 events' ID for station 1 51. Partition 3 events' ID for station 1 52. Partition 4 events' ID for station 1 53. System events' ID for station 1 54.
Satel CA10 plus - LCD keypad Tel. messaging Timers Special functions Event log Programming and Installation Manual Tel. numbers 87. Telephone number 1 88. Telephone number 2 89. Telephone number 3 90. Telephone number 4 91. Telephone number 5 92. Telephone number 6 93. Telephone number 7 94. Telephone number 8 95. Partitions and messages assignment Pager messages 96. Message 1 97. Message 2 98. Message 3 99. Message 4 Messages (HEX mode) 119. 120. 121. 122.
Satel CA10 plus - LCD keypad Programming and Installation Manual Notes: • To call a function (currently pointed by the display arrow) press[ #] or Ö. • To cancel a function press [*] or Õ or sometimes the combination of [*] and [#] (this depends on the type of the function - in some functions the keys [*] and Õ are used to edit data). • It is possible to call a function straight by entering its number (without using the menu).
Satel CA10 plus - LCD keypad Programming and Installation Manual Key Numeric mode function Text mode function × delete proceeding character Ø toggle insert/overwrite 1 1 . , 2 2 A a 3 3 D d 4 4 G g 5 5 J j 6 6 M m 7 7 P p 8 8 T t 9 9 W w 0 0 space - previous character (in the alphabet) next character (in the alphabet) The text mode is signaled by * in the upper right corner of the display. Use numeric keys to enter characters according to the table.
Satel CA10 plus - LCD keypad Programming and Installation Manual LCD KEYPAD SUBMENU Names Partitions Partition 1 name Partition 2 name Partition 3 name Partition 4 name Partition 1 users names User 1 name User 2 name User 3 name User 4 name User 5 name User 6 name User 7 name User 8 name User 9 name User 10 name User 11 name User 12 name Master user name Partition 2 users names User 1 name xxxxx MASTER user name Partition 3 users names User 1 name xxxxxx MASTER user name Partition 4 users names
Satel CA10 plus - LCD keypad Programming and Installation Manual Output names Output 1 name Output 2 name Output 3 name Output 4 name Output 5 name Output 6 name Texts System ok. System Armed Silent Arm Arming Arming Silent Disarming Zones bypassed Alarm ! Fire Alarm Alarm Memory Fire Memory Alarm off Trouble Entry Time Exit Time Time Left: Wait for data... Symbols CA-10+ standard led off led on numbers of zones to display LCD standard Zone ok.
Satel CA10 plus - LCD keypad Programming and Installation Manual Partition names The functions are used to program partition descriptions which are displayed when GOTO function is called. The name of the current partition is displayed when the key Ø is pressed. Partition users names User names are used when the system is armed, disarmed or when the event log is reviewed.
Satel CA10 plus - LCD keypad Programming and Installation Manual turned on after a key is pressed and then turned off after time set with use of option “Long illumination” (40 or 150 seconds).
Satel CA10 plus - LCD keypad Programming and Installation Manual The following priority levels are assigned by default (starting with the highest): 1. entry delay, 2. fire alarm, 3. burglary alarm, 4. armed (or silent armed) 5. fire alarm occurred, 6. burglary alarm occurred, 7. exit delay. Reset Defaults The function restores default parameters of keypad. Test The function enables keypad functioning correctness to be tested. Starting this function restores default keypad parameters.
Specifications Minimum power supply voltage ............................................................................... 11 V Maximum power supply voltage .............................................................................. 16 V Maximum current................................................................................................ 170 mA Current drawn logic circuits....................................................................................................
History of the Manual Updates. The updates below refer to the manual for the LCD Keypad with program version 3.08. 07-2003 3.10 y The service functions menu has been enhanced by new functions: FS 125 (p. 8), FS 134-139 (p. 7). y New option that applies to possibility of activation the functions assigned to arrow keys has been added (p. 14). y The description of keypad service function: “Reset Defaults” has been added (p. 15). y New keypad service function: “Test” has been added (p. 15).