
Printer User Manual


Page 6-8
Section 6. Replacement Procedures
SATO CL408e/CL412e Service Manual
PN 9001078
Rev. B
Replacing the Fuses
6.3.2 Removing and Replacing the Internal Fuse(s)
Required: T3.15A, 250V Fuse or T1 Amp 250V Fuse
To remove and replace these fuse(s) do the following:
STEP PROCEDURE
1. Switch the printer OFF and disconnect the power cable.
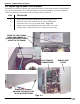
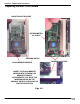
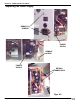
2. Raise the access door and remove (2) screws holding the side cover to
the inside frame. Figs. 6-1
3. Remove (2) screws holding the side cover to the outside frame. Remove
the cover to expose the electronics.
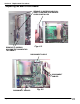
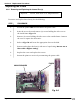
4. Refer to Fig. 6-8 and locate the appropriate fuse on the PCB.
5. Remove and replace the fuse(s) with one of equal rating. Do not use a
fuse with a higher rating.
6. Replace the cover and replace the screws.
7. Return the printer to service by reconnecting the power cable.
MAIN PC BOARD
FUSES
Fig. 6-8