
Printer User Manual
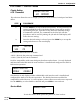


Page 2-36
Section 2. Configuration
SATO CL408e/CL412e Service Manual
PN 9001078
Rev. B
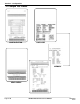
STEP PROCEDURE
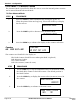
1. Record all current dip switch positions, then place all switches in the OFF
position.
2. Place the DSW2-4 in the ON or up position.
3. Press the LINE and FEED key while simultaneously turning ON the power
switch. When the printer beeps, release the keys. The following screens will
appear.
4. Place the DSW-4 in the OFF position and the following screen will appear.
5. Press the LINE key to display the next screen.
6. Press the FEED key to display the next screen.
7. Press the LINE key to select either COUNTER or EEPROM.
Select Counter to clear all counters.
Select EEPROM to clear/reset the firmware to factory default setting
8. Press the FEED key to display the next screen.
9. Press the LINE key to select YES or NO. If YES is selected press the FEED key
to clear your selection.
10. The printer will beep three times signaling the competion of the process.
11. Power off the printer to exit Maintenance Mode.
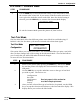
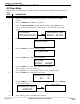
LCD Panel — Maintenance Mode
all clear mode
factory mode
initializing
rom v00.00.00.00
maintenance mode
dipsw2-4 on->off
all clear
counter eeprom
counter all clear
yes no
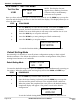
All Clear Mode
This function is used to clear counters and reset the firmware and doesn't produce a test
label.
counter all clear
completed
all clear mode