SAP Device Driver for SATO Printers SAP ABAP-Based Printer Driver for SATO Printers User Manual - Version 1.0.
Software License Agreement PLEASE READ THE FOLLOWING TERMS AND CONDITIONS BEFORE USING THIS PRODUCT. BY INSTALLING THE PRODUCT YOU THEREBY INDICATE YOUR ACCEPTANCE OF THESE TERMS AND CONDITIONS. SHOULD YOU DISAGREE WITH ANY OF THE TERMS OR CONDITIONS LISTED BELOW, PROMPTLY REMOVE ALL FILES RELATED TO THIS PRODUCT FROM YOUR HOST PLATFORM AND RETURN THE PRODUCT TO SATO CORPORATION. 9.
Copyrights The contents of this document are proprietary information of SATO Corporation and/or its subsidiaries in Japan, the U.S and other countries. No part of this document may be reproduced, copied, translated or incorporated in any other material in any form or by any means, whether manual, graphic, electronic, mechanical or otherwise, without the prior written consent of SATO Corporation. SATO Corporation and/or its subsidiaries in Japan, the U.
Table of Contents Table of Contents ............................................................................................ 4 1 Introduction ............................................................................................... 5 2 SAP Environment ..................................................................................... 6 3 Overview of Solution ................................................................................ 7 4 Using SATO Device Type ........................
Introduction 1 “SAP Device Driver for SATO printers” is a SAP Smart Forms printing solution to SATO printer. It allows users to use a driver for a Page Description Language (PDL) that is rd implemented in ABAP and resided in the SAP environment to print SATO printer without 3 party solutions. With this device driver, SATO BARCODE PRINTER LANGUAGE (SBPL) is sent to the SATO printer directly from SAP –- providing greater performance and efficiency.
SAP Environment 2 The following SAP environment supports the ABAP based PDL drivers: SAP_BASIS Release 6.20: Support Package SAPKB62064 + attached correction instructions or Support Package SAPKB62065 + attached correction instructions or Support Package SAPKB62066 Kernel 6.40 patch level 222 SAP_BASIS Release 6.40: Support Package SAPKB64022 + attached correction instruction or Support Package SAPKB64023 Kernel 6.40 patch level 222 SAP_BASIS Release 7.
Overview of Solution 3 This solution is primarily for Smart Forms printing. It requires 2 components from the printer providers, such as SATO. ABAP Based PDL device driver Device Type files After uploading the components into the SAP system, users will Use Smart Styles to define the available printing items in the device type, Use Smart Forms to design the label Define Output Device that points to the given Device Type Print the Smart Forms through the output device.
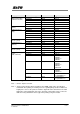
4 Using SATO Device Type The following device types for SATO PDL Driver are available: Codepage Name of Device Type Resolution Supported Models Latin1 (ISO8859-1) YSTLTGT2 203dpi GT408e S8408 LT408 MB400i **S84-ex 203dpi **S86-ex 203dpi YSTLTGT3 305dpi GT412e S8412 MB410i **S84-ex 305dpi **S86-ex 305dpi YSTLTGT6 609dpi GT424e S8424 **S84-ex 609dpi YSTLTGL2 203dpi GL408e YSTLTGL3 305dpi GL412e YSTLTSR2 203dpi *SR408 *PT408e *MR400e *SG408R *SG408R-ex *SG608R YSTLTSR3 305dpi *SR412 *
Codepage Name of Device Type Resolution Supported Models English Only (7-Bit USA ASCII) YSTENGT2 203dpi GT408e S8408 **S84-ex 203dpi **S86-ex 203dpi LT408 YSTENGT3 305dpi GT412e S8412 **S84-ex 305dpi **S86-ex 305dpi YSTENGT6 609dpi GT424e S8424 **S84-ex 609dpi YSTENGL2 203dpi GL408e YSTENGL3 305dpi GL412e YSTENSR2 203dpi *SR408 *MR400e *SG408R *SG408R-ex *SG608R YSTENSR3 305dpi *SR412 *MR410e *SG412R *SG412R-ex *SG612R *SG112T/R YSTENSR6 609dpi YSTENHR6 609dpi *SR424 *SG424R *S
Codepage Name of Device Type Resolution Supported Models Korean (Wansung Encoding, HYRGothic-Medium) YSTKOGT2 203dpi GT408e YSTKOGT3 305dpi GT412e YSTKOGT6 609dpi GT424e YSTKOGL2 203dpi GL408e YSTKOGL3 305dpi GL412e Korean Unicode (UTF-8) YSTKUGL2 203dpi GL408e YSTKUGL3 305dpi GL412e Traditional Chinese (Big5) YSTZFGT2 203dpi GT408e YSTZFGT3 305dpi GT412e YSTZFGT6 609dpi GT424e YSTZFGL2 203dpi GL408e YSTZFGL3 305dpi GL412e Traditional Chinese Unicode (UTF-8) YSTFU
Printer Model Supported Languages Device Type CL4NX Latin1 (ISO8859-1) YSTLTCNx CL6NX English (ASCII characters) European Characters (codepage 850) YSTENCNx YSTCPCLx CL4xxe/CL6xxe European Characters (codepage 850) YSTCPCLx GL4xxe Latin1 (ISO8859-1) YSTLTGLx English (ASCII characters) YSTENGLx Korean (Wansung Encoding / Unicode) Simplified Chinese (Unicode) YSTKOGLx / YSTKUGLx YSTHUGLx Traditional Chinese (Big5 / Unicode) YSTZFGLx / YSTFUGLx Latin1 (ISO8859-1) YSTLTGTx English (ASCII
Printer Model Supported Languages Device Type * SG112T/R Latin1 (ISO8859-1) YSTLTSRx English (ASCII characters) YSTENSRx Japanese (Shift-JIS) + English (ASCII) YSTJASRx Printer Model Supported Languages Device Type * MR4xx Latin1 (ISO8859-1) YSTLTSRx English (ASCII characters) YSTENSRx Latin1 (ISO8859-1) YSTLTSRx Japanese (Shift-JIS) + English (ASCII) YSTJASRx * L’espritT/R4xxv Japanese (Shift-JIS) + English (ASCII) YSTJALPx * L’espritT/R4xxv-ex Japanese (Shift-JIS) + English (ASCI
To print Asian languages from GT/SR or GL printer, language memory cartridge is needed: Language Pack Part Number GT Korean Memory Cartridge WWGT0590C GT Simplified and Traditional Cartridge WWGT0590K GL Simplified Chinese Memory Cartridge WWGL159BC GL Traditional Chinese Memory Cartridge WWGL159DC GL Korean Memory Cartridge WWGL159FK SR Japanese Cartridge WSR401910 Table 3 Memory Cartridge and Part No.
Click ‘F8’ to execute the command. The following screen will be displayed: Figure 3 Importing Device Type file Click on the radio button on ‘Device Type’. Change the Mode (EXPORT/IMPORT) to ‘IMPORT’. Then key in a name to represent the Device Type. Note: The name must start with ‘YST’. It should contain 8 characters. The object name must match with the file name of the device type (without the extension). Click the Execute button (F8) to continue.
Creating Output Device 5 Enter ‘/nspad’ transaction code to go to the Spool Administration application. Figure 5 Creating Output Device Under the Devices/Servers tab, click on “Display” button for ‘Output Devices’. Figure 6 Click on the 'Edit' button to change the Edit mode Figure 7 Edit Mode buttons Click on the ‘Create’ button to create a new Output Device.
Figure 8 Defining Output Device Enter a meaningful name in the textbox for Output Device. In the drop-down list of Device Type, select the Device Type you have previously uploaded into the SAP system. Figure 9 Defining Printing Method Under the ‘Access Method’, define your Host Spool Access Method. In the above example, method “G: Front End Printing with Control Tech’ will prompt user to select a list of installed printer driver under the ‘Printer and Faxes’ in your Windows platform.
Functionalities of SATO-SAP Printer Driver 6 ‘SAP ABAP-Based Printer Driver for SATO printers’ provides the following printing features: 6.1 Barcode Both SAP traditional and new barcode symbology are supported. (Please refer to SAP notes: 430887 and 645158 for more information about the barcode symbology). For New Barcode Technology (NBT), user only needs to define the barcode in SE73 transaction as System Barcode.
Interleave 2 of 5 (Ratio 2:5) JAN/EAN13 (Ratio 2:5) JAN/EAN8 (Ratio 2:5) UPC-A (Ratio 2:5) Code 39 (Ratio 1:3) Code 39 (Ratio 1:2) Code 39 (Ratio 2:5) Code 93 XB321-XB332 XB341-XB352 XB361-XB372 XB381-XB392 XB501-XB512 XB521-XB532 XB541-XB552 XB561-XB572 ESC+BD2 ESC+BD3 ESC+BD4 ESC+BDH ESC+B1 ESC+D1 ESC+BD1 ESC+BC Table 4 Barcode Print Controls Note: The SATO PDL Driver supports Barcode Code
Figure 12 System Barcode screen Click the ‘Create’ button or press ‘F5’ key to create a new System Barcode definition. Figure 13 Create Button 6.1.2 New Barcode Technology The following describes how to create a barcode with new Barcode Technology.
The ‘New Barcode Technology’ supports the following barcodes: Code39 PDF417 Code93 2 of 5 Interleaved Code128 Click on the ‘New’ button to enter the following screen. Figure 15 Entering Barcode information For SATO barcode, it is recommended to define a Barcode name with prefix ‘YST’. For example, to define a new Code39 barcode, the following Barcode name can be used: YSTCd39 Enter some description on the textbox for ‘Short text’. Press the tick button to continue.
Figure 17 Choosing the Barcode alignment Figure 18 Entering Barcode Information Figure 19 Saving the Barcode definition SAP Device Driver for SATO Printers User Manual 21-62
Figure 20 Saving the definition to workspace That is all for the System Barcode definition. The next step will be defining the Printer Barcode in order to link the System Barcode to the Printer Control in the device type. 6.1.3 New Technology Barcode For more information about the SATO Barcode printing command, please refer to the printer command specifications. Code 39 This barcode is to start and end with ‘*’ characters.
RFID Gen2 Tag User is to enter the necessary data based on the following descriptions: RFID Attribute: Representation in barcode field data: EPC value EPC:xxxxxxxxxxxxxxxxxxxxxxxx; (xxxxxxxxxxxxxxxxxxxxxxxx is 24 digit hex value representing 12 bytes) PC value PC:xxxxxxxxxxxxxxxxxxxxxxxx; (xxxxxxxxxxxxxxxxxxxxxxxx is 24 digit hex value representing 12 bytes) (SATO Device Driver does not support this feature) USR value USR:xxxxxxxxxxxxxxxxxxxxxxxx; (xxxxxxxxxxxxxxxxxxxxxxxx is 24 digit hex value repre
6.1.4 Old Barcode Technology (Conventional System Barcode) Click the ‘Old’ button (as in Figure 14 Choosing Barcode Technology to define a Barcode with Old Barcode Technology. Figure 21 Defining Barcode with Old Barcode Technology * In Old Barcode Technology, there is no way to define the Barcode Module Width. Thus, print controls with such information have been defined. User is to select the print control which carries required Barcode Module Width. 6.1.
UPC Barcode Type A The data of this barcode should be 11 digits + 1 check digit. If user supplies 12 digits data, then SATO-SAP printer driver will assume the last digit is the given check digit. Else, the driver will generate the check digit. EAN 8 Barcode The data of this barcode should be 7 digits + 1 check digit. If user supplies 8 digits data, then SATO-SAP printer driver will assume the last digit is the given check digit. Else, the driver will generate the check digit based on Modulo 10 formula.
Figure 22 Printer Barcode Definition Choose the ‘Printer Barcodes’ and then click the ‘Change’ button to create a Printer Barcode definition. Figure 23 Device List for Printer Barcodes Double click the SATO device type which starts with prefix ‘YST’.
Figure 24 Printer Barcode List in the device type Click on the ‘Create’ button or ‘F5’ key to create a new definition of Printer Barcode. Figure 25 Defining Printer Barcode Select the System Barcode which has been defined previously from the entry list. Then key in the required Print Control. Note: Key in the same print control for both ‘Bar code prefix’ and ‘Bar code suffix’. Refer to Table 4 Barcode Print Controls for the available print control definition in the device type.
6.1.7 Customized Barcode with UNDEF Note that this task should only be performed by advanced users. Please contact Sato technical team at global.sysdev-gbs@sato-global.com should you have any queries. If the printer-resident (such as GS1-128) is not supported in SAP, customized print control can be added into the device type and “UNDEF” barcode type can be used to map to the print control. UNDEF is only in Old Barcode Technology.
ii. Create Print Control in device type Figure 27 Defining Print Control in Device type Use SPAD->Full Administration->Device Types to open the Print Controls tab of the device type. Add a new barcode print control (Prefix SB) and input the hex value of Control Character Sequence. In this example, the hex value of “EU1203” is entered for Print Control SB012. This print control defines Sato Barcode commands for GS1-128 (UCC/EAN128) with CC-C with Narrow Barcode with = 3 dots.
Figure 29 Mapping of Print Control 6.1.7.2 GS1 Datamatrix Barcode with UNDEF 6.1.7.2.1 Create a new Barcode Definition. Note: 1. The name of the Barcode must start with “YSTDMX”. This is how the Sato Device Driver identifies this as the Barcode Definition for Datamatrix. 2. The Barcode Type must be UNDEF. 3. The rest of the parameters (except Rotation) will not be used by Sato Device Driver for the Datamatrix barcode. Those parameters has to be defined inside the Print Control as below.
6.1.7.2.2 Define the Print Control information in the device type SB013 defines the prefix which carries the following Sato Print Commands: Font ID: 01 Error correction level: 20 (ECC200) Cell width: 02 Cell pitch: 02 No. of cells per line: 000 No.
Example 3) Cell width: 09, Cell pitch 15 BX01200915000000001 Output: The data of the Barcode will be appended to the Prefix print control (in this case, SB013). If there is any special code (such as FNC1 code), you can append it here (as hex value). SB014 defines the suffix. If there is no data for the Suffix, you can leave the print control empty.
Select the Barcode Definition created previously, and map it to the print controls.
6.1.7.3 QR Barcode with UNDEF 6.1.7.3.1 Create a new Barcode Definition. Note: 4. The name of the Barcode must start with “YSTQR_”. This is how the Sato Device Driver identifies this as the Barcode Definition for QR Code. 5. The Barcode Type must be UNDEF. 6. The rest of the parameters (except Rotation) will not be used by Sato Device Driver for the QR barcode. Those parameters has to be defined inside the Print Control as below. 6.1.7.3.
For Data Part Command Format : mmmm,n~n SBPL Command : DN Parameters: m n 6.1.7.3.3 No of data = 1 to 2953 data = Print Data Mapping the Barcode Definition to Print Control Go to SE73->Printer Bar codes. Create the mapping in the device type. Select the Barcode Definition created previously, and map it to the print controls.
6.
SAP Font DBGothic, DBMincho, JPMincho HELVETICA ^ TIMES ^ COURIER BOLD * (optional Italic) SATO Font SATO Japanese resident bitmap font Type Bitmap, fixed size SBPL Command ESC+K CG Triumvirate CG Times Helvetica Outline Font, fixed character pitch Scalable Scalable Scalable ESC+RDB ESC+RDA ESC+$B, ESC+$= Note: * YSTJAPTx not supported, ^ YSTJALPx not supported Table 7 Supported font in SATO-SAP Printer Driver For Fixed size SATO Resident Font, please refer to the Font Appendix for a list of supporte
6.3 SmartStyles Enter Transaction code ‘smartstyles’ to use the Smart Styles application. Figure 30 SmartStyles Create or edit a SmartStyles to define the printing items which are to be used in the Smart Forms. Figure 31 Create node of printing items Right click on the ‘Character Formats’ and choose ‘Create Node’.
Figure 32 Defining Barcode printing item in SmartStyles Figure 33 Defining Font Printing item in SmartStyles After defining the necessary Barcode and Fonts as printing items, check and activate the SmartStyles.
6.4 Smart Forms Enter transaction code ‘/nsmartforms' to run the Smart Forms application. Figure 35 Smart Forms application Create or edit a Smart Forms which the name is prefixed with ‘YST’. Figure 36 Applying the SmartStyles Click on the ‘Global settings’->’Form Attributes’, in the ‘Output Options’, apply the SmartStyles defined previously.
6.4.1 Adding Text Right click on the ‘Page1’, choose ‘Create’->’Window’. Figure 37 Creating Window Give the Window component a meaningful name. Then right click on it and create a ‘Text’ component.
Figure 39 Defining Text Component Under the ‘Output Options’ tab, select the SmartStyles which previously defined. So that the text printing item can be available to use. Figure 40 Adding Text Click on the ‘General Attributes’ tab and click on the ‘Editor’ button to insert the text. Note: This procedure could be varied depending on the editor mode. Figure 41 Entering the text with format The message is embedded in format tags.
6.4.2 Adding Barcode Define a ‘Window’ component under ‘Page1’ and give it a meaningful name. From this new window create a ‘Text’ component. Figure 42 Creating Barcode component Apply the SmartStyles in the ‘Output Options’. Then in the Editor under ‘General Attributes’, type the Barcode value, and apply the Barcode printing format. Figure 43 Entering Barcode value The message is embedded in format tags.
6.4.3 Adding Images Figure 44 Creating Image component All images must be imported to the SAP system through SE78 command before attaching them to the smart form. Select the required image from the Name drop-down list under the General Attributes. Then key in the Resolution information for the image. For example, if the image is to be printed in 300 resolution printer, then select 300 from the Resolution field.
6.4.4 Positioning Printing Components Form Painter Figure 45 Positioning printing items The positions of the printing items can be adjusted by drag & drop the components in the ‘Form Painter’. Alternatively, it can be done by manipulating the values in the Left and Upper margin fields under the ‘Output Options’ tab of the window component. 6.4.5 Printing the Smart Forms After the Smart Forms has been made, it has to be checked and activated before it can be printed.
Figure 48 Printing Screen Click the ‘Execute’ button to continue. Figure 49 Printing Screen - Select the output device Select the required Output Device and check on the ‘Print Immediately’ checkbox. Then click the ‘Print’ button to print.
6.5 System Commands User can specify the System Commands of SBPL in the Smart Forms label by using the Command nodes. Right click on the Window node->Create->Flow Logic->Command to display Command node feature. Figure 50 Defining System Command using Command node Under the ‘Output Options’, user is to define the System Command in the Name-Value pairs format. The value must be enclosed within the single quote character ( ‘ ) or empty, depending on the command.
Figure 51 Name-Value pairs information The following are the available system commands: Function Command Name Command Value 1~11 SBPL Command ESC+CS Print Speed PRINT_SPEED Print Darkness PRINT_DARKNESS ab, a: 1~ 5 b: A~F ESC+#E Label Size LABEL_SIZE Refer to the command specification ESC+A1 The printer driver will generate a default ESC+A1 command, based on the label size of designed Smart Forms, if this System command is not specified.
90 degree Text Rotation ROTATE_90_x Name of Window to be rotated ESC+%1 x is any number to make sure the command name is not repeated in the SmartForms 180 degree Text Rotation ROTATE_180_x Name of Window to be rotated ESC+%2 x is any number to make sure the command name is not repeated in the SmartForms 270 degree Text Rotation ROTATE_270_x Name of Window to be rotated ESC+%3 x is any number to make sure the command name is not repeated in the SmartForms Page Number PRINT_QUANTITY Number o
the printout.
6.5.1 Text and Image Rotation To rotate a text or an image on SmartForms, user is to create a command in the window to be rotated. The name of parameter (e.g., ROTATE_180_x) should not be repeated. Image below is an example of how the rotated text can be setup: Figure 53 Text Rotation Rotation Result: Figure 54 Rotation result Please refer to the command specification for the behavior of the rotation.
6.5.2 Setup Label Size Using Command This is the alternative method to setup custom label size using SATO Printer Language, A1 command. This will overwrite the standard Label size value by Page Format setting of Smart Forms. User should consult SBPL manual for A1 command before using it in Smart Forms. As described in Table 8 System Commands, add LABEL_SIZE command with Parameter of label height follow by label width with correct number of digits as described in SBPL manual for specific printer.
Limitations 7 Please note the following are not supported by the SATO PDL Driver: Compressed graphics and color bitmap Underlined, superscript and subscript text There could be some slight variations of font size in SmartForms and the actual font size printed from SATO printer. This is due to the size conversion and rounding up issues. Courier Font (which will be mapped to SATO Fixed Width Scalable font) does not support 8 points or lower font size printing in 203dpi printer.
Appendix 8.1 Print Controls List for Barcode 8 For the control list of New Barcode Technology, please refer to Table 4 Barcode Print Controls.
SB149 SB150 SB151 SB152 9 10 11 12 ESC+B309 ESC+B310 ESC+B311 ESC+B312 JAN/EAN8 SB161 SB162 SB163 SB164 SB165 SB166 SB167 SB168 SB169 SB170 SB171 SB172 1 2 3 4 5 6 7 8 9 10 11 12 ESC+B401 ESC+B402 ESC+B403 ESC+B404 ESC+B405 ESC+B406 ESC+B407 ESC+B408 ESC+B409 ESC+B410 ESC+B411 ESC+B412 UPC-A SB181 SB182 SB183 SB184 SB185 SB186 SB187 SB188 SB189 SB190 SB191 SB192 1 2 3 4 5 6 7 8 9 10 11 12 ESC+BH01 ESC+BH02 ESC+BH03 ESC+BH04 ESC+BH05 ESC+BH06 ESC+BH07 ESC+BH08 ESC+BH09 ESC+BH10 ESC+BH11 ESC+BH12 Pos
SB212 12 ESC+D012 Interleaved 2 of 5 SB221 SB222 SB223 SB224 SB225 SB226 SB227 SB228 SB229 SB230 SB231 SB232 1 2 3 4 5 6 7 8 9 10 11 12 ESC+D201 ESC+D202 ESC+D203 ESC+D204 ESC+D205 ESC+D206 ESC+D207 ESC+D208 ESC+D209 ESC+D210 ESC+D211 ESC+D212 JAN/EAN13 SB241 SB242 SB243 SB244 SB245 SB246 SB247 SB248 SB249 SB250 SB251 SB252 1 2 3 4 5 6 7 8 9 10 11 12 ESC+D301 ESC+D302 ESC+D303 ESC+D304 ESC+D305 ESC+D306 ESC+D307 ESC+D308 ESC+D309 ESC+D310 ESC+D311 ESC+D312 JAN/EAN8 SB261 SB262 SB263 SB264 SB265 SB2
SB288 SB289 SB290 SB291 SB292 8 9 10 11 12 Barcode (Ratio 2:5) NW-7 (CODABAR) SAP Print Narrow Control Bar Width SB301 SB302 SB303 SB304 SB305 SB306 SB307 SB308 SB309 SB310 SB311 SB312 ESC+DH08 ESC+DH09 ESC+DH10 ESC+DH11 ESC+DH12 Mapped to SBPL Command 1 2 3 4 5 6 7 8 9 10 11 12 ESC+BD001 ESC+BD002 ESC+BD003 ESC+BD004 ESC+BD005 ESC+BD006 ESC+BD007 ESC+BD008 ESC+BD009 ESC+BD010 ESC+BD011 ESC+BD012 Interleaved 2 of 5 SB321 SB322 SB323 SB324 SB325 SB326 SB327 SB328 SB329 SB330 SB331 SB332 1 2 3 4 5 6 7
JAN/EAN8 SB361 SB362 SB363 SB364 SB365 SB366 SB367 SB368 SB369 SB370 SB371 SB372 1 2 3 4 5 6 7 8 9 10 11 12 ESC+BD401 ESC+BD402 ESC+BD403 ESC+BD404 ESC+BD405 ESC+BD406 ESC+BD407 ESC+BD408 ESC+BD409 ESC+BD410 ESC+BD411 ESC+BD412 UPC-A SB381 SB382 SB383 SB384 SB385 SB386 SB387 SB388 SB389 SB390 SB391 SB392 1 2 3 4 5 6 7 8 9 10 11 12 ESC+BDH01 ESC+BDH02 ESC+BDH03 ESC+BDH04 ESC+BDH05 ESC+BDH06 ESC+BDH07 ESC+BDH08 ESC+BDH09 ESC+BDH10 ESC+DBH11 ESC+BDH12 Code 39 (Ratio 1:3) SB501 1 SB502 2 SB503 3 SB504 4 S
SB530 SB531 SB532 10 11 12 ESC+D110 ESC+D111 ESC+D112 Code 39 (Ratio 2:5) SB541 1 SB542 2 SB543 3 SB544 4 SB545 5 SB546 6 SB547 7 SB548 8 SB549 9 SB550 10 SB551 11 SB552 12 ESC+BD101 ESC+BD102 ESC+BD103 ESC+BD104 ESC+BD105 ESC+BD106 ESC+BD107 ESC+BD108 ESC+BD109 ESC+BD110 ESC+BD111 ESC+BD112 Code 93 SB561 SB562 SB563 SB564 SB565 SB566 SB567 SB568 SB569 SB570 SB571 SB572 ESC+BC01 ESC+BC02 ESC+BC03 ESC+BC04 ESC+BC05 ESC+BC06 ESC+BC07 ESC+BC08 ESC+BC09 ESC+BC10 ESC+BC11 ESC+BC12 1 2 3 4 5 6 7 8 9 10 11
8.
ESC+XU (5x9) (Cour_i7) LM4 Device Type 8 9 10 11 12 48.0 54.5 60.5 66.5 72.5 32.0 36.0 40.0 44.0 48.0 SF208 SF209 SF210 SF211 SF212 1 2 3 4 5 6 7 8 9 10 11 12 3.0 6.5 9.5 13.0 16.0 19.0 22.5 25.5 28.5 32.0 35.0 38.5 2.0 4.0 6.5 8.5 10.5 12.5 15.0 17.0 19.0 21.0 23.5 25.5 SF101 SF102 SF103 SF104 SF105 SF106 SF107 SF108 SF109 SF110 SF111 SF112 Note: The fixed size resident fonts are only supported in English-only and LM4 Device Types.
Extensive contact information of worldwide SATO operations can be found on the Internet at www.satoworldwide.