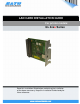
LAN CARD INSTALLATION GUIDE For printer models: GL 4xxe Series 1 General 1.1 Important information Read this Installation Guide before and during the installation This quick guide provides important information on how to setup your of the above accessory. Keep this Installation Guide handy for new SATO product. future reference.
LAN Card Installation Guide Be sure to read this quick guide thoroughly before using this printer. It is an integral part of the product and should be kept in the immediate vicinity of the device and available to the operating staff. 1.2 Limitation of liability All information in this manual have been compiled under due consideration of federal standards and regulations.
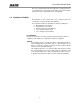
LAN Card Installation Guide 1.3 Explanation of symbols This instruction manual uses various warning icons to help you understand the safe operation of your printer. Explanations of the icons are below. WARNING! Indicates neglectful or erroneous use may cause irreparable damage to the product, serious injury to the operator, or worse. CAUTION! Indicates a specific point where caution should be used. The graphic within the triangle will indicate the specific issue, i.e.
LAN Card Installation Guide 1.4 Contact and Document Information SATO GROUP OF COMPANIES . International Headquarters Americas SATO INTERNATIONAL PTE. LTD 438A Alexandra Road #05-01/04, Alexandra Technopark, Singapore 119967 Phone: 65-6271-2122 Fax : 65-6271-2151 Email: sales@sato-int.com SATO INTERNATIONAL AMERICA, INC. (Regional HQ) 10350 Nations Ford Road Suite A, Charlotte, NC 28273 Phone: 1-704-644-1650 Fax: 1-704-644-1662 Email: satosales@satoamerica.com Americas SATO AMERICA, INC.
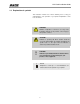
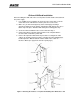
LAN Card Installation Guide GL4exe LAN Card Installation Before installing the LAN card, make sure the printer is OFF and disconnected from the power supply. 1. Use a Phillips head screwdriver to remove the two screws that secure the Cover Plate to the LAN Card slot. Set the plate and screws aside. 2. Make sure you have discharged any static electricity (by touching a grounded component on the printer) and plug the LAN card into the slot so that it snaps into place.
LAN Card Installation Guide LAN CONFIGURATION FOR ETHERNET CONNECTION Once the LAN card is installed, you can access the Ethernet settings in the GL’s Interfaces Mode menu. An overview of the LAN options is listed below, followed by explanations of relevant LCD menu options in the following pages.
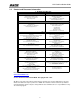
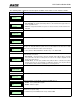
LAN Card Installation Guide The following tables explain the relevant options available via the LCD screen in Interfaces Mode. Menu screen What the options mean Is the menu selection screen for the Host Interface option of the INTERFACES mode. INTERFACES Host Interface* There are only two options relative to the serial interface, ignore all others. Host Interface Auto Switching* • Auto Switching - the printer automatically switches to the relative interface type and moves into the applicable menus.
LAN Card Installation Guide Menu screen Keep Alive Timer 3 minutes* What the options mean Determines the amount of time that the tcp connection will remain connected after the print job has terminated. The allowable range is 2 to 10 minutes, and the factory default is 3 minutes. This menu appears only if a 10/100Base-t Network Interface Card (NIC) is installed. There are five different speed modes to allow compatibility with different systmes and networks.
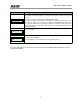
LAN Card Installation Guide Menu screen What the options mean Allows the Gateway Address to be set for the TCP/IP protocol in four three-digit segments (SEG1 through SEG4). If the Gateway Address is assigned by Bootp, ARP, or DHCP, it is dynamic and read only. Gateway Address XXX.XXX.XXX.XXX MAC Address The defaults for the SEG1 through SEG4 are 000, 000, 000, and 000. Note: When changing the Gateway Address, the printer resets the NIC when the printer is place online.
LAN Card Installation Guide 10