HT200e Stand-Alone Printer QUICK GUIDE
Contents Subject •Getting Started •Power Supplies •Options •Names of printer parts •Quick start guide •Function keys explained •Fixed formats •Loading the lalbels •Printing labels •Initial printer settings •Using the formats •Selecting the currency unit •Changing the discount rate •Changing the Euro conversion rate •Changing the VAT rate •Memory Cards •Preset Data •Printer care and maintenance •Error Messages •Inputting Data •Trouble Shooting •Technical specifications Page 1 2~5 5~6 7~8 9 10 11~14 15~17 18
Getting Started Your HT200e Printer has been checked and tested before despatch to you. The contents of the packaging have been checked and are listed below. Label roll holder & mains lead Printer unit Cleaning sheet & check label Your printer has been designed and built to the highest standards Please take time to read this booklet in order to not only get the best use from it but also to ensure that you continue to get satisfaction for many years to come.
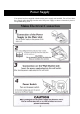
Power Supply Your printer has been supplied with the mains power supply unit installed. You will see that it has a supply cable that plugs into the end of the power supply as shown. Alternatively there is an optional battery pack.
Battery Pack Connection Installation of Battery Pack 3
Battery Pack Connection Charging the Battery Pack 4
Battery Pack Connection Discharging the Battery Pack Options Installing the Scanner 5
Options Your printer has the capability to store information to be used in your label designs (Formats). These can be either stored in your printers own memory or to an optional memory card. This card can also be used to back up your formats for security or to copy them to another printer.
Working with your printer Names of Individual Parts 7
Working with your printer 8
Sato HT200e Quick Start Guide Press pink button to open case. Open case. Find roll holder. Ensure label guides touch labels. Place roll holder into label core. Place labels on holder into the printer. Lay labels along printer base. Apply pressure to centre of lid to lock case. Switch on the power. Key in the format number you wish to use. Press ENTR button. Type in the price. Use the FNC1 Key to change £1.00 (Pound) to 99p (Pens). Enter only the numbers decimal point is automatic. For £1.
Explanation of main keys you will need FNC1 When price is prompted on screen pressing FNCI gives you the option to change from £1.00 price printing (pounds) to 99p (Pens) Use < > keys to select. <> These two keys move the flashing cursor to the position that you want to change. A/C This key when pressed clears the display, you can use this to cancel if a mistake is made in a price etc. S/S This means start/stop and is used to halt or pause whilst printing.
Fixed Formats Your printer comes with 29 fixed formats (label Designs PLU Barcodes Format 01 This is an EAN 8 barcode with price and three digit human code Format 03 This is an EAN 13 barcode, with price and three digit human code Format 02 This is an EAN 8 barcode The flag 50 is fixed with price and three digit human code Format 04 This is an EAN138 barcode. The flag 50 is fixed,with price and three digit human code Non PLU Barcodes Format 05 This is an EAN 8 barcode.
Fixed Formats Non PLU Barcodes Format 14 This is 2 EAN8 barcodes. Not normally PLU, price and 3 digit human code. Format 15 This is 2 EAN13 barcodes. Not normally PLU, price and 3 digit human code. Price Reductions HT200e will calculate discount for you on these formats to set the discount % see Adjusting the Discount Rate section of this manual Format 16 Here you enter the WAS price. The printer calculates the discount. Format 17 Here you input the EAN13 barcode and the WAS price.
Fixed Formats Simple Data and Price Format 13 Here we have a two lines of 15 characters which can be a mixture of Alpha and Numeric along with a price. Format 10 Here we have a single line of 15 characters which can be a mixture of Alpha and Numeric along with a price. VAT Calculation Format 24 Here you enter the EX VAT amount and the printer calculates all the values. It also needs data to make or copy an EAN 13 barcode.
Fixed Formats Euro Pricing HT200e will calculate a conversion from your local currency into €uro. The conversion rate can be changed. Please refer to the Adjusting Conversion Rate section of this manual. Format 20 Here you enter the the local currency price and the printer calculates Euro value. It also needs data to make or copy an EAN 13 barcode. The conversion rate can be altered. Please refer to Adjusting Conversion Rate section of this manual.
15
When in continuous mode 16
For dispense mode 17
For batches of labels Continuous mode is best With Dispense mode the backing is peeled and the label ready to apply 18
Initial Printer Settings 1 Format No [00] HT200e 2 Enter 00, press ENTR. SAVE PRESET TO INT RAM OPT CARD 3 Use < > Keys to select. Press ENTR. Print NORMAL DEMAND Use < > Keys to select. Press ENTR. Note Demand mode is only suitable for labels 25~50mm long 4 7 CHECK LABEL YES NO 5 GUARD BARS NORMAL LONG Use < > Keys to select. Press ENTR. Use < > Keys to select. Press ENTR. Note Check label can be printed after each job to separate jobs and for early warning of print deficiencies.
How to use the formats 1 Format No [00] HT200e 2 Enter 04, press ENTR. 4 [PRICE £------ ] [BARCODE 50……….C ] * 3 Key in ten digits. Press ENTR. You must fill all ten. 5 Key in a price, press ENTR. [CODE --- ] Key in three digits. Press ENTR Note You can leave this blank QTY ---- 6 PRINTING Enter quantity required. Press ENTR Will return to screen 1 when printing is complete Note Decimal point will automatically be inserted therefore for £1.
To adjust the discount rate 1 Was 23% £-------- 2 Press FNC1. 3 If fix [CODE --- ] Reduce Rate Fix Variable Use <> Keys to select Press ENTR 4 If variable [PRICE £------ ] Key in a price, press ENTR. Key in three digits. Press ENTR Note Decimal point will automatically be inserted. Therefore for £1.00 you must enter 100 Note You can leave this blank To adjust the conversion rate Formats 20, 21, 28 & 29 1 Price £-------Press FNC1.
Adjusting the VAT Rate Formats 23 & 24 Ex VAT £-------- 1 VAT Rate [--.-] % 2 Press FNC1. Enter the VAT rate press ENTR Notes •An exchange rate must be entered for this format to work. •If a VAT rate is not set up the printer will automatically go into this sequence to enable it to work. Memory Cards Optional memory cards can be purchased for your printer. These should be purchased only from a recognised SATO Dealer to ensure they actually work.
Preset Data Preset data is a means to store data which you wish to use in the formats. This means that rather than enter large amounts of information every time you wish to print you can simply recall the data needed by entering a four digit number or scanning a special barcode containing that number. Storing Preset Data HT200e will store 300 sets of data in it’s own memory and a further 1,000 on the optional memory card. 1 Format No [00] HT200e 2 Press RCL.
Printing Preset Data 1 Format No [00] HT200e 2 Press RCL. [PRESET] PRINT STR MODIFY DEL DUMP MASTER 3 Use < > Keys to select. PRINT Press ENTR PRESET NO INPUT --- Enter the stored number for the data you wish to change. Press ENTR. Follow the prompts on screen and print the label. Deleting Preset Data 1 Format No [00] HT200e 2 Press RCL. 4 [PRESET] PRINT STR MODIFY DEL DUMP MASTER 3 Use < > Keys to select.
Preset Data Preset Master Print Here the printer will now produce a small barcode label with the number of a saved label. These can be used to index your menu book and with the scanner, can be used for quick access to the saved labels 1 Format No [00] HT200e 2 Press RCL. 4 [PRESET] PRINT STR MODIFY DEL DUMP MASTER Use < > Keys to select. MASTER Press ENTR. PRESET NO. INPUT ….-…. Enter the numbers you wish to print out (first and last.
Time of maintenance Use the blue lapping sheet included with your printer occasionally to remove stubborn deposits on the print head. This should not be used too often as it does have an abrasive effect on the head face. Light deposits should be removed on a Daily/Weekly basis with alcohol and swabs or alcohol wipes.
27
Error Messages Displayed Message Measures 1 MEDIA PITCH ERROR No more paper. Paper jammed. Please set or change paper correctly. Press [S/S] and printing continues. 2 COVER OPEN Printer cover top is opened. Close the cover top firmly until you hear a click. 3 CHARGE PWR PACK Please charge the battery. 4 PRINT BATT LOW Memory card battery has run out. It is necessary to replace the internal battery. 5 CHNG PRINT BATT Memory card battery has run out. Please change battery.
Error Messages 9 CHNG CARD BATT PC card battery has run out. As the data in the card might be lost, you will need to store again. 10 WRITE PROTECT ON Cannot write to PC card. Please ensure card is not write protected. 11 CONFIRM CLR TYPE Wrong usage and clearing methods With respect to proper card usage, please clear again. 12 BLANK FORMAT An unregistered format number has been inputted. Please confirm format no. 13 DATA ERR Inputted value, setting exceeded specified limits.
Error Messages 18 HEAD OVERHEATED The head functions at an unusually high temperature. Please switch OFF the power, wait for a while and resume printing. 19 PRINTER H/W ERR There is an abnormality in the printer itself. Switch OFF the printer, wait a while before switching it on again. 20 PRE SET NO ERR An unregistered preset number has been inputted. Please confirm the number. 21 PRE SET FULL The amount of preset data entries has exceeded the capacity.
Inputting Data •Numeric keys “2” to “0” all also have an ALPHA VALUE. •To change to alpha mode press [SET] for upper case and [SHFT] for lower case. •Each push of the number key will show a different letter. All have three letters except “O” which has “Y,S and Blank”. •To return to numeric press [SHFT] or [SET] again. •The message “ALP” will show in the top right of the display. Special Keys •Key “1” gives the following symbols £*+!&%$=/° •Key “.
32
Specifications Print method Print head density Maximum print area Print speed Media size Printing mode Size Weight Environmental Font type Bar code Options Direct thermal 8 dots/mm 48mm x 96 60, 80 mm/sec 60mm/sec when used with battery power Width 28~51mm Pitch 19mm~103mm Continuous, Dispenser Width 132 x Depth 230 x Height 151mm 2.4kg (2.5kg with battery pack). Operating Temp 5~40° Humidity 30~80%,. But with no condensation. Storage temp 5~60° Humidity 30~90%, but with no condensation.
34