WS Printer Owner’s Manual WS408DT
FCC ID In a domestic environment this product may cause radio interference in which case the user may be required to take adequate measures. FCC Warning This equipment has been tested, pursuant to Part 15 of the FCC Rules. These limits are designed to provide reasonable protection against harmful interference when the equipment is operated in a commercial environment.
Bluetooh/Wireless Communication Compliance Statement This product has been certified for compliance with the relevant radio interference regulations of your country or region. To make sure continued compliance, do not: ∙ Disassemble or modify this product. ∙ Remove the certificate label (serial number seal) affixed to this product.
Liability Disclaimer SATO Corporation takes steps to assure that the company’s published engineering specifications and manuals are correct; however, errors do occur. SATO reserves the right to correct any such errors and disclaims any resulting liability.
Contents 1 2 3 4 5 Introduction ........................................................................................................... 2 1.1 Features....................................................................................................... 2 1.2 Unpacking.................................................................................................... 2 1.3 Understand your printer ............................................................................. 3 1.3.
5.1 Printer issues ............................................................................................. 31 5.2 Media issues .............................................................................................. 32 5.3 Other issues............................................................................................... 33 Specifications ....................................................................................................... 34 6.1 Printer .............................
1 Introduction Unpacking 1 Introduction Thank you for purchasing a SATO WS printer. This manual provides information about how to set up and operate your printer, load the media and solve common problems. 1.
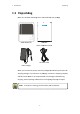
1 Introduction Unpacking 1.2 Unpackiing Make sure all of the t followin ng items are e included in n your packkage. SATO WS Printer SATTO WS Quick Instaallation Guide AC Power Cord ply Power Supp e package im mmediately and inspecct for When you receivee the printeer, open the pany shipping damage. If you disccover any daamage, contact the shipping comp and fille a claim. SATO S is not responsible e for any damage incurrred during shipping.
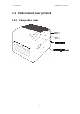
1 Introduction Underrstand your prrinter 1.3 Understa and your printerr 1.3 3.
1 Introduction Underrstand your prrinter 1.3 3.2 Ba ack view w Cau ution The areas indiccated by the ellipse haave sharp eedges. To avoid inju ury, be carefful not to to ouch them when w handling the prin nter. Cau ution To avoid injury, be careful not to trap p your fingeers in the Paaper Slott while open ning or closing the Top Cover.
1 Introduction Underrstand your prrinter 1.3 3.3 Interior view v Warrning The printhead becomes ve ery hot durring printingg. Do not to ouch the printhead or o touch arround it dirrectly after printing. B By doing so you mayy get burnt.
1 Introduction Printer lights 1.4 Printer lights There are two LED lights that show the status of your printer. 1.4.1 Status lights Status lights help you check printer’s condition. The following tables show the blinking speed of status lights and the conditions they indicate. Symbol Blinking Speed Blinking Interval Fast 0.5 Second Medium 1 Second Slow 2 Seconds LED 1 Off LED 2 Off Description The print module is opened when the printer is turned on. Green Off In the online mode.
1 Introduction Printer lights 1.4.2 System mode The system mode consists of status light color combinations. It contains a list of commands for you to select and run. To enter the system mode and run the command, do the following: 1. Turn off the printer. 2. Press and hold the FEED button, and turn on the printer. 3. Both status lights glow solid orange for a few seconds. Next, they turn to green shortly, and then turn to other colors. 4.
2 G started Get Attaach the powerr cord 2 Get startted This ch hapter desccribes how to t set up yo our printer. Cau ution Do not n use your printer in areas exposed to splasshing waterr or anyy other liquid. Cau ution Do not n drop your printer, or o place it in n an area su ubject to hum midity, vibraation or sho ock. 2.1 Atttach th he pow wer co ord 1. Maake sure thee power sw witch is set to the OFF position. p 2. Inssert the pow wer supply’s connectorr into the prrinter poweer jack. 3.
2 Get started Turn on/off the printer 2.2 Turn on/off your printer When your printer is connected to a host (a computer), it is good to turn on the printer before turning on the host, and turn off the host before turning off the printer. 2.2.1 Turn on your printer 1. To turn on your printer, turn on the Power Switch as below. The “I” is the ON position. 2. Both status lights glow solid orange for a few seconds, and then LED 2 goes out, while LED 1 turns to solid green.
2 Get started Turn on/off the printer 2.2.2 Turn off your printer 1. Make sure LED 2 is off and LED 1 is solid green before turning off the printer. 2. To turn off your printer, turn off the Power Switch as below. The “O” is the OFF position. Caution Do not turn off your printer during data transmission.
2 Get started Load media 2.3 Load media There are various types and sizes for the media roll. Load the applicable media to satisfy your need. 2.3.1 Prepare media The inside wound and outside wound media roll can be loaded into the printer the same way. In case the media roll is dirty during shipping, handling or storage, remove the outside length of the media. It helps avoid dragging adhesive and dirty media between the printhead and platen roller. Inside Wound Outside Wound 2.3.