sauder.com You'll love what we have in storage. Storage Credenza Adept Storage Collection | 417653 NOTE: THIS INSTRUCTION BOOKLET CONTAINS IMPORTANT SAFETY INFORMATION. Need help? Visit Sauder.com to view video assembly tips or chat with a live rep. Prefer the phone? Call 1-800-523-3987. Share your journey! PLEASE READ AND KEEP FOR FUTURE REFERENCE. English pg 1-18 Français pg 19-21 Español pg 22-24 Lot # 386735 11/13/15 Purchased: __________________ Be sure to give us a ring before making any returns.
Table of Contents Part Identification Hardware Identification Assembly Steps Assembly Tools Required 3 No. 2 Phillips Screwdriver Tip Shown Actual Size 4 5-18 Hammer Français 19-21 Español 22-24 Safety 25-26 Warranty Not actual size Skip the power trip. This time. 27 ! WARNING Use of a TV that is too heavy or large is hazardous. A TV that is too heavy will create a risk of a tip-over that can cause severe injury or death.
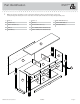
Now you know our ABCs. Part Identification å While not all parts are labeled, some of the parts will have a label or an inked letter on the edge to help distinguish similar parts from each other. Use this part identification to help identify similar parts.
Hardware Identification å Screws are shown actual size. You may receive extra hardware with your unit. 34E ADJUSTABLE FOOT - 2 1F 2F 15F WOOD DOWEL - 4 4G METAL BRACKET - 4 HIDDEN CAM - 36 1L CAM DOWEL - 20 8F CAM SCREW - 16 WARNING LABEL - 1 21M CARD HOLDER - 3 WARNING Never use this furniture with a TV that is too large or too heavy. Severe injury or death can occur. The TV and furniture will be unstable and may tip. -The TV must less than 50 lbs.
Look for this icon. It means a video assembly tip is available at www.sauder.com/services/tips Step 1 å å Assemble your unit on a carpeted floor or on the empty carton to avoid scratching your unit or the floor. Do not tighten the HIDDEN CAMS in this step. Push thirty-six HIDDEN CAMS (1F) into the ENDS (A), UPRIGHTS (B), SMALL UPRIGHTS (C), BOTTOM (E), and SHELF (F). Then, insert the metal end of a CAM DOWEL (2F) into each HIDDEN CAM except in the long edges of the ENDS (A) and SHELF (F).
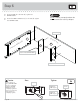
Step 2 å Turn sixteen CAM SCREWS (8F) into the LEGS (I and J) and SHELF MOLDING (L). 8F (16 used) L J J I I Page 6 417653 www.sauder.
Step 3 å Insert two WOOD DOWELS (15F) into the holes in the LEGS (I and J). å Fasten the LEGS (I and J) to the ENDS (A). Tighten six HIDDEN CAMS. å NOTE: Be sure the WOOD DOWELS insert into the ENDS (A). Some assembly (and snacks) required. These surfaces must be even. 15F S HI urfa DD ce EN wi CA th M S J S HI urfa DD ce EN wi CA th M S A A The LEG should overhang this edge. I The LEG should overhang this edge. 15F 1 www.sauder.
Step 4 å å Flip the ENDS (A) over. å Slide the END MOLDINGS (M) onto the ENDS (A). Line up the grooves in the MOLDINGS over the heads of the SCREWS in the ENDS. Turn four BLACK 9/16" FLAT HEAD SCREWS (32S) into the ENDS (A) until the shoulders of the SCREWS rest on the surfaces of the ENDS. These edges should be even. M A A M Shoulder These edges should be even.
Step 5 å å Flip the ENDS (A) over. å Fasten the remaining LEGS (I and J) to the ENDS (A). Tighten six HIDDEN CAMS. å NOTE: Be sure the WOOD DOWELS insert into the ENDS (A). Insert two WOOD DOWELS (15F) into the holes in the LEGS (I and J). S HI urfa DD ce EN wi CA th M S These surfaces must be even. A I S HI urfa DD ce EN wi CA th M S J A 15F www.sauder.
Step 6 å Fasten an END (A) to the TOP (D). Tighten two HIDDEN CAMS. å Fasten the SMALL UPRIGHTS (C) to the TOP (D). Tighten four HIDDEN CAMS. Caution Do not stand the unit upright without the BACK fastened. The unit may collapse. Finished edge A ith ew c a f Sur S AM C DEN HID C Surface with HIDDEN CAMS Sur fac ew ith hol es D C Surface with HIDDEN CAMS Caution Risk of damage or injury. HIDDEN CAMS must be completely tightened.
Step 7 å Fasten the SHELF (F) to the END (A). Tighten two HIDDEN CAMS. å Fasten the SHELF (F) to the SMALL UPRIGHTS (C). Use four BLACK 1-7/8" FLAT HEAD SCREWS (2S). Maximum 210 degrees Arrow Minimum 190 degrees These holes must be here. C A C F Sur HIDface w DEN ith CA MS 2S BLACK 1-7/8" FLAT HEAD SCREW (4 used in this step) www.sauder.
Step 8 å Fasten the UPRIGHTS (B) to the SHELF (F). Tighten four HIDDEN CAMS. Now might be a good time to refresh your drink. F EN IDD H t u itho B w e fac Sur MS CA S AM C DEN HID ith ew c a f B Sur Maximum 210 degrees Arrow Minimum 190 degrees Page 12 417653 www.sauder.
Step 9 å Fasten the BOTTOM (E) to the END (A). Tighten two HIDDEN CAMS. å Fasten the BOTTOM (E) to the UPRIGHTS (B). Use four BLACK 1-7/8" FLAT HEAD SCREWS (2S). Maximum 210 degrees Arrow Minimum 190 degrees These holes must be here. A B E B Sur HIDface w DEN ith CA MS 2S BLACK 1-7/8" FLAT HEAD SCREW (4 used in this step) www.sauder.
Step 10 Fasten three CARD HOLDERS (21M) to the SHELF MOLDING (L). Use six SILVER 1/2" MACHINE SCREWS (38S) as shown to the right. å These holes must be closer to the top edge. å Separate the CARDS on the CARD SHEET (38M) and insert them into the CARD HOLDERS (21M). å Fasten the SHELF MOLDING (L) to the SHELF (F). Tighten four HIDDEN CAMS. å Fasten the remaining END (A) to the TOP (D), BOTTOM (E), and SHELF (F). Tighten six HIDDEN CAMS.
Step 11 å Tap four DECORATIVE NAILS (4N) into the BOTTOM MOLDING (K) as shown to the right. å Fasten four METAL BRACKETS (4G) to the BOTTOM (E). Use four BLACK 9/16" LARGE HEAD SCREWS (1S). å NOTE: Be sure the BRACKETS are even with the edge of the BOTTOM. å Fasten the BOTTOM MOLDING (K) to the BRACKETS on the BOTTOM (E). Use four BLACK 9/16" LARGE HEAD SCREWS (1S). 4N K ed h is n Fi e ac rf su K 4G E 1S BLACK 9/16" LARGE HEAD SCREW (8 used in this step) www.sauder.
Step 12 å å Carefully turn your unit over onto its front edges. Unfold the BACK (G) and lay it over your unit. å å å å Fasten the BACK (G) to your unit using the NAILS (1N). Make equal margins along the two long edges and along the two short edges of the BACK (G). Push on opposite corners of your unit if needed to make it "square". NOTE: Be sure to tap NAILS into the holes that line up over the SHELF and UPRIGHTS. Fasten the ADJUSTABLE FOOT (34E) to the BOTTOM (E).
Step 13 å å å Carefully stand your unit upright. å IMPORTANT: The ADJUSTABLE FEET should not extend beyond the bottom edges of the LEGS (I and J). Pro Tip: Lift with your legs. And, you know, your arms. Position your unit in its final location. Turn the ADJUSTABLE FEET (34E) downward until they touch the floor. J I I J With your No. 2 Phillips Screwdriver, turn the ADJUSTABLE FEET downward until they touch the floor. Floor 34E www.sauder.
Step 14 å Apply the WARNING LABEL (1L) to the TOP (D). You should be able to read the label when the TV is removed from the unit. When the TV is in place, it should hide the label. Peel off the backing and apply the label as shown in the diagram. å å NOTE: This is a permanent label intended to last for the life of the product. Once applied, do not try to remove it. å å å å Push two HOLE PLUGS (55P) into the holes in the BOTTOM (E). Push the RUBBER SLEEVES (2R) over the METAL PINS (1R).
417653 Utilisez les instructions d’assemblage en français avec les schémas étape par étape du manuel d’instruction en anglais. Chaque étape en français correspond à la même étape en anglais. La pièce devant être attachée à l’élément est représentée en gris sur les schémas de chaque étape pour plus de précision. Comparer la “Liste de pièces” ci-dessous avec la “PART IDENTIFICATION” du manuel en anglais pour vous familiariser avec les pièces avant l’assemblage.
AVERTISSEMENT ÉTAPE 4 L'utilisation d'un téléviseur trop lourd ou trop gros est dangereuse. Un téléviseur trop lourd créera un risque de basculement pouvant provoquer de graves blessures ou la mort. Un téléviseur trop gros pour l'espace disponible risque d'être accidentellement poussé ou de tomber du mobilier ou d'être sujet à basculer. Retourner les EXTRÉMITÉS (A). • Vérifier la taille et le poids du téléviseur.
ÉTAPE 9 ÉTAPE 13 Fixer le DESSOUS (E) à l'EXTRÉMITÉ (A). Serrer deux EXCENTRIQUES ESCAMOTABLES. Relever, avec précaution, l'élément dans sa position verticale. Fixer le DESSOUS (E) aux MONTANTS (B). Utiliser quatre VIS TÊTE PLATE 48 mm NOIRES (2S). Tourner le PIED RÉGLABLE (34E) vers le bas jusqu'à ce qu'il touche le sol. ÉTAPE 10 IMPORTANT : Le PIED RÉGLABLE ne doit pas dépasser les chants inférieurs des PIEDS (I et J). Fixer trois PORTE-CARTES (21M) sur la MOULURE DE TABLETTE (L).
417653 Use estas instrucciones de ensamblaje en español junto con las figuras paso-a-paso provistas en el folleto inglés. Cada paso en español corresponde al mismo paso en inglés. Se destacan las figuras de cada paso con una tonalidad oscura para mostrar precisamente cual parte se debe montar a la unidad. Compare la “Lista de Part” abajo con la “Part Identification” en el folleto en inglés para familiarizarse con Las partes de ensamblaje.
ADVERTENCIA PASO 3 El uso de un televisor demasiado pesado o grande es peligroso. Un televisor demasiado pesado generará riesgo de caída, lo cual podría causar lesiones graves o muerte. Un televisor demasiado grande para el espacio disponible puede ser empujado o golpeado por accidente, causando que éste se salga del mueble o se caiga. Inserte dos PASADORES DE MADERA (15F) en los agujeros de las PATAS (I y J). • Verifique el tamaño y peso del televisor.
PASO 8 PASO 12 (CONTINUACIÓN) Fije los PARALES (B) al ESTANTE (F). Apriete cuatro EXCÉNTRICOS ESCONDIDOS. NOTA: Asegúrese de clavar ligeramente los CLAVOS dentro de los agujeros que se alinean sobre el ESTANTE y los PARALES. PASO 9 Fije el FONDO (E) al EXTREMO (A). Apriete dos EXCÉNTRICOS ESCONDIDOS. Fije el FONDO (E) a los PARALES (B). Utilice cuatro TORNILLOS NEGROS DE CABEZA PERDIDA de 48 mm (2S). Fije la PATA AJUSTABLE (34E) al FONDO (E).
WARNING Please use your furniture correctly and safely. Improper use can cause safety hazards, or damage to your furniture or household items. Carefully read the following chart. Look out for: What can happen: How to avoid the problem: • Children climbing on furniture. • A child may try to reach a toy or other object by climbing on furniture. • Children will play and be active near the TV. • Risk of injury or death.
ADVERTENCIA Por favor use el mobiliario correcta y seguramente. El mal uso puede causar riesgos de seguridad o daño a las unidades o artículos domésticos. Cuidadosamente lea la tabla a continuación. Esté alerto de: Puede ocurrir: Evitar el problema: • Los niños subiendo al mobiliario. • El niño que intenta a alcanzar un juego u otro objeto subiendo al mobiliario. • Los niños jugarán y estarán activos cerca del televisor. • Riesgo de lesiones o la muerte.
5-YEAR LIMITED WARRANTY 1. Sauder Woodworking Co. (Sauder®) provides limited warranty coverage to the original purchaser of this product for a period of five years from the date of purchase against defects in materials or workmanship of Sauder furniture components. As used in this Warranty, “defect” means imperfections in components which substantially impair the utility of the product. This Warranty gives you specific legal rights, and you may also have other rights which vary from state to state. 2.
Dear Valued Customer: So, how did it go? Thanks so much for choosing Sauder® furniture. I hope the purchase and assembly process was a positive experience and you feel good about the furniture you just built. If you need assistance or want to learn more, please contact our award-winning, Ohio-based customer service team at 800-523-3987 or Sauder.com. Set a world record for speed? Feeling good about yourself? Nice. Get social with it on any of these quality share sites.