Operating Instructions For safety, please read this manual carefully before you use this product and keep it handy for future reference.
Note to users in the United States of America Notice: This equipment has been tested and found to comply with the limits for a Class B digital device, pursuant to Part 15 of the FCC Rules. These limits are designed to provide reasonable protection against harmful interference in a residential installation. This equipment generates, uses and can radiate radio frequency energy and, if not installed and used in accordance with the instructions, may cause harmful interference to radio communications.
Introduction This manual describes detailed instructions on the operation and notes about the use of this machine. To get maximum versatility from this machine all operators are requested to read this manual carefully and follow the instructions. Please keep this manual in a handy place near the machine. Notes: Some illustrations in this manual might be slightly different from the machine. Certain options might not be available in some countries. For details, please contact your local dealer.
Safety Information When using this machine, the following safety precautions should always be followed. Safety During Operation In this manual, the following important symbols are used: R WARNING: Indicates a potentially hazardous situation which, if instructions are not followed, could result in death or serious injury. R CAUTION: Indicates a potentially hazardous situation which, if instructions are not followed, may result in minor or moderate injury or damage to property.
R CAUTION: • Protect the machine from dampness or wet weather, such as rain, snow. • Unplug the power cord from the wall outlet before you move the machine. While moving the machine, you should take care that the power cord will not be damaged under the machine. • When you disconnect the power plug from the wall outlet, always pull the plug (not the cable). • Do not allow paper clips, staples, or other small metallic objects to fall inside the machine.
How to Read This Manual Symbols In this manual, the following symbols are used: R WARNING: This symbol indicates a potentially hazardous situation that might result in death or serious injury when you misuse the machine without following the instructions under this symbol. Be sure to read the instructions, all of which are described in the Safety Information section.
Making Prints Before making prints using this machine, you have to make a master by pressing the {Start} } key. When you press the { Start} } key, the machine scans the original image and makes a master. This procedure describes how to make basic prints. B Press the {Start}} key. A Place your originals in one of the following two ways: Placing originals on the exposure glass C Press the {Proof}} key. A Place a single page face down.
To decrease the image density, press the {V} key. See p.25 “Adjusting the Image Density of Prints”. D Enter the desired number of prints with the number keys. E Press the {Print}} key. When the print job has finished, press the {Clear Modes/Energy Saver} } key. Previously entered job settings will be cleared.
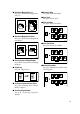
What You Can do with this Machine Below is a quick summary of this machine's features and where to look in this manual for more information. ❖ Standard Printing See p.19 “Standard Printing”. ❖ Reducing and Enlarging Using Preset Ratios See p.29 “Reducing and Enlarging Using Preset Ratios”. ❖ Energy Saver Mode See p.22 “Energy Saver Mode” ❖ Adjusting the Print Image Position See p.24 “Adjusting the Position of Printed Images”. GRRATI0E ❖ Auto Magnification See p.31 “Auto Magnification”.
❖ Directional Magnification (%) See p.36 “Directional Magnification (%)”. a% b% ❖ Economy Mode See p.50 “Economy Mode”. ❖ Auto Cycle See p.51 “Auto Cycle”. ❖ All Class Mode See p.52 “All Class Mode”. CP2P01EE ❖ Directional Magnification (Size) See p.38 “Directional Magnification (Size)”. 1 GRCLAS2E ❖ Auto Class Mode See p.54 “Auto Class Mode”. 3 2 4 CP2M01EE ❖ Erasing Center and Edge Margins See p.40 “Erasing Center and Edge Margins”. ❖ Edge Erase See p.41 “Edge Erase”.
B C D GRACOM0E GRCLAS1E ❖ Class Mode See p.62 “Class Mode”. R ❖ Skip Feed Printing See p.71 “Skip Feed Printing”. ❖ Programs See p.73 “Programs”. R R R R 1 1 1 1 A 1 1 1 A B C D ❖ Auto Combine Mode See p.69 “Auto Combine Mode”. 1 ❖ Manual Class Mode with two or More Originals See p.59 “Manual Class Mode with two or More Originals”. R R GRCLAS0E ❖ Security Mode See p.76 “Security Mode”. ❖ Quality Start Mode See p.77 “Quality Start Mode”. ❖ Job Separation See p.79 “Job Separation”.
❖ Printing in Two Colors See p.134 “Printing in Two Colors”. R ❖ Date Stamp See p.111 “Date Stamp”. R P P GRCOLO0E ❖ Page Stamp See p.113 “Page Stamp”. ❖ Image Rotation See p.85 “Image Rotation”. ❖ Make-up Printing See p.97 “Make-up Printing”. 1 5 ❖ Merging Images See p.108 “Image Overlay”.
❖ Memory Combine See p.118 “Memory Combine”. 1 2 3 4 1 2 3 4 GRMCOM0E GRREPE0E ❖ Original Storage See p.103 “Original Storage”. ❖ Storage Overlay See p.108 “Image Overlay”.
TABLE OF CONTENTS Machine Exterior......................................................................................... 1 Machine Interior.......................................................................................... 2 Options ........................................................................................................ 4 Operation Panel .......................................................................................... 5 Keys ................................................
Printing onto Various Kinds of Paper..................................................... 43 Printing onto Thick Paper............................................................................. 43 Printing onto Standard Paper....................................................................... 43 Printing onto Envelopes ............................................................................... 44 Printing onto Special Kinds of Paper............................................................
Command Sheets for Make-Up Printing................................................. 90 Command Sheets ........................................................................................ 90 Making a Command Sheet........................................................................... 90 Command Sheets and Finished Prints......................................................... 95 Make-up Printing ......................................................................................
4. User Tools Accessing the User Tools...................................................................... 141 User Tools Menu..................................................................................... 143 1. System ................................................................................................... 143 2. Set Operat'n Mode ................................................................................. 144 3. Initial Setting.......................................................
When the Open Cover/Unit Indicator (M M) Lights................................. 185 When the Add Ink Indicator (j j) Lights................................................ 186 When the Master End Indicator (C C) Lights.......................................... 188 When the Master Eject Indicator (k k) Lights........................................ 190 When Other Indicators Are Lit............................................................... 191 When Prints Are Not Delivered in a Neat Stack...............
xvi
Machine Exterior 1. Front door 6. Paper feed side plates Open to access the inside of the machine. Prevent paper skewing. 2. Flip up cover 7. Paper feed tray Flip up to access the keys underneath. Load paper here. 3. Operation panel 8. Paper feed side plates knob See p.5 “Operation Panel”. Use to move the side plates. 4. Master tray 9. Paper feed side plates knob lock Open this unit when installing the master. lever Locks the paper feed side plates. 5.
Machine Interior 3 4 ZBHH180E 14 1. Main switch 5. Paper delivery tray Use to turn the power on or off. Completed prints are delivered here. 2. Paper alignment wings 6. Paper delivery side plates Lift or lower the wings depending on the type of paper being used. These plates align the prints on the paper delivery tray. 3. Paper delivery end plate 7. Paper delivery side plate knobs This plate aligns the leading edge of prints. Use to move the side plates. 4.
9. Ink holder Set the ink cartridge in this holder. 10. Drum unit lock lever B1 Lower to unlock and pull out the drum unit. 11. Drum unit The master is wrapped around this unit. 12. Exposure glass Position originals here face down for printing. 13. Exposure glass cover or document feeder (option) Lower this cover over an original on the exposure glass. 14. Trailing edge guides Swing out these guides when you use A4, 81/2" × 11"KL paper.
Options ❖ Document feeder 1.
Operation Panel Keys Auto On Line lay Original Storage ZDZS200N 1. {Quality Start}} key 9. {Image Density}} key See p.77 “Quality Start Mode”. Press to make prints darker or lighter. See p.25 “Adjusting the Image Density of Prints”. 2. {Security}} key See p.76 “Security Mode”. 3. {Skip Feed}} key Press to select skip feed printing. See p.71 “Skip Feed Printing”. 4. {User Tools}} key Press to change the default settings to meet your requirements. 5. {Stamp}} key Press to select the Stamp mode.
16. {Class}} key Press to select All Class, Auto Class, Manual Class, or Class mode. See p.52 “All Class Mode”, see p.54 “Auto Class Mode”, see p.57 “Manual Class Mode with One Original”, see p.59 “Manual Class Mode with two or More Originals”, see p.62 “Class Mode”. 17. {W} {V} keys (Speed keys) Press to adjust the printing speed. See p.25 “Adjusting the Image Density of Prints”, see p.27 “Changing the Printing Speed”. 18. {~}{}}{|}{{} keys Press to shift the image forward, backward, right, or left.
Indicators 1. Special feature indicator 6. Counter Lights to indicate that special features have been selected. To access the special features, lift up the cover on the left side of the operation panel. Displays the number of prints entered. While printing, it shows the number of prints remaining. 2. Monitor indicators See p.8 “Panel Display”. These indicators light to inform you of the status of the machine. See p.171 “If Your Machine Does Not Operate as You Want”. 3.
Panel Display The panel display shows the machine status, error messages, and function menus. ZBZX170N 1. Items for the selected function 2. These keys correspond to the se- 3. Machine status or messages 4. Items which can be selected lectable items shown above them on the panel display. To select an item shown on the panel display, press the key directly below it. Important ❒ Strong impact or pressure exceeding 30N will damage the panel display.
Panel Display Layout The basic elements used on the panel display are shown below. Understanding their meaning helps you use this machine's features quickly and easily. ❖ Sample display when selecting the [Original] key ZBZX180N 1. Machine status or message 2. Available functions 3. Illustrations of displays in this manual show the next key to be pressed whitened When the [Original] key is pressed, the following display is shown. 1. Available functions 2.
10
1. Operation Print Paper The following limitations apply Paper Size Metric Inch Paper feed tray A3 L, B4 L, A4 L K, B5 L K, 11" × 17" L, 81/2" × 14" L, A5 L, B6 L, A6 L, Others (Ver- 81/2" × 11" L K, 51/2" × tical: 70 - 297mm, Horizontal: 148 81/2" L K, Others (Verti- 432mm) cal: 2.76" - 11.7", Horizontal: 5.83" - 17") Paper Weight 47.1 209.3g/m2, 12.5 - 55.6 lb Non-recommended paper: • Roughly cut paper • Paper of different thickness in the same stack • Envelopes heavier than 85g/m2, 22 lb.
Operation • The following types of envelopes 1 Note ❒ If you print on rough grained paper, the copy image might be blurred. ❒ You can use A3 (297 × 420mm) or 11" × 17" originals or printing paper. When you want to print the entire image of an A3, 11" × 17" original, select Reduce mode because the maximum print areas are as follows: • Metric version: 290 × 409mm, 11.4" × 16.1" • Inch version: 290 × 419mm, 11.4" × 16.4" ❒ When you use A3, 11" × 17" and 209.3g/m2, 55.
Originals Originals The machine can detect the following original sizes placed on the exposure glass. Metric version A3L, B4L, A4KL, B5KL Inch version 11" × 17"L, 81/2" × 14"L, 81/2" × 11"KL 1 If the machine cannot detect the original sizes properly, select the area to copy with the {Edge Erase} } key. See p.41 “Edge Erase”. The machine may not detect the original size properly when: • Originals contain index tabs. • Originals are OHP transparencies or are translucent. • Originals are dark.
Operation Original Print a 1 a = 8mm, 0.
Printing Preparations Printing Preparations C Make sure that the paper feed side Loading Paper A Carefully open the paper feed tray. 1 plates knob lock lever is raised (lock is released), and then grasp the paper feed side plates knob and adjust the paper feed side plates to match the paper size. ZDCY130E B Lift the paper feed side plates. ZDCY01 Important ❒ Always adjust the position with the lock lever for the paper feed side plates in the raised position (lock released).
Operation E Make sure that the paper feed side plates are touching both sides of the paper, and then push the lock lever for the side plates down to lock the side plates into position. 1 Setting Up The Paper Delivery Tray A Raise the paper delivery tray slightly, and then gently lower it with your hand. ZDCY041 ZBHH050E Important ❒ Always make sure that you push the lock lever for the side plates down to lock the side plates into position.
Printing Preparations When you use standard paper (47.1 g/m2 to 105 g/m2, 12.5 lb to 28 lb) When you use 81.4 g/m2, 21.6 lb or thinner and A4, 81/2 × 11" or larger paper A Adjust the side plates to match the paper size scale on the end plate side. A Lift the paper alignment wings. C Lower or lift the paper alignment wings by turning the left and right knobs. 1 When you use A4, 8 1/2" × 11"KL paper A Swing out the guides as shown in the illustration.
Operation Entering a User Code to Use the Machine If user codes are turned on, operators must enter their user code before they can use the machine. The machine keeps count of the number of copies made under each user code. 1 Note ❒ If you want to use this feature, you must turn it on and register the user codes with the user tools. You can register up to 20 user codes. See “Set User Code” and “Reg. User Code” on p.153 “6. Administrator Mode”.
Standard Printing Standard Printing A Make sure that the machine is ready for printing. E Place the original face down on 1 the exposure glass. The original should be aligned with the reference mark and the left corner scale. B If user codes are turned on, enter your user code with the number keys, and then press the {q} key. Reference See p.18 “Entering a User Code to Use the Machine”. C Make sure that there are no previous settings remaining.
Operation I Press the {Proof}} key and check the image density and the image position on the proof print. K Press the {Print}} key. 1 Note ❒ If the image position is not correct, adjust it using the [Image =] key. See p.24 “Adjusting the Position of Printed Images”. ❒ If the image density is slightly dark or light, adjust the image density using the {W}{V} keys. See p.25 “Adjusting the Image Density of Prints”. J Enter the number of prints required with the number keys.
Standard Printing B Remove the prints from the paper delivery tray and close the paper delivery side plate.
Operation Energy Saver Mode If you do not operate the machine for a certain period the machine can enter Idling for pre-printing function to remove ink from inside the ink drum, and then the machine can enter Energy Saver mode to save energy consumption. You can press the {Clear Modes/Energy Saver} } key to cancel Energy Saver mode and return the machine to the ready condition. Idling for pre-printing function helps to reduce excess ink when printing. It reduces recovery time from Energy Saver mode.
Auto Reset Auto Reset If you do not operate the machine for a certain period after printing, the machine will return to the initial condition. This function is called “Auto Reset”. 1 Note ❒ You can change the time the machine waits before Auto Reset starts. See “Auto Reset” on p.143 “1. System”.
Operation Adjusting the Position of Printed Images Use the following procedure to adjust the position of print images as required. 1 GRPOSI0E * Paper feed direction Limitation ❒ For 308 mm, 12.2"-width paper, you can only adjust the position of the print image 5 mm, 0.2" up or down. Note ❒ When the main switch is turned off, the position returns to the default. A Press the [Image =] key. B Adjust image position using the {~}, {}}, {|}, and {{} keys.
Adjusting the Image Density of Prints Adjusting the Image Density of Prints There are two ways to adjust the image density of prints: After Making a Master ❖ Before making a master Use the {Image Density} } key. A To 1 increase the image density, press the {W} key. To reduce the image density, press the {V} key. ❖ After making a master Use the {W}{V} (Speed) keys. Before Making a Master A Press the {Image Density} } key to adjust the image density.
Operation Tint Mode Use this function to make halftone prints. 1 GRTINT0E A Press the [Original] key. ←] [→ →] B Select the [Tint] with the [← or {~} {}} keys. C Press the {Start}} key.
Changing the Printing Speed Changing the Printing Speed Use the {W} or {V} key to adjust the printing speed. The relationship between printing speed and print quality depends on the type of paper you use. 1 A Press the {V} key to increase the speed and press the {W} key to reduce the speed.
Operation Stopping a Multi-print Run Stopping a Multi-print Run to Print Another Original 1 A Press the {Clear/Stop}} key. B Set the original. C Enter the number of prints and press the {Start} } key. Changing the Number of Prints Entered and Checking Completed Prints A Press the {Clear/Stop}} key. B Change the number of prints or check the completed prints. Note ❒ To change the number of prints, press the {Clear/Stop} } key, and then re-enter the number of prints with the number keys.
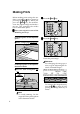
Reducing and Enlarging Using Preset Ratios Reducing and Enlarging Using Preset Ratios Use this function to have originals reduced or enlarged by a preset ratio. A total of 7 ratios are available (3 enlargement ratios, 4 reduction ratios). GRRATI0E Note ❒ The leading edge of the print image does not shift when a print image is made with this function. 1 ❒ You can select a ratio regardless of the size of an original or printing paper.
Operation A Press the [Ratio] key. G Check the image position on the trial or proof print. Note ❒ If the image position is not correct, adjust it using the [Image =] key. See p.24 “Adjusting the Position of Printed Images”. 1 B Select the desired ratio with the [← ←] [→ →] or {~} {}} keys. C Press the [OK] key. D Make sure that the original and the print paper are the correct size. E Place your original on the expo- sure glass or in the optional document feeder. F Press the {Start}} key.
Auto Magnification Auto Magnification Use this function to have the machine choose an appropriate enlargement or reduction ratio based on the size of your original and the paper size you select. 1 GRAUTO0E Note ❒ The range of ratios which the machine can select depends on where you place the original: • On the exposure glass: 50 – 200% ❒ The table below shows the reproduction ratios that can be selected for various combinations of original and paper size.
Operation ❖ Inch version 1 Original 11" × 17"L Paper 81/2" × 14"L 81/2" × 11"L 81/2" × 11"K 81/2" × 51/2"L *2 81/2 × 51/2" K *2 11" × 17"L 100% 121% 129% -- 200% -- 81/2" × 14"L 77% 100% -- -- 155% -- 81/2" × 11"L 65% 77% 100% 100% *1 129% 129% *1 81/2" × 11"K 65% *1 77% *1 100% *1 100% 129% *1 129% 81/2" × 51/2" L 50% 61% 65% 65% *1 100% 100% *1 *1 *2 The machine automatically rotates the original image by 90° to match the paper direction and selects an appropri
Auto Magnification E Press the {Start}} key. 1 F Check the image position on the trial or proof print. Note ❒ If the image position is not correct, adjust it using the [Image =] keys. See p.24 “Adjusting the Position of Printed Images”. G Make your prints.
Operation Zoom Use this function to fine-tune the reproduction ratio in increments of 1%. 1 Note ❒ To select a custom ratio, select the closest ratio with the [← ←] [→ → ] or { ~ } { } } keys. Then press the {|} or {{} key and go to step F. C Press the [OK] key. D Make sure that [Zoom] is selected. GRZOOM0E Note ❒ The range of ratios you can select depends on where you place the original: • On the exposure glass: 50–200% A Press the [Ratio] key. E Press the [OK] key.
Zoom Using the number keys A Enter the ratio with the number keys. K Check the image position on the trial or proof print. Note ❒ If the image position is not correct, adjust it using the [Image =] key. See p.24 “Adjusting the Position of Printed Images”. 1 L Make your prints. B Press the {q} key. G Press the [OK] key. H Make sure that the original and the print paper are the correct size. I Place your original on the expo- sure glass or in the optional document feeder. J Press the {Start}} key.
Operation Directional Magnification (%) Use this function to choose different reproduction ratios for the horizontal and vertical directions. The result is a squeezing or stretching effect. 1 →] D Select [Direct.Mag.(%)] with the [→ or {}} key. a% b% CP2P01EE Note ❒ The range of ratios you can select depends on where you place the original: • On the exposure glass: 50 – 200% A Press the [Ratio] key. E Press the [OK] key. F Enter the vertical and horizontal ratio.
Directional Magnification (%) C Enter the horizontal ratio with the number keys. D Press the {q} key. G Press the [OK] key. H Make sure that the original and 1 the print paper are the correct size. I Place your original on the expo- sure glass or in the optional document feeder. J Press the {Start}} key. K Check the image position on the trial or proof print. Note ❒ If the image position is not correct, adjust it using the [Image =] key. See p.24 “Adjusting the Position of Printed Images”.
Operation Directional Magnification (Size) Use this function to have the machine select suitable reproduction ratios based upon the dimensions of the print you require and the size of the original you specify. 1 1 A Press the [Ratio] key. 3 2 4 →] or {}} B Select [Mag.] with the [→ key. CP2M01EE 1. Horizontal original size 2. Vertical original size 3. Horizontal print size 4. Vertical print size Note ❒ You can enter sizes within the following ranges.
Directional Magnification (Size) F Enter the vertical original size with the number keys and press the {q} key. M Press the {Start}} key. 1 Note ❒ To change the value entered, press the {Clear/Stop} } key and enter the new value. ❒ Up to 999mm, 99.9" can be entered. G Enter the vertical print size with the number keys, and then press the {q} key. H Enter the horizontal original size with the number keys, and then press the {q} key. N Check the image position on the trial or proof print.
Operation Erasing Center and Edge Margins When printing from thick books, or similar originals, the binding margin at the center and the edges might appear on prints. To prevent this, perform the following steps. 1 Important ❒ Be sure to keep the platen cover at an angle of at least 25 degrees with the exposure glass. A Set the book on the exposure glass. B Keep the exposure glass cover at an angle of at least 25 degrees with the exposure glass. C Press the {Start}} key.
Edge Erase Edge Erase This function erases all four margins of the original image. A Press the {Edge Erase}} key. ❖ Using Edge Erase mode Stamp Image Density Lighter 1 On Line Normal Darker 1 A B A B Skip Feed Make-Up Darker 2 Over lay Economy Mode Edge Erase Original Storage Auto On Line Job Separator GRERAS0E ZDZS150N ❖ When not using Edge Erase mode When printing from thick books, or similar originals, the binding margin at the center and the edges might appear on prints.
Operation F Check the image position on the trial or proof print. Note ❒ If the image position is not correct, adjust it using the [Image =] key. See p.24 “Adjusting the Position of Printed Images”. 1 G Make your prints.
Printing onto Various Kinds of Paper Printing onto Various Kinds of Paper Before printing onto thick paper, thin paper, envelopes or special kinds of paper loaded in the paper feed tray, you must select the paper type. Printing onto Thick Paper If you wish to print onto thick (128 to 209.3g/m2, 34 to 55.6 lb or heavier) paper, perform the following steps. Printing onto Standard Paper 1 If you wish to print onto standard (47.1 to 105g/m2, 12.5 to 28 lb) paper, perform the following steps.
Operation E If your envelopes do not feed in Printing onto Envelopes well, lift the paper feed tray a little, and then lower it so that it slants up slightly. A Press the [Ppr.Type] key. 1 B Select [Special] with the [→ →] or {}} key. ZDZY030E Printing onto Special Kinds of Paper C Press the [OK] key. D Place the envelopes in the paper Preparation To use this function, you have to register the special paper type in [User1] or [User2] with the user tools. See p.161 “4-19 Type of Paper”.
Printing onto Various Kinds of Paper - To prevent paper misfeeds: If paper misfeeds occur frequently, even if you have selected a suitable paper, follow the steps below. A Press the [Select] key. B 1 Select the type of paper misfeed and frequency with the {~}, {}}, {|}, or {{} keys. C Press the [OK] key. If paper misfeeds occur frequently in the paper exit section, even if you are using standard or thin paper and have selected [Std.
Operation Selecting Original Modes Select one of the following five modes to match your originals: 1 ❖ Letter mode Select when originals contain only letters (no pictures). ❖ Letter/Photo mode Select when originals contain photographs or pictures with letters. Letter/Photo Mode Printing Preparation You can adjust the contrast of the image. A Press the [Original] key. ❖ Photo mode Select when originals contain photographs or pictures with delicate tones.
Selecting Original Modes ←] D Adjust the contrast with the [← [→ →] or {~} {}} keys. Photo Mode Printing A Press the [Original] key. Note ❒ Use "High" to produce clear prints of people's faces. ❒ Use "Low" to produce clear prints of landscapes and scenery etc. 1 →] or {}} B Select [Photo] with the [→ key. E Press the [OK] key. F Place your original on the expo- sure glass or in the optional document feeder. G Press the {Start}} key. H Check the image position on the trial or proof print.
Operation B Adjust the contrast with the [← ←][→ →] or {~}{}} keys. G Press the {Start}} key. 1 C Press the [OK] key. Note ❒ Use "High" to produce clear prints of people's faces. ❒ Use "Low" to produce clear prints of landscapes and scenery etc. D Select the dot pattern with the [← ←] [→ →] or {~} {}} keys. H Check the image position on the trial or proof print. Note ❒ If the image position is not correct, adjust it using the [Image =] key. See p.24 “Adjusting the Position of Printed Images”.
Selecting Original Modes →] or {}} B Select [Pencil] with the [→ key. 1 C Press the [OK] key. D Place your original on the exposure glass. E Press the {Start}} key. F Check the image position on the trial or proof print. Note ❒ If the image position is not correct, adjust it using the [Image =] key. See p.24 “Adjusting the Position of Printed Images”. G Make your prints.
Operation Economy Mode When you want to save ink, select Economy mode. 1 Note ❒ Prints will be lighter in this mode. A Press the {Economy Mode}} key. Stamp Image Density Lighter On Line Normal Darker 1 Skip Feed Make-Up Darker 2 Over lay Economy Mode Edge Erase Original Storage Auto On Line Job Separator ZDZS020N B Place your original on the expo- sure glass or in the optional document feeder. C Press the {Start}} key. D Check the image position on the trial or proof print.
Auto Cycle Auto Cycle Use the {Auto Cycle} } key to process masters and make prints in a single operation. 1 A If the indicator of {Auto Cycle}} key is off, press the {Auto Cycle} } key. B Press the {Start}} key.
Operation All Class Mode Preparation You have to store the number of students in each class with the user tools. See p.157 “3-5 Class Enter No.”. 1 Use the {Class} } key to make sets of prints from the same original. All the stored numbers of prints are made for each set. This feature is useful for teachers who frequently make multiple print sets for classes e.g. notes, handouts, tests etc.
All Class Mode E Press the {Start}} key. 1 F Check the image position on the trial or proof print. Note ❒ If the image position is not correct, adjust it using the [Image =] key. See p.24 “Adjusting the Position of Printed Images”. G Make your prints.
Operation Auto Class Mode Preparation You have to store the number of students in each class with the user tools. See p.157 “3-5 Class Enter No.”. 1 Use the {Class} } key to make sets of prints from the same original. The stored numbers of prints are made for each set. This feature is useful for teachers who frequently make multiple print sets for their classes, e.g. notes, handouts, tests etc.
Auto Class Mode Selecting classes with the {~}, {}}, {|}, or {{} key Selecting classes with the number keys A Select the desired class for the 1st grade with the {}} key. The number of students is displayed on the counter. A Enter the desired grade and class with the number keys. 1 Note ❒ When you want to select all the classes, select [ALL]. B Press the [Select] key. Note ❒ Repeat steps A and B until you have finished designating classes for the 1st grade.
Operation F Place one original on the exposure glass or in the optional document feeder. G Press the {Start}} key. 1 H Check the image position on the trial or proof print. Note ❒ If the image position is not correct, adjust it using the [Image =] key. See p.24 “Adjusting the Position of Printed Images”. I Make your prints.
Manual Class Mode with One Original Manual Class Mode with One Original Use the {Class} } key to make sets of prints from the same original. Various numbers of prints are made for each set. GRCLAS2E Note ❒ When you set the Manual Class mode, Job Separation mode is automatically turned on. The job separator pulls the top sheet of each set delivered to the paper delivery tray to mark the end of each printed set. The next cycle begins automatically. See p.79 “Job Separation”.
Operation F Enter the desired number of prints for the second set with the number keys. 1 G Press the {q} key. Note ❒ Repeat steps F and G for each set. ❒ The maximum number of sets that can be made is 20. H Press the [OK] key. I Place one original on the exposure glass or in the optional document feeder. J Press the {Start}} key. K Check the image position on the trial or proof print. Note ❒ If the image position is not correct, adjust it using the [Image =] key. See p.
Manual Class Mode with two or More Originals Manual Class Mode with two or More Originals Preparation To use this function, you have to select “by each original” with the “Class Manual Set” setting in the user tools. See “Class Manual Set” on p.146 “4. Mode Setting”. 1 A Press the {Class}} key. Use the {Class} } key to make sets of prints from different originals. Various numbers of prints are made for each set. A B C D A B C D B Select [Manual] with the [→ →] or {}} key.
Operation E Press the {q} key. J Press the {Start}} key. F Enter K Check the image position on the 1 the desired number of prints for the second original with the number keys. trial or proof print. Note ❒ If the image position is not correct, adjust it using the [Image = ] keys. See p.24 “Adjusting the Position of Printed Images”. L Press the {Auto Cycle}} key. G Press the {q} key. Note ❒ Repeat steps F and G for each original. ❒ Up to 20 classes can be set. H Press the [OK] key.
Manual Class Mode with two or More Originals N After the first set is completed, place the second original on the exposure glass, and then press the {Start} } key. 1 Note ❒ Repeat step N until you have finished printing.