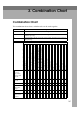
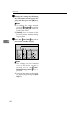
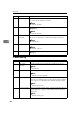
3. Combination Chart Combination Chart This combination chart shows which modes can be used together. ✩ means that these modes can be used together. X means that these modes cannot be used together.
Combination Chart Letter, Photo, Letter/Photo, Pencil, Tint mode Economy mode Auto Cycle Preset Reduce/Enlarge Zoom Auto Magnification Selection Directional Magnification (%) Directional Magnification (size) Combine Originals (2 Images on one sheet) Combine Originals (4 Images on one sheet) Memory Combine mode (4 Originals) Memory Combine mode (8 Originals) Memory Combine mode (16 Originals) Edge Erase All Class mode Auto Class mode Manual Class mode Class mode Job Separation Overlay Form Storage Overlay D
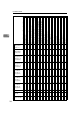
Combination Chart Letter, Photo, Letter/Photo, Pencil, Tint mode Economy mode Auto Cycle Preset Reduce/Enlarge Zoom Auto Magnification Selection Directional Magnification (%) Directional Magnification (size) Combine Originals (2 Images on one sheet) Combine Originals (4 Images on one sheet) Memory Combine mode (4 Originals) Memory Combine mode (8 Originals) Memory Combine mode (16 Originals) Edge Erase All Class mode Auto Class mode Manual Class mode Class mode Job Separation Overlay Form Storage Overlay D
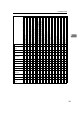
Combination Chart 3 140
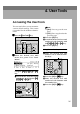
4. User Tools Accessing the User Tools The user tools allow you to customize various default settings. This section is intended for the machine administrator. A Press the {User Tools}} key. Stamp Image Density Lighter On Line Note ❒ [Next]: Press to go to the next page. ❒ [Prev.]: Press to go back to the previous page. B Press the [OK] key. C Search for the desired user tool number of each function with the {~}, {}}, {|}, or {{} key. D Press the [OK] key.
User Tools C Change the settings by following the instructions on the panel display, and then press the [OK] key. Note ❒ To change the value entered, press the {Clear/Stop} } key before pressing the [OK] key. Then enter the new value. ❒ [Cancel]: Press to return to the previous menu without changing any data. D Press the {User Tools}} key to re- 4 turn to the standby display.
User Tools Menu User Tools Menu Reference For accessing the user tools, see p.141 “Accessing the User Tools”. 1. System No. Mode Description 1 Auto Reset The machine returns to its initial condition automatically after your job is finished. The automatic reset time can be set from 1 to 5 minutes or off (0 minutes). 4 Note ❒ Default: Off 2 R. Cntr. Display Use to display the total number of masters and prints.
User Tools No. Mode Description 7 Data Print Use to print out the following data. Note ❒ Available settings: • Log Data (Number of prints made, how many times paper misfeeds occur and so on.) • Reset Counters (Number of prints and master made under each user code.) • Store Class (Registered number of students in each class.) 8 Energy Saving You can set the time until the Energy Saver mode starts. Note ❒ Default: 3 Min. (minutes) 4 2. Set Operat'n Mode No. Mode Description 1 Min.
User Tools Menu 3. Initial Setting No. Mode Description 1 Paper Type Specifies the paper type at power on. Note ❒ Default: Std. (Standard) 2 MSTR Makg. Density Specifies the image density at power on. Note ❒ Default: Std. (Standard) 3 Original Priority Specifies the original mode at power on. 4 Note ❒ Default: Letter 4 Reproduct'n Ratio Adjust a fixed reproduction ratio between 50 and 200%.
User Tools No. Mode Description 8 Photo Contrast Specifies the contrast level for Photo when the power is switched on or after mode settings are cleared. Note ❒ Default: Standard 9 Photo(Screen) Specifies the screen image in Photo mode when you press the [Original] key. Note ❒ Default: Standard 10 Eco.Mode ON/OFF Specifies whether Economy Mode is set to “On” or “Off” when the power is switched on or after mode settings are cleared. Note 4 ❒ Default: Off 11 Margin Eras.
User Tools Menu No. Mode Description 5 No Orig. Size When you place originals of non standard sizes on the exposure glass, set original detection to “Ignore”. The machine will not detect the original size. Note ❒ Default: Not to ignore 6 Background ON/OFF When you make prints in Photo, Letter/Photo, or Tint mode, the background of the prints might become dirty. Turn Background “On” to improve the clarity of your prints. Note ❒ Default: W/O back.
User Tools No. Mode Description 10 Cancel Comb. Specifies whether Combine Originals or Memory Combine mode is cleared after finishing your print job. Note ❒ Default: Not to cancel 11 No. of Skip Feed Specifies the number of drum rotations in Skip Feed mode at power on. You can also select whether you can change the number of drum rotations temporarily when you press the {Skip Feed} } key. See p.71 “Skip Feed Printing”.
User Tools Menu No. Mode Description 15 Deflector Angle You can change the angle of the wing guide depending on the paper type you use. Note ❒ Default: Auto ❒ Available settings: • Up (Select this setting when standard thickness or thin paper misfeeds at the paper exit section occur frequently.) • Down (Select this setting when A4 – B5, 81/2" × 11" thick paper is not delivered properly to the paper delivery tray.
User Tools No. Mode Description 20 Auto Rotation When the direction in which your original is placed differs from that of the paper, the machine automatically rotates the original image by 90° to match the paper direction. You can cancel this setting. Note ❒ Default: ON 21 Master length The machine determines the master length according to the number of originals placed in the optional document feeder and the paper sizes.
User Tools Menu 5. Stamp No. Mode Description 1 Type You can select the stamp message at power on with the Stamp mode. Note ❒ Default: CONFIDENTIAL 2 Size You can edit the preset stamp sizes. Note ❒ Default: Standard ❒ Adjustment values: 4 • Double size 3 Stamp Density You can select the style of the stamps. Note ❒ Default: Solid-fill 4 Stamp Position You can edit the preset stamp position. Note ❒ Default: See p.162 “5-4 Stamp Position”. ❒ Available settings: See p.
User Tools No. Mode Description 8 Type(Page) You can select the page numbering style at power on in Page Stamp mode. Note ❒ Default: P1,P2 9 Direction(Page) You can select the page numbering direction at power on in Page Stamp mode. Note ❒ Default: • When you select “P1,P2” or “1/5,2/5” with the “Type(Page)” user tool: Upper Right • When you select “-1-,-2-” with the “Type(Page)” user tool: Down Center 4 10 Position(Page) You can edit the page numbering position. Note ❒ Default: See p.
User Tools Menu 6. Administrator Mode ❖ User Codes If user codes are turned on, operators must enter their user codes before they can operate the machine. The machine keeps count of the number of copies made under each user code. Turn this function on with the “Set User Code(s)” user tool. You can also turn on Key Operator Code mode so that only the key operator (administrator) can use the functions below. 1 Check Counter You can check the number of masters and copies made under each user code.
User Tools 6 Del. User Code You can delete user codes. Note ❒ The number of copies made under the deleted code is also deleted. Reference For deleting user codes, see p.168 “6-6 Del. User Code”. 7 Key Operator Code Use to turn Key Operator Code mode on or off. Note ❒ Default: Not to use 4 8 Reg/Chg KeyOpCode You can register or change key operator codes. (up to 4 digits) 9 Restrict. Access In Key Counter mode, you have to set the key counter before making prints.
User Tools Menu 5 IP Address Sets the IP Address. Note ❒ Default: 011.022.033.044 Reference See the Printer Reference 1 for information about the IP Address setting. 6 Ethernet Speed Sets the Ethernet communication speed. Note ❒ Default: Auto 7 Network Sets the Network boot. Note 4 ❒ Default: NONE Reference See the Printer Reference 1 for information about the Network boot setting. 8 I/O Timeout Sets the time to enable the interface after data stops being received.
User Tools User Tool Menus in Detail E Press the {q} key. 1-6 Time Setting A Press the {User Tools}} key. Stamp Image Density Lighter On Line Normal 4 Darker 1 Make-Up Darker 2 Auto On Line ZDZS110N B Make sure that “1” is selected, and then press the [OK] key. F Enter the month with the number keys. G Press the {q} key. Note ❒ Follow steps F and G for the "date", "hour", "minute", and "second". H Press the [OK] key.
User Tool Menus in Detail B Enter 3 with the number keys, and then press the [OK] or {q} key. 3-5 Class Enter No. A Press the {User Tools}} key. C Enter 4 with the number keys, and then press the [OK] or {q} key. Stamp Image Density Lighter On Line Normal Darker 1 Make-Up Darker 2 Auto On Line ZDZS110N D Select the ratio you want to adjust with the [← ←] [→ →] or {~} {}} keys. 4 B Enter 3 with the number keys, and then press the [OK] or {q} key.
User Tools ←] [→ →] F Select the class with the [← or {~} {}} keys. 3-11 Margin Erase Area A Press the {User Tools}} key. Stamp Image Density Lighter On Line Normal G Enter the number of students with the number keys, and then press the {q} key. 4 Darker 1 Make-Up Darker 2 Auto On Line ZDZS110N B Enter 3 with the number keys, and then press the [OK] or {q} key. C Enter Note ❒ Repeat steps F and G until you have finished registering the number of students in each class.
User Tool Menus in Detail F Adjust the erase edge margin. If you selected A3 to A6 or 11" × 17" to 51/2" × 81/2" A Adjust the erase edge margin with the [← ←] [→ →] or {~} {}} keys. 4-11 No. of Skip Feed The following procedure explains how to change the number of drum rotations. A Press the {User Tools}} key. Stamp Image Density Lighter On Line Normal 4 Darker 1 Make-Up Darker 2 Auto On Line ZDZS110N Note ❒ You can also enter the ratio with the number keys and the {q} key.
User Tools E Change the number of drum rotations while one sheet of paper is fed with the [← ←] [→ →] or {~} {}} keys. A Press the {User Tools}} key. Stamp Image Density Lighter On Line Normal Darker 1 Make-Up Darker 2 Auto On Line ZDZS110N B Enter Note ❒ You can also change the number of rotations with the number keys. 4 4 with the number keys, and then press the [OK] or {q} key. F Press the [OK] key. C Enter 14 with the number keys, and then press the [OK] or {q} key. 4-14 No. of Q.
User Tool Menus in Detail F Select the time period (hours) the drum unit idles for with the [← ←] [→ →] or {~} {}} keys. B Enter 4 with the number keys, and then press the [OK] or {q} key. C Enter 19 with the number keys, and then press the [OK] or {q} key. G Press the [OK] key. H Select the number of drum rota- tions with the [← ←] [→ →] or {~} {}} keys. 4 D Select [User1] or [User2] with the [← ←] [→ →] or {~} {}} keys. I Press the [OK] key. E Press the [OK] key.
User Tools Stamp positions 5-4 Stamp Position Note ❒ The default position and available settings of each stamp are as follows. Stamp positions a b 4 Default Available settings a = 24mm, 0.96" a=8– 104mm, 0.32" – 4.16" b = 24mm, 0.96" GPSPOS0E b c GRSPOS1E a=8– 104mm, b = 0mm, 0" 0.32" – 4.16" b = – 72 – c = center 72mm, – line 2.88" – 2.88" a = 24mm, 0.96" a b b = 24mm, 0.96" GRSPOS2E a = 24mm, 0.96" b a b = 24mm, 0.96" GRSPOS3E b a GRSPOS4E b a GRSPOS5E b = 24mm, 0.
User Tool Menus in Detail C Enter 4 with the number keys, and then press the [OK] or {q} key. D Select the stamp position you want with the [← ←] [→ →] or {~} {}} keys. 5-7 Position (Date) Note ❒ The default position and available settings of each date stamp are as follows. Stamp positions b a dd.mm.yy Default Available settings a = 8mm, 0.32" a=8– 40mm, 0.32" – 1.60" b = 20mm, 0.80" GRDPOS0E dd.mm.yy a E Press the [Change] key. F Adjust the horizontal stamp posi- b=8– 40mm, 0.32" – 1.
User Tools B Enter 5 with the number keys, and then press the [OK] or {q} key. C Enter 7 with the number keys, and then press the [OK] or {q} key. 5-10 Position (Page) Note ❒ The default position and available settings of each page stamp are as follows. ❖ P1 or 1/5 Stamp positions a P.1 4 D Select Available settings a = 8mm, 0.32" a=8– 40mm, 0.32" – 1.60" b = 12mm, 0.48" GRPPOS0E a = 12mm, 0.48" a b P.1 the date stamp position you want to adjust with the [← ←] [→ →] or {~} {}} keys.
User Tool Menus in Detail A Press the {User Tools}} key. Stamp Image Density Lighter F Adjust the horizontal page numbering position with the {|} or {{} key, and then press the {}} key. On Line Normal Darker 1 Make-Up Darker 2 Auto On Line ZDZS110N B Enter 5 with the number keys, and then press the [OK] or {q} key. C Enter 10 with the number keys. Then press the [OK] or {q} key. Note ❒ The value increases or decreases in 4mm, 0.16" increments.
User Tools C Enter 11 with the number keys, and then press the [OK] or {q} key. H Press the [OK] key twice. 6-1 Check Counter A Press the {User Tools}} key. D Select the background pattern with the {~}, {}}, {|}, or {{} key. Stamp Image Density Lighter On Line Normal Darker 1 Make-Up 4 Darker 2 Auto On Line ZDZS110N E Press the [Change] key. F Move the cursor to the position you wish to edit with the { ~ } , {}}, {|}, or {{} keys.
User Tool Menus in Detail →] or {}} key D Keep pressing the [→ to display the number of masters and prints made under your user code. C Enter 2 with the number keys, and then press the [OK] or {q} key. ←] D Select [Single] or [All] with the [← [→ →] or {~} {}} keys. E Press the [OK] key after checking 4 the number of masters and prints made under your user code. 6-2 Reset Counters E Press the [OK] key. A Press the {User Tools}} key.
User Tools F Enter the new user code with the 6-5 Chg. User Code number keys. A Press the {User Tools}} key. Stamp Image Density Lighter On Line Normal Darker 1 Make-Up Darker 2 Auto On Line ZDZS110N 4 B Enter 6 with the number keys, and then press the [OK] or {q} key. G Press the [OK] key. 6-6 Del. User Code A Press the {User Tools}} key. C Enter 5 with the number keys, and then press the [OK] or {q} key.
User Tool Menus in Detail →] or {}} key D Keep pressing the [→ to display your user code. E Press the [OK] key. F Press the [Yes] key.
User Tools 4 170
5. Troubleshooting If Your Machine Does Not Operate as You Want If a malfunction or a misfeed occurs, the following messages will appear on the panel display. Message Meaning Check the original direction. The paper is not placed in the same direction as the original. Place the original in the same direction as the paper. If you press the {Print} } key, the selected paper will be used for printing. Size of original and paper is not the same.
Troubleshooting Message Meaning Print image is larger than the selected paper size. The master image previously printed is larger than the paper, the image exceeds the paper size. Change the paper size. Make prints again after pressing the [Exit] key and selecting the paper size again. Note ❒ If you press the [Exit] key to erase the message and press the {Print} } key, the machine starts to make the prints. However, the image might not fit on the paper.
If You Cannot Make Prints as You Want If You Cannot Make Prints as You Want Problem Cause Misfeeds occur frequently. Improper paper type is select- Select proper paper type. See ed. p.43 “Printing onto Various Kinds of Paper”. When you try to set several functions at a time, you cannot set some functions. Some functions cannot be used together. See p.137 “Combination Chart”. Parts of the image are not printed in Edge Erase mode. Erase margin is too wide.
Troubleshooting Loading Paper The Load Paper indicator (B) lights when the paper feed tray runs out of paper. C Adjust the paper feed side plates to match the paper size. Limitation ❒ Load paper when the paper feed tray is completely empty. If you add paper when some paper is left in the tray, it may cause multiple feeds or misfeeds. Reference For available paper sizes, see p.11 “Print Paper”. A Raise the lock lever for the paper 5 feed side plates to release the lock.
x Clearing Misfeeds x Clearing Misfeeds R CAUTION: • Be careful not to cut yourself on any sharp edges when you reach inside the machine to remove misfed sheets of paper or masters. - To prevent paper misfeeds: Check the following before restarting the printing run. • Did you select an appropriate paper type with the [Ppr.Type] key? Note ❒ After clearing misfeeds, make sure that all the doors, covers, and units are closed and the x indicator is off.
Troubleshooting • When paper edges stick together or paper is not fed in, fan the paper as shown. x + A + B” Paper Misfeeds in ”x the Paper Feed Section A Open the front door. B Lower drum unit lock lever (B1). B1 Z067 • When printing onto postcards or thick paper, lower the printing speed to setting 1 or 2. See p.27 “Changing the Printing Speed”. C Take out the drum.
x Clearing Misfeeds E If you cannot remove the misfed paper, remove it from the paper feed tray. C Take out the drum. B2 B3 F Set the drum unit and close the B2 front door. Note ❒ For setting the drum unit, see p.132 “Changing the Color Drum Unit”. - To prevent paper misfeeds: See p.175 “”x + A” Paper Misfeeds in the Paper Feed Section”. Note ❒ For taking out the drum unit, see p.132 “Changing the Color Drum Unit”.
Troubleshooting B Lower drum unit lock lever (B1). When paper is misfed inside the machine A Open the front cover. B Lower drum unit lock lever (B1). B1 C Take out the drum. B2 B1 C Take out the drum. B2 5 B3 B2 B3 B2 Note ❒ For taking out the drum unit, see p.132 “Changing the Color Drum Unit”. D Remove the misfed paper from the drum. Note ❒ For taking out the drum unit, see p.132 “Changing the Color Drum Unit”. D Remove the misfed paper from the inside as shown in the illustration.
x Clearing Misfeeds F Set the drum unit and close the front door. Note ❒ For setting the drum unit, see p.132 “Changing the Color Drum Unit”. x + C” Paper Misfeeds in the ”x Paper Exit Section A Slowly, but firmly pull out the misfed paper. - To prevent paper misfeeds: If the paper is curled or the original's leading edge margin is too narrow, the following action is necessary. • When you use curled paper, correct as shown. Z066 • When the leading edge margin of the original is less than 8mm, 0.
Troubleshooting D Remove the master roll (2). 2 1 x + D + B” Master Misfeeds ”x in the Master Feed Section A Open the front door. B Lower drum unit look lever (B1). E Reset the master roll (1). Note ❒ The master roll must be positioned as shown in the illustration in step F. F Close the master tray cover (2). B1 C Take out the drum. 5 B2 1 2 B3 G Position the master roll so that the B2 edge reaches the interior of the master holder. Note ❒ For taking out the drum unit, see p.
x Clearing Misfeeds E Set the drum unit and close the front door. D Grasp handle (E1) and pull out the master eject unit until it stops. Note ❒ For setting the drum unit, see p.132 “Changing the Color Drum Unit”. E1 x + B + E” Master Misfeeds ”x in the Master Eject Section E Pull out lever (E3) and remove the A Open the front door. B Lower drum unit lock lever (B1). E3 misfed master. 5 B1 C Take out the drum. B2 F Return lever (E3) and the master eject unit to their original positions.
Troubleshooting x + E” Master Misfeeds in ”x the Master Eject Section A Slide out the master tray. A Open the front door. B Grasp handle (E1) and pull out the master eject unit until it stops. E1 B Open the cover at the bottom of C Check the master tray while holding the lever and remove the fragments. where the misfed master is. Remove the misfed master. 5 D Return the master eject unit to its original position and close the front door.
x Clearing Misfeeds E Return the document feed sheet x + P” Original Misfeeds ”x Occur When Using the Optional Document Feeder to its original position. F Close the document feeder (ADF) A Open the document feeder (ADF) cover until it clicks in position and if necessary, close the document feeder. cover. ZDCY100E 5 ZDCY090E B Pull out the misfed original gently. ZDCY120E C If you cannot remove misfed originals as in step B, open the document feeder.
Troubleshooting • Pasted originals • Originals written in pencil • Thin originals that have low stiffness • Originals with index tabs • Transparent originals such as OHP transparencies or translucent paper Note ❒ Do not mix different sizes of originals in the optional document feeder. ❒ Remove staples or paperclips from originals. Fan originals that have had staples or paperclips removed. ❒ Do not stack originals above the limit mark.
When the Open Cover/Unit Indicator (M) Lights When the Open Cover/Unit Indicator (M M) Lights MMake sure that the following doors/covers are closed. ❖ Front door Close the front door completely. 5 ❖ Optional document feeder (ADF) cover Close the document feeder (ADF) cover until it locks in position.
Troubleshooting When the Add Ink Indicator (j j) Lights The Add Ink indicator (j) lights when it is time to supply ink. R CAUTION: • If ink comes into contact with your eyes, rinse immediately in running water. For other symptoms, consult a doctor. R CAUTION: • Keep the ink or ink container out of reach of children. R CAUTION: • If ink is ingested, induce vomiting by drinking a strong saline solution. Consult a doctor immediately.
When the Add Ink Indicator (j) Lights C Remove the used ink cartridge. D Remove the cap of the new ink cartridge. 5 E Insert the new cartridge into the ink holder. Note ❒ Always supply ink of the same color. F Return the ink holder to its original position until it clicks. G Close the front door. The machine will start idling to supply ink to the drum.
Troubleshooting When the Master End Indicator (C C) Lights The Master End indicator (C) lights when it is time to replace the master roll or when you need to set the master roll. R CAUTION: • Our products are engineered to meet high standards of quality and functionality, and we recommend that you use only the expendable supplies available at an authorized dealer. A Pull out the master tray until it stops. B Open the master guide. 5 C Open the master tray cover (1). D Remove the used master roll (2).
When the Master End Indicator (C) Lights G Position the master roll so that the edge reaches the interior of the master holder. H Close the master guide. 5 I Push in the master feed unit until it stops.
Troubleshooting When the Master Eject Indicator (k k) Lights The Master Eject indicator (k) lights when it is time to empty the master eject unit or when you need to set the master eject unit. F Remove the used master by pushing down the handle (1) towards the waste container (2). Note ❒ Ink is easily removed from skin by waterless hand cleaners followed by washing with soap and water. ❒ Be careful not to get any ink on your clothing while emptying the master eject unit.
When Other Indicators Are Lit When Other Indicators Are Lit Indicator Meaning and action The key counter (option) is not set. Insert the key counter. TPES270E • (Metric version) Color drum unit is installed. A3 A4 TPES280E • (Inch version) m 81/2 Color TPES280N • (Metric version) A3/11" × 17" drum unit is set. A3 A4 5 TPES290E • (Inch version) Drum 17 81/2 Co TPES290N • (Metric version) A4/81/2" × 11" drum unit is set.
Troubleshooting When Prints Are Not Delivered in a Neat Stack When Printing on Small Size Paper A Adjust the angle of the end plate B Re-adjust the paper feed side plates so that there is no space between the side plates and the paper, and then lock the side plates in position. by turning the screw clockwise or counterclockwise. 5 ZDCY030E ZDCH150E When the Machine Cannot Detect the Paper Size If the paper size is not detected correctly when printing, prints might not be delivered in a neat stack.
Poor Printing Poor Printing Dirty Background If the background of prints is dirty, the drum unit might be dirty. R CAUTION: • If ink comes into contact with your eyes, rinse immediately in running water. For other symptoms, consult a doctor. R CAUTION: • Keep the ink or ink container out of reach of children. R CAUTION: • If ink is ingested, induce vomiting by drinking a strong saline solution. Consult a doctor immediately.
Troubleshooting B Pull out the drum unit. TPEH101E Note ❒ For taking out the drum unit, see p.132 “Changing the Color Drum Unit”. C While pressing the drum lock, turn the drum until you can see the trailing edge of the master. 5 D With a dry soft cloth, remove any ink that has accumulated on the trailing edge of the drum unit. Important ❒ Do not use benzine, thinner, or other organic liquids—doing so can damage the machine.
Poor Printing E Turn the drum unit and lock it after cleaning. F Insert the drum unit until it locks into position, and then lower the drum unit lock lever. 5 TPEH091E G Close the front door. H Turn on the main switch.
Troubleshooting Black Lines/Stained Prints Check the platen cover and clean it if dirty. See p.201 “Cleaning the platen cover”. Check the exposure glass and clean it if dirty. See p.201 “Cleaning the exposure glass”. Check the sheet of the optional document feeder and clean it if dirty. See p.202 “Cleaning the Sheet”. Note ❒ If black lines or stains still appear on prints even following the cleaning procedures above, please contact your service representative.
6. Remarks Do's and Don'ts R CAUTION: • Unplug the power cord from the wall outlet before you move the machine. While moving the machine, you should take care that the power cord will not be damaged under the machine. Important ❒ Make sure that the m indicator on the PC controller operation panel is off before unplugging the power cord. • While printing, do not turn off the main switch. • While printing, do not unplug the power cord. • While printing, do not open the door or covers.
Remarks • If the printed paper is stored for more than one day, the paper may become wrinkled. If this paper is used, wrinkles may also appear on the master. If the paper will be stored for more than one day, store it in its original wrapping paper or other protective covering. • Shadowing may occur if the printed image at the rear edge of the paper is a solid color, when the printing speed is set to 1. If this occurs, print the image with the printing speed set to 3.
Where to Put Your Machine Where to Put Your Machine Environment Your machine's location should be carefully chosen because environmental conditions greatly affect its performance. Optimum environmental conditions R CAUTION: • Keep the machine away from humidity and dust. Otherwise a fire or an electric shock might occur. • Do not place the machine on an unstable or tilted surface. If it topples over, an injury might occur.
Remarks Power Connection R WARNING: • Connect the machine only to the power source described on the inside front cover of this manual. Connect the power cord directly into a wall outlet and do not use an extension cord. • Do not damage, break or make any modifications to the power cord. Do not place heavy objects on it. Do not pull it hard nor bend it more than necessary. These actions could cause an electric shock or fire.
Maintaining Your Machine Maintaining Your Machine To maintain high print quality, clean the following parts and units regularly. ❖ Cleaning the machine Wipe the machine with a soft, damp cloth. Then wipe it with a dry cloth to remove the water. Cleaning the platen cover A Lift the platen cover. B Clean the platen cover with a damp cloth and wipe it with a dry cloth. Important ❒ Do not use chemical cleaner or organic solvents, such as thinner or benzene.
Remarks Cleaning the Optional Document Feeder Cleaning the Sheet A Lift the document feeder. B Clean the sheet with a damp cloth and wipe it with a dry cloth. AM1D600 6 Note ❒ If you do not clean the sheet, marks on the sheet will be printed.
7. Specifications Main Frame ❖ Configuration: Floor standing (with custom table or cabinet). ❖ Printing Process: Full automatic one drum system ❖ Original Type: Sheet/Book ❖ Original Size: Maximum 305mm × 432mm, 12.0" × 17.
Specifications ❖ Printing Area: • A3 drum: • Inch version: More than 290 × 420mm, 11.4" × 16.5" • Metric version: More than 290mm × 410mm, 11.4" × 16.1" • A4 drum: More than 290mm × 200mm, 11.4" × 7.8" ❖ Print Paper Size: Maximum recommended: 297mm × 432mm, 11.6" × 17.0" (Maximum: 320mm × 447mm, 12.6" × 17.6") Minimum: 70mm × 148mm, 2.8" × 5.8" ❖ Leading Edge Margin: Less than 8mm, 0.32" ❖ Print Paper Weight: • 47.1 – 209.3g/m2, 12.5 – 55.
Main Frame ❖ Master Eject Unit Capacity: • A3 drum More than 70 masters • A4 drum 100 masters ❖ Dimensions (W × D × H) Width Depth Height Stored 730mm, 28.8" 700mm, 27.6" 585mm, 23" Stored with document feeder 730mm, 28.8" 700mm, 27.6" 695mm, 27.4" Set up 1435mm, 56.5" 700mm, 27.6" 585mm, 23" Set up with cabinet 1435mm, 56.5" 700mm, 27.6" 1,020mm, 40.2" Set up with cabinet 1435mm, 56.5" and document feeder (when you use A3, 11" × 17" or larger paper) 700mm, 27.6" 1,130mm, 44.
Specifications ❖ Optional Equipment: • Drum unit: Color Drums Type 80(L) A3, 11" × 17" Type 80(S) A4, 81/2" × 11" • Key Counter • Document Feeder • PC Controller Note ❒ Specifications are subject to change without notice.
Document Feeder (Option) Document Feeder (Option) ❖ Original Type: Sheet ❖ Original Weight: 52.3g/m2 to 127.9g/m2, 13.9 lb to 34 lb ❖ Original Size: Max. 297mm × 864mm, 11.7" × 34.0" Min. 149mm × 210mm, 5.9" × 8.3" ❖ First Copy Time (Master Process Time): Less than 34 seconds (A3, 11" × 17") Less than 28.5 seconds (A4, 81/2" × 11") ❖ Second Copy Time (First Print Time): Less than 35 seconds (A3, 11" × 17") Less than 30 seconds (A4, 81/2" × 11") ❖ Original Capacity: 50 sheets (80g/m2, 20 lb) 7.5mm, 0.
Specifications Editing Function Type 85 (Option) PC Controller (Option) Key Counter (Option) 7 208
Twin Color Press Roller Printing System TC-II (Option) Twin Color Press Roller Printing System TC-II (Option) ❖ Configuration: Floor standing (with custom table or cabinet) ❖ Printing Process: Twin color press roller printing system ❖ Print Paper Size: Maximum: 297mm × 432mm, 11.6" × 17.0" Minimum: 70mm × 250mm, 2.8" × 9.8" ❖ Print Paper Weight: • 52.3 – 209.3g/m2, 13.9 – 55.
Specifications Consumables Name Size Remarks Master: Length: 140m, 520ft/roll A3 drum Width: 320mm, 12.
INDEX {~ ~}{} }}{| |}{{ {}, 6 16 single-sided originals → 1 single-sided print of 16 images, 118 1 single-sided original → 1 single-sided print of 2 images, 69 1 single-sided originals → 1 single-sided print of 4 images, 69 2 single-sided originals → 1 single-sided print with 2 images, 64 2 single-sided originals → 1 single-sided print with 4 images, 64 4 single-sided originals → 1 single-sided print of 4 images, 118 8 single-sided originals → 1 single-sided print of 8 images, 118 A A3/11" × 17" drum indi
E Eco.Mode ON/OFF, 146 Economy mode, 50 {Economy Mode} } key, 5 Edge Erase, 41 {Edge Erase} } key, 5 Energy Saver mode, 22 Energy Saving, 144 envelopes, 44 environment, 199 erasing center and edge margins, 40 Error indicator (Red), 7 Ethernet Speed, 155 Exit, 8 exposure glass, 3 Exposure glass cover, 3 F flip up cover, 1 Format, 108 front door, 1 H handle E1, 2 I Idling for Q.
N Network, 155 Next, 8 No. of Q.start, 148, 160 No. of Skip Feed, 148, 159 No Orig. Size, 147 No Orig.
special kinds of paper, 44 specifications, 203 Stamp, 116, 151 Stamp Density, 151 {Stamp} } key, 5 Stamp Position, 151, 162 standard paper, 43 standard printing, 19 {Start} } key, 6 stopping a multi-print run, 28 Storage Overlay, 108 storing a program, 73 System, 143 T thick paper, 43 Time Setting, 143, 156 Tint Mode, 26 trailing edge guides, 3 troubleshooting, 171 Type, 151 Type of Paper, 149, 161 Type(Page), 152 U user code, 18, 153 user tools, 141 {User Tools} } key, 5 user tools menu, 143 W what you
MEMO 215
MEMO 216 UE USA C244