
Instruction manual


3700R/3740 Refrigerated Sampler
Section 2 Setup and Operating Procedures
2-5
battery connector to the sampler’s power connector. A
rechargeable nickel-cadmium battery is most commonly used;
however, lead-acid batteries are available.
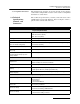
The Teledyne Isco Nickel-Cadmium battery has an operating
capacity of seven standard sampling programs after an 18 hour
charge. (A standard sampling program is defined to be 24
samples at a rate of one 200 ml sample per hour, using 10 feet of
3
/8 inch vinyl suction line at a 5 foot head.)
The Teledyne Isco Lead-Acid Battery has an operating capacity
of 11 standard sampling programs. The sampler may also be
powered by an Isco 120 VAC 50/60 Hz or 240 VAC 50/60 Hz
Power Pack. Both power packs may also be used to recharge the
Teledyne Isco batteries.
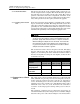
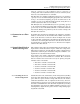
2.4 Connection to a Flow
Meter
To permit flow proportional sampling, the sampler’s controller
must be connected to an external flow meter. This connection is
made to the flow meter connector (shown in Figure 2-6) located
on the controller. A small port is provided on the right side of the
control base for routing the flow meter cable. Refer to Section 4
for information on interfacing devices to interface the sampler
with non-Isco Flow meters.
2.5 Sample Bottle Rack or
Bottle Locating Base
The sample bottle rack is used with both the 24 and 8 bottle con-
figurations to hold the bottles in place inside the refrigerator.
The bottle locating base is used with the 2 bottle configuration to
position the bottles in place inside the refrigerator. All three con-
figurations are described in detail below.
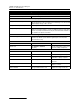
If you want to use a bottle configuration other than the one pres-
ently being used, conversion kits are available. The conversion
kits are listed below. Contact the factory for pricing and part
numbers of the various kits.
• 24 bottle to 8 bottle conversion kit.
• 24 bottle to 2 bottle conversion kit.
• 8 bottle to 24 bottle conversion kit.
• 8 bottle to 2 bottle conversion kit.
• 2 bottle to 24 bottle conversion kit.
• 2 bottle to 8 bottle conversion kit.
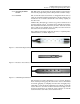
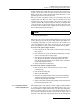
2.5.1 Installing the 24 or 8
Bottle Configuration
Install the bottle rack, with bottles, in the refrigerator by sliding
it into the unit until it drops over the two ramps which hold it in
place. The five posts and two ramps which locate the bottles
under the distributor arm are adjusted at the factory; however,
manufacturing tolerances may result in misalignment between
the bottles and distributor arm. Check the alignment by rotating
the distributor arm using the
NEXT BOTTLE key. If there is any
misalignment, adjust the five posts and two ramps until proper
alignment is attained.