Operating Instructions General Settings Guide 1 Connecting the Machine 2 System Settings 3 Copier Features 4 Printer Features 5 Interface Settings 6 Other User Tools Read this manual carefully before you use this machine and keep it handy for future reference. For safe and correct use, be sure to read the Safety Information in "About This Machine" before using the machine.
Introduction This manual contains detailed instructions and notes on the operation and use of this machine. For your safety and benefit, read this manual carefully before using the machine. Keep this manual in a handy place for quick reference. Important Contents of this manual are subject to change without prior notice. In no event will the company be liable for direct, indirect, special, incidental, or consequential damages as a result of handling or operating the machine.
Manuals for This Machine Refer to the manuals that are relevant to what you want to do with the machine. Important ❒ Media differ according to manual. ❒ The printed and electronic versions of a manual have the same contents. ❒ Adobe Acrobat Reader/Adobe Reader must be installed in order to view the manuals as PDF files. ❒ Depending on which country you are in, there may also be html manuals. To view these manuals, a Web browser must be installed.
TABLE OF CONTENTS Manuals for This Machine ......................................................................................i How to Read This Manual .....................................................................................1 Symbols .....................................................................................................................1 Display Panel..........................................................................................................
. Interface Settings Network................................................................................................................. 45 6. Other User Tools Changing the Display Language ........................................................................47 Counter ................................................................................................................. 48 Displaying the Total Counter....................................................................................
iv
How to Read This Manual Symbols This manual uses the following symbols: Indicates important safety notes. Ignoring these notes could result in serious injury or death. Be sure to read these notes. They can be found in the “Safety Information” section of About This Machine. Indicates important safety notes. Ignoring these notes could result in moderate or minor injury, or damage to the machine or to property. Be sure to read these notes.
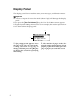
Display Panel The display panel shows machine status, error messages, and function menus. Important ❒ A force or impact of more than 30 N (about 3 kgf) will damage the display panel. If you press the {User Tools/Counter} key, the User Tools Menu screen appears. Using the System Settings menu screen as an example, this section explains how to use the machine's display panel. 2 1 ARG001S 1. The settings menu appears.
Reading the Display and Using Keys This section explains how to read the display and use the Selection keys. If you press the {Copy} key, the initial copy screen appears. Using the initial copy screen menu as an example, this section explains how to use the machine's control panel. APE026S 1. Selection keys 2. {Escape} key Correspond to items at the bottom line on the display. Press to cancel an operation or return to the previous display.
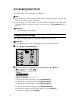
Accessing User Tools User Tools allow you to change or set defaults. Note ❒ Operations for system settings differ from normal operations. Always quit User Tools when you have finished. ❒ Any changes you make with User Tools remain in effect even if the main power switch or operation switch is turned off, or {Clear Modes} key is pressed. Reference p.4 “Changing Default Settings” Changing Default Settings This section describes how to change the settings of User Tools.
C Select the item using {U} or {T}, and then press the {OK} key. D Change settings by following instructions on the display, and then press the {OK} key. Note ❒ Press the {Escape} key to return to the previous display. ❒ To discontinue the operation and return to the initial display, press the {User Tools/Counter} key. Exiting User Tools This section describes how to end User Tools. A Press the {User Tools/Counter} key.
6
1. Connecting the Machine This chapter describes how to connect the machine to the network and specify the network settings. Before using this machine, make sure all environmental and electrical requirements are met. Connect the machine to the host computer using the USB port or network interface unit. Make sure all cables, connectors, and electrical outlets necessary for attaching the machine to the host computer or network are close at hand.
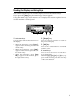
Connecting the Machine Connecting to the USB Interface Connect the USB 2.0 interface cable to the USB 2.0 port. A Connect the USB 2.0 interface cable to the USB 2.0 port. 1 ARG006S B Connect the other end to the USB port on the host computer. The machine and computer are now connected. The printer driver and TWAIN driver must be installed next. Note ❒ If USB 2.0 is used with Windows 98/Me, only a speed equivalent that of USB 1.1 is possible.
Network Settings Network Settings This section describes the network settings you can change with User Tools (System Settings). Make settings according to functions you want to use and the interface to be connected. 1 Important ❒ These settings should be made by the system administrator, or with the advice the system administrator. Settings Required to Use the Printer This section lists the settings required for using the printer.
Connecting the Machine Settings Required to Use Network TWAIN Scanner This section lists the settings required for using TWAIN Scanner under the network environment. 1 Ethernet This section lists the settings required for using network TWAIN Scanner with Ethernet cable. For details about how to specify the settings, see “Interface Settings”.
2. System Settings This chapter describes User Tools in the System Settings menu. For details on how to access User Tools, see “Accessing User Tools”. General Features This section describes User Tools in the General Features menu under System Settings. Default settings are shown in bold type. ❖ Panel Key Sound The beeper (key tone) sounds when a key is pressed. The default setting is On.
System Settings ❖ Output:Copier (copier) You can specify a tray to which documents are delivered. 2 AYN001S 1. Internal Tray 2. Upper Internal Tray 3. Finisher Shift Tray The default setting is Internal Tray. If you set [Paper Type: Bypass Tray] to [OHP], paper loaded in the bypass tray cannot be fed to the Finisher Shift Tray. If you select a paper size, paper type, or paper tray not supported by the Upper Internal Tray or Finisher Shift Tray, paper is output to the Internal Tray.
General Features Output tray settings You cannot use the Upper Internal Tray as the output tray when copying from the bypass tray. When the 500-sheet finisher is installed and Staple or Shift Sort is specified for a job, the job will be delivered to the Finisher Shift Tray regardless of the output tray specified.
System Settings Tray Paper Settings This section describes User Tools in the Tray Paper Settings menu under System Settings. Default settings are shown in bold type. Important ❒ If the specified paper size differs from the actual size of the paper loaded in the paper tray, a misfeed might occur because the correct paper size was not detected. 2 ❖ Tray Paper Size: Tray 1-4 Select the size of the paper loaded in the paper tray.
Tray Paper Settings ❖ Paper Type: Tray 2 Select the type of the paper loaded in the paper tray 2. The setting specified here is also applied to [Auto Paper Select] in Printer Features. • The paper types you can set are as follows: No Display (Plain Paper), Thick Paper The default setting for Paper Type is No Display (Plain Paper). ❖ Ppr Tray Priority:Copier (copier) You can specify the tray to supply paper for output. The default setting is Tray 1.
System Settings Timer Settings This section describes User Tools in the Timer Settings menu under System Settings. Default settings are shown in bold type. ❖ Auto Off Timer After a specified period has passed, following job completion, the machine automatically turns off, in order to conserve energy. This function is called “Auto Off”. The machine status after the Auto Off operation is referred to as “Off mode”, or “Sleep mode”. For the Auto Off Timer, specify the time to elapse before Auto Off.
Administrator Tools Administrator Tools This section describes User Tools in the Administrator Tools menu under System Settings. Default settings are shown in bold type. Administrator Tools are used by the administrator. To change these settings, contact the administrator. We recommend specifying Administrator Authentication before making Administrator Tools settings. 2 ❖ User Code Man.:Copier Allows you to control who uses the machine by setting codes for users.
System Settings ❖ Display/Print Counter Allows you to view and print the number of prints. • Display/Print Counter Displays the number of prints for each function (Total, Copier, Printer, A3/DLT, and Duplex). • Print Counter List Prints out a list of the number of prints made under each function. • To print the counter list A Press the {User Tools/Counter} key. 2 APE028S 18 B Select [System Settings] using {U} or {T}, and then press the {OK} key.
Administrator Tools E Press [Print]. F Press the {Start} key. G Press the {User Tools/Counter} key. 2 ❖ Counter per User Code You can display, print, and reset the copy counters for jobs performed under each user code. The number of prints may differ from the counter value shown in Display/Print Counter. • Display counter per user code Display the number of prints made under each user code. • Print counter per user code Prints the number of prints made under each user code.
System Settings User Code This section describes how to register user codes to restrict copier functions to certain users, and check on their use of copier functions. Registering a New User Code 2 This section describes how to register a user code. A Press the {User Tools/Counter} key. APE028S B Select [System Settings] using {U} or {T}, and then press the {OK} key. C Select [Administrator Tools] using {U} or {T}, and then press the {OK} key.
User Code E Select [Program] using {U} or {T}, and then press the {OK} key. F Enter the user code using the number keys, and then press the {OK} or {q} 2 key. The “ Programmed ” message appears, and then the “ User Code ” display returns. G Press the {User Tools/Counter} key. Changing a User Code This section describes how to change a user code. A Press the {User Tools/Counter} key. APE028S B Select [System Settings] using {U} or {T}, and then press the {OK} key.
System Settings C Select [Administrator Tools] using {U} or {T}, and then press the {OK} key. D Select [Program/Change User Code] using {U} or {T}, and then press the {OK} 2 key. E Select [Change] using {U} or {T}, and then press the {OK} key. F Enter the registered user code you want to change using the number keys, and then press the {OK} or {q} key. When you select the user code from the User Code List, press [List].
User Code Deleting a User Code This section describes how to delete a user code. Important ❒ This operation also deletes user codes registered to multiple functions. User control via the deleted user code is no longer possible. 2 A Press the {User Tools/Counter} key. APE028S B Select [System Settings] using {U} or {T}, and then press the {OK} key. C Select [Administrator Tools] using {U} or {T}, and then press the {OK} key.
System Settings E Select [Delete] using {U} or {T}, and then press the {OK} key. F Select [Per User Code] or [All User Codes] using {U} or {T}, and then press the 2 {OK} key. When selecting [All User Codes], a confirmation message appears. Press [Yes], and then proceed to step I. G Enter the registered user code you want to delete using the number keys, and then press the {OK} or {q} key. When you select the user code from the User Code List, press [List].
User Code Displaying the Counter for Each User Code This section describes how to display the counter for each user. A Press the {User Tools/Counter} key. 2 APE028S B Select [System Settings] using {U} or {T}, and then press the {OK} key. C Select [Administrator Tools] using {U} or {T}, and then press the {OK} key. D Select [Counter per User Code] using {U} or {T}, and then press the {OK} key. E Select [Display] using {U} or {T}, and then press the {OK} key.
System Settings F Press the {User Tools/Counter} key. Printing the Counter for Each User Code This section describes how to print the counter for each user. A Press the {User Tools/Counter} key. 2 APE028S B Select [System Settings] using {U} or {T}, and then press the {OK} key. C Select [Administrator Tools] using {U} or {T}, and then press the {OK} key. D Select [Counter per User Code] using {U} or {T}, and then press the {OK} key. E Select [Print] using {U} or {T} and then press the {OK} key.
User Code F Press the {Start} key. The counter list prints out. 2 G Press the {User Tools/Counter} key. Clearing the Counter This section describes how to clear the counter. A Press the {User Tools/Counter} key. APE028S B Select [System Settings] using {U} or {T}, and then press the {OK} key. C Select [Administrator Tools] using {U} or {T}, and then press the {OK} key. D Select [Counter per User Code] using {U} or {T}, and then press the {OK} key.
System Settings E Select [Clear] using {U} or {T}, and then press the {OK} key. A confirmation message appears. 2 F Press [Yes]. The “Counter has been cleared.” message appears, and then the “Codes: Counters” display returns. G Press the {User Tools/Counter} key.
3. Copier Features This chapter describes User Tools in the Copier Features menu. For details on how to access Copier Features, see “Accessing User Tools”. Copier Features This section describes User Tools in Copier Features. Default settings are shown in bold type. ❖ APS/ Auto R/E Priority You can select [Auto Paper Select Priority] (APS Priority) or [Auto R/E Priority] (Auto Reduce/Enlarge Priority). When you cancel this setting, select [Off]. The default setting is Auto Paper Select Priority.
Copier Features • Special Mode 3 photo images created by dithering (visible dots), such as newspaper photos - normal resolution • Special Mode 4 photo images created by dithering (visible dots), such as newspaper photos - coarse resolution • Special Mode 5 normal text originals (reproducing the background) The default setting for Original Type 1 (Text) is Text Mode 1. The default setting for Original Type 2 (Photo) is Photo Mode 1.
Copier Features ❖ Duplex Margin Specify left margin on the back side of copies, and top margin on the back side. Select [Top Margin] or [Left Margin], and then set the required value. • Top Margin: 0-50mm, 0"-2" • Left Margin: 0-50mm, 0"-2" The default setting is 5 mm (Metric version) / 0.2 inch (Inch version). ❖ Rotate Sort Specify whether or not to select rotate sort when the {Sort} key (finisher not installed), or {Sort/Staple} key (finisher installed) is pressed. The default setting is Off.
Copier Features 3 32
4. Printer Features This chapter describes User Tools in the Printer Features menu. For details on how to access Printer Features, see “Accessing User Tools”. Paper Input This section describes User Tools in the Paper Input menu under Printer Features. ❖ Bypass Paper Size The size of the paper set in the bypass tray. The default setting is A4 (Metric version)/81/2" × 11" (Inch version). Custom size paper set for Tray Paper Size: Bypass tray will be as follows: Vertical: 90.0 to 297.0 mm (3.55 to 11.
Printer Features List/Test Print This section describes User Tools in the Test Print menu under Printer Features. If changes are made to the machine's environment or its print-related settings, or a new program is registered, we recommend you print the list of settings, so they can be checked. ❖ Multiple Lists You can print the configuration page and error log. ❖ Config. Page You can print the machine's current configuration values.
List/Test Print Printing the Operations Test Page This section describes how to print the operations test page. A Press the {User Tools/Counter} key. 4 APE028S B Select [Printer Features] using {U} or {T}, and then press the {OK} key. The Printer Features menu appears. C Select [List/Test Print] using {U} or {T}, and then press the {OK} key. D Select [Operations Test] using {U} or {T}, and then press the {OK} key. The operations test page is printed. E Press the {User Tools/Counter} key.
Printer Features Maintenance This section describes User Tools in the Maintenance menu under Printer Features. ❖ Menu Protect This procedure allows you to protect menu settings from accidental change. It makes it impossible to change menu settings with normal procedures unless you perform the required key operations. • Level 1 You can protect “Maintenance”, ”System”, “Host Interface” and “PCL Menu”. • Level 2 You can protect ”Paper Input”, “Maintenance”, ”System”, “Host Interface” and “PCL Menu”.
Maintenance C Select [Maintenance] using {U} or {T}, and then press the {OK} key. D Select [Menu Protect], and then press the {OK} key. 4 E Enter an Administrator Code using the number keys, and then press the {OK} key. F Select a menu protect level, and then press the {OK} key. G Press the {User Tools/Counter} key. Reference p.
Printer Features Canceling Menu Protect This section describes how to cancel menu protect. A Press the {User Tools/Counter} key. 4 APE028S B Select [Printer Features] using {U} or {T}, and then press the {OK} key. C Select [Maintenance] using {U} or {T}, and then press the {OK} key. A screen for entering the administrator code appears. D Enter an Administrator Code using the number keys, and then press the {OK} key. E Select [Menu Protect], and then press the {OK} key.
Maintenance F Enter an Administrator Code using the number keys, and then press the {OK} key. G Select [Off], and then press the {OK} key. 4 H Press the {User Tools/Counter} key. Reference p.4 “Accessing User Tools” Temporarily canceling Menu Protect When you select protected items in Printer Features, a screen for entering the administrator codes appears. When this happens, enter the correct administrator codes using the number keys, and then press the {OK} key.
Printer Features System This section describes User Tools in the System menu under Printer Features. Default settings are shown in bold type. ❖ Print Error Report Select this to have an error report printed when a printer or memory error occurs. The default setting is Off. ❖ Auto Continue You can select this to enable Auto Continue. When it is On, printing continues even if a system error occurs. If Auto Continue setting is “0 minute”, the printer continues printing without displaying error message.
System ❖ Page Size You can select the default paper size. The paper size you can select: A3, A4, A5, B4 JIS, B5 JIS, C5 Env, C6 Env, DL Env, COM10, Monarch, 11" × 17", 81/2" × 14", 81/2" × 13", 81/2" × 11", 81/4" × 13", 8" × 13", 71/4" × 101/2", 51/2" × 81/2", 8K,16K, Custom Size The default setting is A4 (Metric version) / 81/2" × 11" (Inch version) ❖ Letterhead Setting You can rotate original images when printing. When printing, original images are always rotated by 180 degrees.
Printer Features Host Interface This section describes User Tools in the Host Interface menu under Printer Features. Default settings are shown in bold type. ❖ I/O Timeout You can set how many seconds the machine should wait before ending a print job. If data from another port usually arrives while an earlier job is printing out, increase the timeout period. The default setting is 15 seconds. Reference p.
PCL Menu PCL Menu This section describes User Tools in the PCL Menu under Printer Features. Default settings are shown in bold type. Important ❒ This menu appears only if the Printer Enhance Option is installed. ❖ Orientation You can set the page orientation. The default setting is Portrait. ❖ Form Lines You can set the number of lines per page. The default setting is 64 (Metric version) / 60 (Inch version). • 5 to 128 by 1 4 ❖ Font Number You can set the ID of the default font you want to use.
Printer Features ❖ Ext. A4 Width You can extend the printing area width (when printing on A4 sheet with PCL). The default setting is Off. When the setting is On, the width will be 81/2 inches. ❖ Append CR to LF When set to [On], a carriage return will follow each line feed: CR=CR, LF=CR-LF, FF=CR-FF. The default setting is Off. ❖ Resolution You can set the print resolution in dots per inch. The default setting is 600 dpi.
5. Interface Settings This chapter describes User Tools in the Interface Settings menu. For details on how to access Interface Settings, see “Accessing User Tools”. Network This section describes User Tools in the Network menu under Interface Settings. Default settings are shown in bold type. ❖ IP Address To use this machine in a network environment, you must first configure its IP address and subnet mask.
Interface Settings 5 46
6. Other User Tools Initial settings allow you switch the language as well as checking the number of printed paper by displaying the counter. For the details on how to access respective settings, see “Accessing User Tools”. Changing the Display Language Following describes [Language] provided for the machine. You can change the language used on the display. English is set as default. A Press the {User Tools/Counter} key. APE028S B Select [Language] using {U} or {T}, and then press the {OK} key.
Other User Tools Counter Displaying the Total Counter You can display the total counter value used for all functions. A Press the {User Tools/Counter} key. APE028S B Select [Counter] using {U} or {T}, and then press the {OK} key. 6 C To print the counter list, press [Print]. D Press the {Start} key. A counter list prints out. E Press the {User Tools/Counter} key.
Counter Note ❒ To print the counter list, set the paper size to larger than A4 or Letter (81/2" × 11"). Reference p.
INDEX A Accessing User Tools, 4 Administrator Code, 17 Administrator Tools, 17 AOF (Always On), 17 Append CR to LF (PCL Menu), 43 APS/ Auto R/E Priority, 29 Auto off timer, 16 Auto reset timer, 16 Auto Tray Switching, 29 B F Font Number (PCL Menu), 43 Font Pitch (PCL Menu), 43 Form Lines (PCL Menu), 43 Function Priority, 11 G Gateway Address, 45 General Features, 11 H Host Interface, 42 Bypass tray, 14 C Canceling Menu Protect, 38 Changing a user code, 21 Changing Default Settings, 4 Clearing the coun
P Panel Key Sound, 11 Paper Input, 33 Paper type, 14 PCL Menu (Printer Features), 43 Point Size (PCL Menu), 43 Ppr tray priority, 14 Preset R/E Priority, 29 printer, 14 Printer Features (PCL Menu), 43 Printing the counter for each user code, 26 Print Priority, 11 Program/Change User Code, 17 R Registering a new user code, 20 Reproduction Ratio, 29 Resolution (PCL Menu), 43 Rotate Sort, 29 Rotate Sort: Auto Continue, 29 S Setting Menu Protect, 36 Symbol Set (PCL Menu), 43 System, 40 System Auto Reset Timer
52 EN USA D010-7670
In accordance with IEC 60417, this machine uses the following symbols for the main power switch: a means POWER ON. b means POWER OFF. c means STAND BY. Trademarks Microsoft®, Windows® and Windows NT® are registered trademarks of Microsoft Corporation in the United States and/or other countries. Acrobat® is a registered trademark of Adobe Systems Incorporated. Other product names used herein are for identification purposes only and might be trademarks of their respective companies.
Operating Instructions General Settings Guide Type for 7025/DSm625/LD125/Aficio MP 2500 EN USA D010-7670