RICOH COMPANY, LTD. 15-5, 1 chome, Minami-Aoyama, Minato-ku, Tokyo Telephone: Tokyo 3479-3111 Operating Instructions Overseas Affiliates Spain RICOH ESPAÑA S.A. Avda. Litoral Mar, 12-14, 08005 Barcelona Phone: +34-(0)93-295-7600 The Netherlands RICOH EUROPE B.V. Groenelaan 3, 1186 AA, Amstelveen Phone: +31-(0)20-5474111 Italy RICOH ITALIA SpA Via della Metallurgia 12, 37139 Verona Phone: +39-(0)45-8181500 United Kingdom RICOH UK LTD.
Introduction This manual contains detailed instructions on the operation and maintenance of this machine. To get maximum versatility from this machine all operators should carefully read and follow the instructions in this manual. Please keep this manual in a handy place near the machine. Please read the Safety Information before using this machine. It contains important information related to USER SAFETY and PREVENTING EQUIPMENT PROBLEMS.
Note to users in the United States of America Notice: This equipment has been tested and found to comply with the limits for a Class B digital device, pursuant to Part 15 of the FCC Rules. These limits are designed to provide reasonable protection against harmful interference in a residential installation. This equipment generates, uses and can radiate radio frequency energy and, if not installed and used in accordance with the instructions, may cause harmful interference to radio communications.
Do not make copies of anything which is prohibited from copying by law. The following items are normally prohibited from copying by national law. Other items may be prohibited by local law. • Money • Stamps • Bonds • Stocks • Bank drafts • Checks • Passports • Driver’s licenses The copy samples in this Operating Instructions differ somewhat from actual copies due to printing effects. The coloring of each Color key may differ somewhat from the actual copies.
SAFETY INFORMATION ii
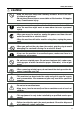
Safety Information Safety Information When using your machine, the following safety precautions should always be followed. Safety during Operation In this manual, the following important symbols are used: R WARNING: Ignoring this warning could cause serious injury or even death. R CAUTION: Ignoring this caution could cause injury or damage to property. Examples of Indications R Symbols R mean a situation that requires you take care. v Symbols v mean “Hot surface”.
Safety Information R WARNING: iv m • Only connect the machine to the power source described on the inside front cover of this manual. • Avoid multi-wiring. • Do not damage, break or make any modifications to the power cord. Do not place heavy objects on it, pull it hard or bend it more than necessary. These actions could cause an electric shock or fire. • Do not plug or unplug the power cord with your hands wet. Otherwise, an electric shock might occur.
Safety Information R CAUTION: m • Keep the machine away from humidity and dust. A fire or an electric shock might occur. • Do not place the machine on an unstable or tilted surface. If it topples over, it could cause injury. o • After you move the machine, fix it with the caster fixture. Otherwise, the machine might move or come down to cause a personal injury. r • When you move the machine, unplug the power cord from the wall outlet to avoid fire or electric shock.
How to Read this Manual How to Read this Manual Symbols In this manual, the following symbols are used: R WARNING: This symbol indicates a potentially hazardous situation that might result in death or serious injury when you misuse the machine without following the instructions under this symbol. Be sure to read the instructions, all of which are described in the Safety Information section.
How to Read this Manual vii
What You Can do with this Machine What You Can do with this Machine • Color Conversion ⇒ Page 73 • Color Erase ⇒ Page 75 • Mirror ⇒ Page 77 • Positive/Negative ⇒ Page 79 • Centering ⇒ Page 60 • Cover Sheet ⇒ Page 69 *3 • Color Balance ⇒ Page 88 Dark Light Dark Light • Bypass feed Copying ⇒ Page 36 • Image Adjustment ⇒ Page 91 • Sharp/Soft • Background Density • Contrast • Pastel *1 The optional 20-bin sorter stapler, 10-bin sorter stapler or 3-bin sorter i
What You Can do with this Machine • Sort ⇒ Page 80 *1 • Stack ⇒ Page 82 • Staple ⇒ Page 84 *1 *2 • Checking the Selected Copy jobs ⇒ Page 50 • Color Mode ⇒ Page 27 • Full Color Copy • Directional Magnification (%) ⇒ Page 55 • Auto Reduce/Enlarge ⇒ Page 43 • Black Copy • Single Color Copy • Twin Color Copy • Original Image Selection ⇒ Page 31 • Projector ⇒ Page 145 • Margin Adjustment ⇒ Page 61 • Zoom ⇒ Page 53 • Directional Size Magnification ⇒ Page 57 • Series Copies ⇒ Page 63 • Combine 2 Origin
Table of Contents Table of Contents Where it is & What it is Machine Exterior ........................................................................................................................ 2 Options ....................................................................................................................................... 4 Operation Panel ......................................................................................................................... 6 Panel Display ..........
Table of Contents Copying Basic Operation ....................................................................................................................... 24 How to Make Copies ............................................................................................................. 24 Adjusting Copy Image Density .............................................................................................. 25 Selecting a Color Mode ................................................................
Table of Contents Color Creation .......................................................................................................................... 73 Color Conversion—Converting a Selected Color into a Different Color .............................. 73 Color Erase—Erasing the Selected Color ............................................................................ 75 Image Creation ....................................................................................................................
Table of Contents xClearing Misfeeds .............................................................................................................. 108 dAdding Staples .................................................................................................................. 111 eRemoving Jammed Staples ............................................................................................. 113 Changing the Machine’s Settings Changing Paper Size ................................................
Table of Contents Copy Paper .......................................................................................................................... 142 Paper Storage ...................................................................................................................... 143 Toner Storage ...................................................................................................................... 143 Projector Unit Operation Guide to Components ...................................
Table of Contents Exterior ................................................................................................................................. 180 Lens ..................................................................................................................................... 180 Film Holder .......................................................................................................................... 180 Holder Slot ........................................................
xvi
1 Where it is & What it is Where it is & What it is
Machine Exterior Machine Exterior TRSH011E 1. Platen cover (option) Lower this cover over originals placed on the exposure glass (platen grass) for copying. 2. Behind cover Flip up when you use the keys underneath. 3. Main power switch To start the machine, turn on this switch. Note ❏ If the machine does not operate after turning on the operation switch, check if the main power switch is turned on. If it is off, turn it on. 4. Copy tray Copied paper is delivered here. 5.
Where it is & What it is Machine Exterior 3 1 2 TRSH030E TRSH020E 1. Bypass tray Use to copy onto OHP transparencies, adhesive labels, translucent paper, post cards, and non-standard size paper, ☛ See page 36. 2. Right covers Open this cover to remove jammed paper. 3. Ventilation holes Prevents overheating. Do not obstruct the ventilation hole by placing or leaning an object near it. If the machine overheats, a fault might occur.
Options Options This machine can be provided with the following options: 1. Platen cover Lower this cover over originals placed on the exposure glass (platen glass) for copying. 2. Document feeder (ADF) Insert a stack of originals here. They will be fed automatically. 3. Original tray 4. Film projector unit Use to copy films. ☛ See page 145. Note ❐ The holder is required for installation. 5.1000-sheet tray unit (two 500-sheet trays) Consists of two paper trays. 6.
Where it is & What it is Options 5
Operation Panel Operation Panel 1. User Tools key Press to change the default settings and conditions to meet your requirements. 2. Color Balance key Press to adjust and store the color balance. ☛ See page 88. 3. Menu key Displays the names of available functions. 4. Favorite keys Press to use the stored functions you frequently use. As default, the following functions are stored: 1: Combine 2 Originals 2: Series Copies 3: Margin Adjustment 4: Directional Size Magnification (inch) 5. Directional Mag.
Where it is & What it is Operation Panel 17. On indicator This indicator lights up when the operation switch is turned on, and goes off when the switch is turned off. 18. Operation switch Press this switch to turn the power on (the On indicator lights up). To turn the power off, press this switch again (the On indicator goes off). 19. Clear/Stop key Press to cancel the copy number entered. While copying, press to stop copying. This key is also used to clear data. 20. Start key Press to start copying.
Panel Display Panel Display The panel display shows the status of the machine, error messages, and function menus. Important ❐ Do not apply a strong shock or force of about 30N (about 3kgf) or more to the panel display or you could damage it. Note ❐ Currently selected items are shown highlighted on the panel display (e.g. Auto ). ❐ Keys that are not available are shown grayed out (e.g. OK ). Layout and Keys Initial display 4 1 5 2 3 6 1. The machine status and messages appear here. 2.
Panel Display Where it is & What it is Function menu display 2 1 3 1. ✔ mark appears before the names of functions that are currently selected. 2. The machine status and messages appear here. 3. Items which can be selected or specified. Common keys [OK] Confirm the selected function or value and return to the previous display. [Cancel] Cancel the selected function or value and return to the previous display. [ Prev.
Panel Display Example Displays The basic elements used on the display are shown below. Understanding their meaning help you exploit this machine’s features quickly and easily. Sample display for Color Erase 1 2 3 1. The machine status and messages appear here. 2. Available settings. 3. Screened key means to press it. k Press the [OK] key. 1 2 3 1. Selected item. 2. Cancel the settings and returns to the previous display. 3. Confirm the settings and returns to the previous display.
Basics Basics 11
Starting the Machine Starting the Machine To start the machine, press the operation switch to turn the power on. Note ❐ This machine automatically enters Energy Saver mode or turns itself off if you do not use the machine for a while. About Energy Saver mode, ☛ see page 44. About Auto Off Timer, ☛ see page 125. Power Switches This machine has the operation switch and main power switch. ❐ Operation switch (right side of the operation panel) Press this switch to activate the machine.
Starting the Machine Turning on the Power the operation switch to make 1 Press the On indicator light up. Note ❐ If the power is not turned on when the operation switch is pressed, check if the main power switch is on. If off, turn it on. Basics ❐ During the warm-up period (about 7 minutes), you can use the Auto Start function. ☛ See page 46. When the machine is set for user codes your user code using the Num1 Enter ber keys. Then press the # key.
Originals Originals Standard Size Originals The machine will detect original of the following sizes and directions as standard size originals: ❐ When you set originals on the exposure glass (platen glass) Metric version A3l, B4l, A4lp, B5lp, 81/2" x 13"l Inch version 11" x 17"l, 10" x 14"l, 81/2" x 14"l, 81/2" x 13"l, 81/2" x 11"lp ❐ When you set originals in the document feeder Metric version A3l, B4l, A4lp, B5lp, A5lp, B6lp, 267 x 390mml, 195 x 267mmlp, 11" x 17"l, 81/2" x 13"l, 81/2" x 11"lp Inch
Setting Originals on the Exposure Glass (Platen Glass) Setting Originals on the Exposure Glass (Platen Glass) the platen cover or the document 1 Lift feeder. the original face down on the ex2 Set posure glass (platen glass). The origi- 1 Basics nal must be aligned with the rear left corner. 2 the platen cover or the docu3 Lower ment feeder. TRSR010E 1. Reference mark 2.
Setting a Stack of Originals in the Document Feeder Setting a Stack of Originals in the Document Feeder You can insert a stack of originals into the document feeder. These originals are individually fed onto and removed from the exposure glass (platen glass). Note ❐ Some originals are unsuitable for the document feeder. ☛ See page 14. ❐ Do not press down or hold originals after inserting them. ❐ While originals are fed from the original table to the exposure glass (platen glass), do not pull them out.
Setting one Original at a Time in the Document Feeder Setting one Original at a Time in the Document Feeder If you set one original at a time in the document feeder, the second and subsequent originals can be fed and copied automatically without pressing the Start key. Note ❐ Do not press down or hold originals after inserting them. ❐ While originals are fed from the original table to the exposure glass (platen glass), do not pull them out.
Setting one Original at a Time in the Document Feeder 5 Press the Start key. the Auto Feed indicator is lit af6 While ter an original is fed, set the next original. The original is automatically fed and copied. Note ❐ You can adjust the time the machine waits before being ready for the next original with the user tools. ☛ See page 133.
Setting Originals of Different Sizes in the Document Feeder Setting Originals of Different Sizes in the Document Feeder You can insert a stack of originals of different standard sizes (e.g. A4, B5 etc.) into the document feeder. These originals are individually fed onto and removed from the exposure glass (platen glass). ❐ To use this function, you have to select ADF Mixed Sizes mode with the user tools. See page 133.
Setting Non-standard Sized Originals Setting Non-standard Sized Originals When copying from non-standard sized originals, enter the original size so that copy is well aligned. Limitation ❐ You must set your non-standard size originals on the exposure glass (platen glass). Reference ❐ For the standard sizes the machine can detect, ☛ see page 14. Note ❐ The dimensions you can enter must be within the following ranges: Vertical size 50 - 297mm (in 1mm steps), 2.0" - 11.7" (in 0.
Setting Non-standard Sized Originals the vertical original size with the 4 Enter Number keys, then press the or # key. Note Basics ❐ To change the value entered, press the Clear/Stop key and enter the new value. the horizontal original size with 5 Enter the Number keys, then press the [OK] key. TRSS100E TRSS114E your original on the exposure 6 Set glass (platen glass), then press the Start key.
Removing the Platen Cover to Copy a Large Original Removing the Platen Cover to Copy a Large Original You can remove the platen cover to copy a large (more than A3, 11" × 17") original. Note ❐ You cannnot remove the document feeder. To remove the platen cover, lift it out. Note ❐ Lift the platen cover with both hands. Place the removed cover on a flat surface such as a desk and where it will not be damaged.
Copying Copying 23
Basic Operation Basic Operation How to Make Copies your original on the exposure 1 Set glass (platen glass) or in the document feeder. ☛ See page 15, 16, or 17. that the [Auto Text / Photo], 2 Confirm [Auto Color Select], [Auto] (Auto Paper Select), and [100%] are selected. If not, select these settings. Note ❐ Auto Text / Photo ☛ see page 31. ❐ Auto Color Select ☛ see page 27. ❐ Auto Paper Select ☛ see page 35. the number of copies required 3 Enter using the Number keys.
Basic Operation Adjusting Copy Image Density Image density affects the contrast of copies. With these functions you can control the image density so that copies match originals. Make the selection you require then set your originals and press the Start key. Auto image density The machine automatically controls the image density. Note ❐ Auto Image Density and Auto Color Selection cannot be set together. Auto Color Selection mode is se1 Iflected, select other color modes to cancel it. ☛ See page 27.
Basic Operation Combined auto and manual image density Use when copying originals with a dirty background (such as newspapers). You can adjust the foreground density while masking out the dark background. Auto Color Selection mode is se1 Iflected, select other color modes to cancel it. ☛ See page 27. the Auto Image Density key 2 Press to light the Auto Image Density indicator. the Lighter or 3 toPress adjust the density.
Basic Operation Selecting a Color Mode Select a color mode that best suits your originals and copying requirements. Auto color selection mode The machine automatically detects whether the original has color parts or not. Originals containing only black images will be copied in Black mode. Originals with some color areas will be copied in Full Color mode. Note ❐ If you make one copy set of a black original using the document feeder, it is recommended to select Black mode.
Basic Operation Black copy mode This function makes copies in black. the 1 Press indicator. keys to light the Black your originals, then press the 2 Set Start key. Single color mode This function makes copies in single colors. Note ❐ You can choose one of the following colors: Red, Green, Blue, Yellow, Cyan, Magenta, Yellow Green, Orange, Marine Blue, Beige, Pink, and Purple Reference ❐ For copy samples, ☛ see page 4 of the Color Copy Quick Guide. Press the keys to light the Single 1 Color indicator.
Basic Operation Twin color mode This function makes copies with black parts in the selected color and other parts in the other selected color. Reference ❐ For copy samples, ☛ see page 6 of the Color Copy Quick Guide.
Basic Operation the color you want to copy in 5 Select for the black parts of the original with the key. keys. Then press the [OK] TRSS100E TRSS115E your originals, then press the 6 Set Start key.
Basic Operation Selecting the Original Image Type (Photo/Text) To optimize the likeness between copies and originals, select an image type that matches your originals. Note ❐ You can adjust the readability of black lettering in colored areas, ☛ see page 91. Auto Text/Photo mode This mode automatically detects the areas of your original containing text or photographs. The text areas are copied using Text mode, and the photographs are copied with Photo mode.
Basic Operation your desired photo type with 4 Select keys. Then press the [OK] the key. TRSS100E TRSS115E 5 Press the [OK] key. your originals, then press the 6 Set Start key. Text mode This mode is suitable for copying originals consisting of characters, line diagrams, and letter, but not photograph images. 1 Press the Original key. [Text] with the 2 Select press the [OK] key. keys. Then your originals, then press the 3 Set Start key.
Basic Operation Photo mode This mode is suitable for copying originals consisting of pictures, photographs, and screened letters/areas, but not solid letters. Note ❐ There are 3 types of Photo mode: [Press Print]: Use when copying photographs or pictures that are printed on paper (e.g. magazines). [Glossy Photo]: Use when copying developed photographs. [2nd Generation]: Use when copying copies or originals printed from printers. Original key. 2 Select [Photo] with the Copying 1 Press the keys.
Basic Operation Special Original mode Use this function for originals written in marker pen, originals printed from inkjet printers, or maps. 1 Press the Original Key. [Special Orig.] with the 2 Select keys. Then press the [OK] key. TRSS100E TRSS115E 3 Select your desired original type with the keys. Then press the [OK] key. TRSS100E TRSS115E your originals, then press the 4 Set Start key.
Basic Operation Selecting the Copy Paper Size Select a suitable size of copy paper based on the original size and the reproduction ratio. Auto paper select The machine automatically selects a suitable size of copy paper based on the original size and the reproduction ratio. Reference ❐ Regarding functions that cannot be used together with this function, ☛ see page 96. Note ❐ Depending on the original type and size you use, the machine cannot detect original size. In this case, select paper size manually.
Basic Operation Copying from the Bypass Tray Use the bypass tray to copy onto thick paper, adhesive labels, OHP transparencies, or non-standard size paper. Also use the bypass tray to copy onto the reverse side of paper that has already been copied onto.
Basic Operation ❐ When you copy onto OHP transparencies, you can select whether a blank slip sheet is inserted between OHP transparencies ❐ When you set several sheets at a time, fan them to get air between them before loading. ❐ If the copy paper is curled, gently roll it to remove the curl. ❐ When you copy onto OHP transparencies, insert them with the copy side up. ❐ Do not stack copy paper above the limit mark.
Basic Operation the [l/p] key to select paper 3 Press direction. TRSS100E TRSS112E you select [OHP] in step 2, 4 When press the [OK] key then select whether blank slip sheets are inserted between OHP transparencies with the keys. TRSS100E Note TRSS116E ❐ When you select [On], make sure that the paper for slip sheets is identical in size and direction to the OHP transparencies set in the paper tray. 5 Press the [OK] key. the paper guides to the paper 6 Adjust size.
Basic Operation Copying onto non-standard size paper with the bypass tray Preparation ❐ You can register non-standard paper sizes you use often in keys [Custom 1], [Custom 2], and [Custom 3] with the user tools. ☛ See page 126. Note ❐ Be sure to set the size. Otherwise, a paper misfeed might occur. 1 Open the bypass tray. one of desired paper types or 2 Select settings with the keys. 3 Press the [Custom] key.
Basic Operation 7 Press the [OK] key. the paper guides to the paper 8 Adjust size. 1 Note ❐ Make sure that the paper guides match the paper size. If the paper guides are not adjusted to the paper size properly, paper might be skewed or paper misfeed might occur. the side you wish to copy onto 9 With face up, insert the paper into the bypass tray. 2 3 4 TRSH050E 1: 2: 3: 4: Horizontal size Vertical size Extender Paper guides your originals, then press the 0 Set Start key.
Basic Operation Copying onto the reverse side of paper that has been already copied onto Note ❐ If you want to copy onto thick paper (105-160g/m2, 28-43 lb), select [Duplex Thick]. ❐ Make sure that you set your original and the copy paper in the correct direction to achieve the results you require. Copies Copying Original setting on Copy paper setting the exposure glass on the bypass tray ❐ You cannot use this function for OHP transparencies, translucent paper, adhesive labels and postcards.
Basic Operation 1 Open the bypass tray. Select [Duplex], or [Duplex Thick] 2 with the keys. Note ❐ When you copy onto non-standard size paper, press the [Custom] key and select or enter the size. For details, ☛ see page 39. 3 Press the [OK] key. the paper guides to the paper 4 Adjust size. Note ❐ Make sure that the paper guides match to the paper size. If the paper guides are not adjusted to the paper size properly, paper might be skewed or paper misfeed might occur.
Basic Operation Auto Reduce/Enlarge—Having the Machine Choose the Reproduction Ratios The machine can select the proper reproduction ratio based on the selected paper size and the original size. RRR RRR 1 Note ❐ Regarding functions that cannot be used together with this function, ☛ see page 96. Example: Metric version: Inch version: the 1 Press key. original: A3L, copy paper: A4L original: 11" × 17"L, copy paper: 81/2" × 11"L Auto Reduce/Enlarge 2 Set your originals. your copy paper size (e.g.
Basic Operation Energy Saver Mode—Saving Energy If you do not operate the machine for a certain period after copying, or when you press and hold the Energy Saver key for more than one second, the display disappears and the machine enters Energy Saver mode. When you press the Energy Saver key again, when the originals are set in the document feeder, or when the platen cover or document feeder is opened, the machine returns to the ready condition. In Energy Saver mode, the machine uses less electricity.
Basic Operation Interrupt Copying—Temporarily Stopping one Job to Copy Something Else Use the Interrupt key to interrupt a multicopy run and make urgently needed copies. Reference ❐ Regarding functions that cannot be used together with this function, ☛ see page 96. the Interrupt key. The ma1 Press chine will stop the copy run and store Copying the present settings in the memory. The machine will return to the ready condition. the previous originals.
Basic Operation Auto Start—Entering Copy Job Settings During the Warm-up Period If you press the Start key during the warm-up period, the Start key will blink and the machine will start copying after the warm-up period. your copy settings during the 1 Set warm-up period. 2 Press the Start key. Note ❐ To cancel Auto Start, press the Clear/ Stop key.
Basic Operation Program—Storing and Recalling Your Copy Settings in Memory You can store up to five frequently used copy job settings in machine memory and recall them for future use. Storing your settings the copy settings you want to put 1 Set into memory. Program key. Copying 2 Press the 3 Press the [Store] key. TRSS100E TRSS111E the program number you want 4 Select to store the settings in with the keys. Then press the [OK] key.
Basic Operation Recalling your settings 1 Press the Program key. the program number you want 2 Select to recall with the keys. Note ❐ Only programs with m contain a program. TRSS100E TRSS116E the [OK] key. 3 Press The stored settings are displayed. your originals, then press the 4 Set Start key.
Basic Operation Deleting a program 1 Press the Program key. 2 Press the [Delete] key. TRSS100E TRSS112E with the [OK] key. Copying the program number that con3 Select tains the program you wish to delete keys. Then press the TRSS100E TRSS115E 4 Press the [Yes] key. TRSS100E TRSS114E 5 Press the [Exit] key.
Basic Operations Check Modes—Checking the Selected Copy Jobs By pressing the Check Modes key, you can see at a glance the modes you have selected. Note ❐ You can check the following modes: • Book → 1 Sided • 2 Sided → 1 Sided • Combine • Margin Adjustment • Centering • Cover • Color Conversion • Color Erase • Mirror • Positive/Negative • Bypass Feed Copying Counter—Checking the Total Number of Copies Made By pressing the Counter key, you can check the total number of copies made.
Reduce/Enlarge—Reducing and Enlarging Reduce/Enlarge—Reducing and Enlarging Preset R/E—Reducing and Enlarging Using Preset Ratios GCTHEN1E Reference Note ❐ You can add up to two preset ratios with the user tools. ☛See page 129. ❐ You can select a ratio regardless of the size of an original or copy paper. With some ratios, parts of the image might not be copied or margins will appear on copies. ❐ To return to 100%, press the [100%] key. Reducing 1 Press the [Ratio] key.
Reduce/Enlarge—Reducing and Enlarging Enlarging 1 Press the [Ratio] key. TRSS100E 2 TRSS112E Press the [Enlarge] or lect the enlarging ratio. key to se- TRSS100E 3 Press the [OK] key. your originals, then press the 4 Set Start key.
Reduce/Enlarge—Reducing and Enlarging Zoom—Reducing and Enlarging in 1% Step GCZOOM1E You can change the reproduction ratio from 25% to 400% in 1% steps. Note ❐ To return to 100%, press the [100%] key. ❐ You can select a preset ratio which is near the desired ratio, then press the Zoom key and adjust the ratio with the [+] or [-] key. ❐ There are two ways to set the ratios. Using the [-] and [+] keys 1 Press the Zoom key. the reproduction ratio with the 2 Adjust [-] or [+] key.
Reduce/Enlarge—Reducing and Enlarging Using the Number keys 1 Press the Zoom key. the reproduction ratio with the 2 Enter Number keys. 3 Press the [OK] key. your originals, then press the 4 Set Start key.
Reduce/Enlarge—Reducing and Enlarging Directional Magnification (%)—Stretching and Squeezing the Image in 1% Steps 1 2 GCDHEN1E 1: Horizontal % 2: Vertical % Copies can be reduced or enlarged at different reproduction ratios horizontally and vertically. ❐ You can select the ratio from 25% to 400%. ❐ You can select a ratio regardless of the size of an original or copy paper. With some ratio, parts of the image might not be copied or blank margins will appear on copies. 1 Press the Directional Mag.
Reduce/Enlarge—Reducing and Enlarging the horizontal ratio with the 4 Enter Number keys or the [+] [-] keys. TRSS100E TRSS117E 5 Press the [OK] key. your originals, then press the 6 Set Start key.
Reduce/Enlarge—Reducing and Enlarging Directional Size Magnification (inch)—Stretching and Squeezing the Image into the Copy Area 1 3 2 4 GCDHEN2E 1: 2: 3: 4: Horizontal original size Vertical original size Horizontal copy size Vertical copy size Copying The suitable reproduction ratios will be automatically selected when you enter the horizontal and vertical lengths of the original and copy image you want.
Reduce/Enlarge—Reducing and Enlarging the [↓Next] key until [D. Size 2 Press Mag. (inch)] is displayed. TRSS100E TRSS112E [D. Size Mag. (inch)] with the 3 Selectkeys, then press the [Select] key. TRSS100E TRSS114E the vertical original size with the 4 Enter Number keys, then press the or # key. Note ❐ To change the value entered: • If you have not pressed the or # key yet, press the Clear/Stop key and enter the new value. • If you have already pressed the or # key, select [Orig.:Vert.
Reduce/Enlarge—Reducing and Enlarging the horizontal copy paper size 7 Enter with the Number keys, then press the # key. 8 Press the [OK] key. Copying your originals, then press the 9 Set Start key.
Shifting the Image Shifting the Image Centering R R GCIDOH1E You can move the image to the center. This function is convenient when the copy paper is larger than the original. 1 Press the Menu key. Note ❐ If you assign Centering function to one of the Favorite keys, press it and go to step 4. To assign a function to the Favorite keys, ☛ see page 134. [Centering] with the 2 Select Then press the [Select] key. keys. TRSS100E TRSS115E 3 Press the [Exit] key. 4 Select the copy paper size.
Shifting the Image Margin Adjustment—Adding Margins for Binding A A GCTOJS1E You can make a margin by shifting the image to the left or right. This function is convenient when you want to bind copies. Metric Version 0 - 20mm (in 1mm steps) Inch Version 0" - 0.8" (in 0.1" steps) Copying Note ❐ You can change the width of the binding margin as follows. ❐ The margin width default is as follows. You can change this default setting with the user tools. ☛ See page 129.
Shifting the Image 1 Press the Menu key. Note ❐ If you assign Margin Adjustment function to one of the Favorite keys, press it and go to step 3. To assign a function to the Favorite keys, ☛ see page 134. [Magin Adjustment] with the 2 Selectkeys. Then press the [Select] key. TRSS100E TRSS115E [Left] (left margin) or [Right] 3 Select (right margin) with the keys. Then enter the desired margin width with the Number keys.
Series Copies—Making Single Copies Series Copies—Making Single Copies Book→1 Sided—From Book Originals to 2 One-sided Copies 1 2 1 2 GCSEPR1E This function makes one-sided copies from two facing pages of bound (book) originals. ❐ Regarding functions that cannot be used together with this function, ☛ see page 96. 1 Press the Menu key. Note ❐ If you assign Series Copies function to one of the Favorite keys, press it and go to step 4. To assign a function to the Favorite keys, ☛ see page 134.
Series Copies—Making Single Copies sure that [Book 1 Sided] is 4 Make selected, then press the [OK] key. TRSS100E TRSS114E 5 Select the copy paper size. your originals, then press the 6 Set Start key.
Series Copies—Making Single Copies 2 Sided →1 Sided—From Two-sided Originals to 2 One-sided Copies The optional document feeder is required to use this function. 1 1 2 2 GCSEPR2E Reference ❐ Regarding functions that cannot be used together with this function, ☛see page 96. Menu key. Copying 1 Press the Note ❐ If you assign Series Copies function to one of the Favorite keys, press it and go to step 4. To assign a function to the Favorite keys, ☛ see page 134.
Series Copies—Making Single Copies [2 Sided 1 Sided] with the 4 Selectkeys, then press the [OK] key. TRSS100E TRSS115E 5 Select the copy paper size. your originals in the document 6 Set feeder, then press the Start key.
Series Copies—Making Single Copies Combine—Combining Two Originals The optional document feeder is required to use this function. 1 2 1 2 GCSYYK1E This function automatically combines 2 one-sided originals onto one copy. Copying Note ❐ You cannot use the bypass tray with this function. ❐ The machine cannot copy originals different in size and direction. Reference ❐ Regarding functions that cannot be used together with this function, ☛ see page 96. 1 Press the Menu key.
Series Copies—Making Single Copies 3 Select the copy paper size. your originals in the document 4 Set feeder, then press the Start key.
Cover Sheet—Adding or Inserting Sheets Cover Sheet—Adding or Inserting Sheets Front Cover—Copying a Front Cover The optional document feeder is required to use this function. A B A C B C GCHYOS1E Copying Note ❐ The cover sheets should be identical in size and direction with the copy paper. ❐ The cover sheets should be fed from the bypass tray. ❐ The covers are copied in Thick Paper mode. Reference ❐ Regarding functions that cannot be used together with this function, ☛ see page 96.
Cover Sheet—Adding or Inserting Sheets the [ Next] key until [Cover 2 Press Sheet] is displayed. TRSS100E TRSS112E [Cover Sheet] with the 3 Select keys, then press the [Select] key. TRSS100E TRSS115E sure that [Front Cover] is se4 Make lected, then press the [OK] key . TRSS100E TRSS114E orientation of the copy paper 5 Select and cover sheets with the keys, then press the [OK] key. TRSS100E TRSS115E 6 Set cover sheets into the bypass tray. your originals in the document 7 Set feeder.
Cover Sheet—Adding or Inserting Sheets Front & Back Covers—Copying or Adding Front and Back Covers The optional document feeder is required to use this function. A B C A B C Note ❐ You can specify whether to make a copy on a back cover sheet. If you select [Copy], the last page will be copied on the back cover sheet. If you select [Blank], a cover sheet will just be inserted after the last copy.
Cover Sheet—Adding or Inserting Sheets Press the [ Next] key until [Cover 2 Sheet] is displayed. TRSS100E TRSS112E [Cover Sheet] with the 3 Select keys, then press the [Select] key. TRSS100E TRSS115E 4 Select [Front & Back Cover] with the keys, then press the [OK] key. TRSS100E TRSS115E 5 Specify whether to copy on back cover sheets with the keys, then press the [OK] key. TRSS100E TRSS115E 6 Select orientation of the copy paper and cover sheets with the keys, then press the [OK] key.
Color Creation Color Creation Color Conversion—Converting a Selected Color into a Different Color This function converts a selected color of an original into a different color on the copy. Reference ❐ For copy samples, ☛ see page 8 of the Color Copy Quick Guide. Note ❐ Up to 4 colors can be converted at one time.
Color Creation [Color Conversion] with the 3 Selectkeys, then press the [Select] key. TRSS100E TRSS115E 4 Select the original color (color to be keys, then converted) with the press the [OK] key. TRSS100E TRSS115E 5 Select the new color (color to convert to) with the keys. TRSS100E TRSS116E 6 If you want to select the color density level, press the [Density] key. Select the level with the 7 Then press the [OK] key. keys. TRSS100E TRSS115E 8 Press the [OK] key.
Color Creation Color Erase—Erasing the Selected Color This function erases a selected color from the original image. Reference ❐ For copy samples, ☛ see page 10 of the Color Copy Quick Guide. Note ❐ Up to 4 colors can be erased at one time. ❐ Colors that can be erased: Red, Green, Blue, Yellow, Cyan, Magenta, and Black ❐ This function can be made more or less sensitive to the color to be erased. It can be adjusted within five levels from “Narrow” to “Wide”. ☛ See page 132.
Color Creation [Color Erase] with the 3 Select keys, then press the [Select] key. TRSS100E TRSS115E the color to be erased with the 4 Selectkeys, then press the [OK] key. TRSS100E TRSS115E you want to erase more than one 5 Ifcolor, press the [Add] key. Then repeat step 4. Note ❐ Repeat step 5 until you have finished designating colors. ❐ If you pick the wrong color, press the [Delete] key. 6 Press the [OK] key. your originals, then press the 7 Set Start key.
Image Creation Image Creation Mirror—Making a Mirror Image R R GCMILL1E This function makes a mirror image copy of the original. Copying Note ❐ Set the original as below when setting on the exposure glass (platen glass). GCMILL2E 1 Press the Menu key. Note ❐ If you assign Mirror function to one of the Favorite keys, press it and go to step 4. To assign a function to the Favorite keys, ☛ see page 134.
Image Creation Press the [ Next] key until [Mirror] is 2 displayed. TRSS100E TRSS112E sure that [Mirror] is selected, 3 Make then press the [Select] key. TRSS100E TRSS115E 4 78 Set your originals, then press the Start key.
Image Creation Positive/Negative—Copying in Complementary Colors R R GCHATN1E This function copies the original image in complementary colors. If you use a black and white original, black and white areas of the original are reversed. Note 1 Press the Copying ❐ If you copy using twin color mode, white areas are changed to black, black areas are changed to white, and color areas are changed to the selected color. Menu key.
Finishing Finishing Note ❐ To avoid problems caused by curled copies, try turning over the paper stack in the paper tray. If there is no improvement, change to copy paper with less curl. Reference ❐ Regarding functions that cannot be used together with this function, ☛ see page 96. Sort—Sorting into Sets (123, 123, 123) The optional 20-bin sorter stapler, 10-bin sorter stapler, or 3-bin sorter is required to use this function.
Finishing Note ❐ It is recommended to set originals in the document feeder with this function.
Finishing Stack—Stacking Together All Copies of a Page (111, 222, 333) The optional 20-bin sorter stapler, 10-bin sorter stapler, or 3-bin sorter is required to use this function. 1 23 1 11 2 22 3 33 GCSORT2E All copies of each original are delivered to the same bin.
Finishing Press the Sorter key until the Stack 1 indicator (bottom) is lit. 2 Set your originals in document feeder.
Finishing Staple—Stapling Copies The optional 20-bin sorter stapler, 10-bin sorter stapler is required to use this function. GCSORT3E Each copy set can be stapled together. Note ❐ When you select Staple mode, Sort mode is automatically selected. ❐ You cannot use Staple mode with Stack mode. ❐ When you have an optional 10-bin sorter stapler, you cannot use thick paper fed from the bypass tray in Staple mode. ❐ You cannot use OHP transparencies or non-standard size paper in Staple mode.
Finishing ❐ For Stapling, the following limitations apply: 20-bin sorter stapler 10-bin sorter stapler Normal paper mode Thick paper mode Maximum paper size l: A3, 11” × 17” p: A4, 81/2” × 11” l: A3, 11” × 17” p: A4, 81/2” × 11” l: A3, 11” × 17” p: A4, 81/2” × 11” Minimum paper size l: B5, 81/2” × 11” p: B5, 81/2” × 11” l: B5, 81/2” × 11” p: B5, 81/2” × 11” l: B5, 81/2” × 11” p: B5, 81/2” × 11” 30 sheets 15 sheets 20 sheets Stapler capacity (80g/m2, 20 lb) ❐ In the following cases, the copies
Finishing Stapling copies automatically after copying The optional document feeder is required to use this function. Press the Sorter key until the Sort 1 (top) and Staple (centre) indicators are lit. your originals in the document 2 Set feeder. 3 Press the Start key. Stapling copies manually after copying Press the Sorter key until the Sort 1 indicator (top) is lit. 2 Make your copies. copying is completed, press the 3 After Sorter key before the Staple indicator stops blinking.
Adjustment and Color Memory Adjustment and Color Memory 87
Color Balance—Adjusting and Storing the Color Balance Color Balance—Adjusting and Storing the Color Balance This function allows you to control the overall color tone of copies by adjusting the Yellow, Magenta, Cyan and Black color balance. Nine levels of tone are available. Reference ❐ For copy samples, ☛ see page 12 of the Color Copy Quick Guide. Note ❐ The color balance will return to the default when: • • • • The machine is automatically reset. The Clear Modes key is pressed.
Color Balance—Adjusting and Storing the Color Balance you want to adjust more than one 4 Ifcolor, repeat steps 2 and 3. 5 Press the [OK] key. Color Balance Program—Storing and Recalling the Color Balance You can store the color balance setting in memory and recall it when you want to use it. Note ❐ Only one setting can be stored. Storing the adjusted color balance Change the color balance (☛ see 1 page 88), but don’t press the [OK] key. 2 Press the [Program] key.
Color Balance—Adjusting and Storing the Color Balance Recalling the color balance 1 Press the Color Balance key. 2 Press the [Recall] key. TRSS100E TRSS111E 3 Press the [OK] key.
Image Adjustment Image Adjustment You can change the following default settings for image adjustment: Sharp/Soft You can adjust the edges of the image to make the image sharper or softer. Reference ❐ For copy samples, ☛ see page 14 of the Color Copy Quick Guide. Note ❐ Default: level 4 Contrast You can adjust the contrast between light parts and dark parts of the image. Reference ❐ For copy samples, ☛ see page 14 of the Color Copy Quick Guide.
Image Adjustment A.C.S. (Auto Color Selection) Sensitivity Level You can adjust the sensitivity when detecting whether the original has color areas in Auto Color Selection mode. When set to “B&W” values, the machine will be more likely to detect originals as black originals. “Full Color” values will cause the machine to be more likely to detect originals as color originals.
Image Adjustment Sharp/Soft, Contrast, Background Density and Pastel Note ❐ Any settings you make with the Sharp/Soft, Contrast, Background Density Control and Pastel Color functions will be cancelled under the following conditions: • • • • The machine is automatically reset. The Clear Modes key is pressed. The operation switch is turned off. The main power switch is turned off. 1 Press the Image Adjustment key. your desired function with the 2 Selectkeys. Then press the [OK] key.
Image Adjustment U.C.R. Adjustment, A.C.S. Sensitivity Level and Auto Separation Sensitivity Level Note ❐ Any settings you make with the U.C.R. Adjustment, A.C.S. Sensitivity Level and Auto Separation Sensitivity Level functions are not cleared by turning the power off or by pressing the Clear Modes key. They are cancelled only when you overwrite them with new settings. 1 Press the Image Adjustment key. 2 Press the [Enhance] key. TRSS100E TRSS112E your desired function with the 3 Select [ Prev.
Combination Chart Combination Chart 95
Combination Chart Combination Chart 96 ➝ ➝ ✩ ✩ ✩ ✩ ✩ ✩ ✩ ✩ ✩ ✩ ✩ ✩ ✩ ✩ ✩ ✩ ✩ ✩ ✩ ✩ ✩ ✩ ✩ ✩ ✩ ✩ ✩ ✩ ✩ ✩ ✩ ✩ ✩ ✩ ✩ ✩ ✩ ✩ ✩ ✩ ✩ ✩ ✩ ✩ ✩ ✩ ✩ ✩ ✩ ✩ ✩ ➝ ➝ ➝ ✩ ✩ ✩ ✩ ✩ ✩ ✩ ✩ ✩ ✩ ✩ ✩ ✩ ✩ ✩ ✩ ✩ ✩ ✩ ✩ ✩ ✩ ✩ ✩ ✩ ✩ ✩ ✩ ✩ ✩ ✩ ✩ ✩ ✩ ✩ ✩ ✩ ✩ ✩ ✩ ✩ ✩ ✩ ✩ ✩ ✩ ✩ ✩ ✩ ✩ ✩ ✩ ✩ ✩ ✩ ✩ ✩ ✩ ✩ ✩ ✩ ✩ ✩ ✩ ✩ ✩ ✩ ✩ ✩ ✩ ✩ ✩ ✩ ✩ ✩ ✩ ✩ ✩ ✩ ✩ ✩ ✩ ✩ ✩ ✩ ✩ ✩ ✩ ✩ ✩ ✩ ✩ ✩ ✩ ✩ ✩ ✩ ✩ ✩ ➝ ➝ ➝ ➝ ➝ ➝ ➝ ➝ ➝ ➝ ➝ ➝ ➝ ✗ ✩ ✩ ✩ ✗ ✩ ✩ ✩ ✩ ✩ ✗ ✗ ✩ ✗ ✩ ✩ ✩ ✩ ✩ ✩ ✩ ✩ ✩ ✩ ✩ ✩ ✩ ✩ ✩ ✗ ✩ ✩ ✩ ✩ ✩ ✩ ✩ ✩ ✩ ✩ ✩ ➝ ➝ ➝ ➝ ➝ ➝ ➝ ➝ ➝ ➝ ➝ ➝ ➝ ✩ ★ ★ ★ ✩ ✩ ✩ ✩ ✩ ✩ ✩
Combination Chart 1 2 3 4 5 6 7 8 9 10 11 12 13 14 15 16 17 18 19 20 21 22 23 24 25 26 27 28 29 30 31 32 33 34 35 36 37 38 39 40 41 42 43 44 45 46 47 48 49 50 51 52 53 54 55 ✩ ✩ ✩ ✩ ✩ ✩ ✩ ✩ ✩ ✩ ✩ ✩ ✩ ✩ ✩ ✩ ✩ ✩ ✩ ✩ ✩ ✩ ✩ ✩ ✩ ➝ ✩ ✩ ✩ ✩ ➝ ➝ ➝ ✩ ✩ ✩ ✩ ✩ ✩ ✩ ✩ ✩ ✩ ✩ ✩ ✩ ✩ ✩ ✩ ✩ ✩ ✩ ✩ ✩ ✩ ✩ ✩ ✩ ✩ ✩ ✩ ✩ ✩ ✩ ✩ ✩ ✩ ✩ ✩ ✩ ✩ ✩ ✩ ✩ ✩ ✩ ✩ ✩ ✩ ➝ ✩ ✩ ✩ ✩ ➝ ➝ ➝ ✩ ✩ ✩ ✩ ✩ ✩ ✩ ✩ ✩ ✩ ✩ ✩ ✩ ✩ ✩ ✩ ✩ ✩ ✩ ✩ ✩ ✩ ✩ ✩ ✩ ✩ ✩ ✩ ✩ ✩ ✩ ✩ ✩ ✩ ✩ ✩ ✩ ✩ ✩ ✩ ✩ ✩ ✩ ✩ ✩ ✩ ➝ ✩ ✩ ✩ ✩ ➝ ➝ ➝ ✩ ✩ ✩ ✩ ✩ ✩ ✩ ✩ ✩ ✩ ✩ ✩ ✩ ✩ ✩ ✩ ✩ ✩ ✩ ✩ ✩ ✩ ✩ ✩ ✩ ✩
98
99 What to do if Something Goes Wrong What to do if Something Goes Wrong
If Your Machine Does not Operate as You want If Your Machine Does not Operate as You Want Check the following: Condition Action Nothing happens when the operation switch is turned on. Is the main power switch turned on? Turn on the main power switch. BPaper tray is empty. Load paper. ☛ See page 104. DToner container is almost empty. Or toner container is empty. Add toner. ☛ See page 106. MDoors/covers are open. Close the doors/covers. xMisfeed occurs. Remove misfed paper. ☛ See page 108.
If You Cannot Make Copies as You Want Problem Copies appear dirty. Cause The image density is too dark. Action Adjust the image density. ☛ See page 25. Adjust the background density. ☛ See page 91. The reverse side of an original image is copied. The exposure glass (platen glass) or document feeder belt is dirty. Clean them. ☛ See page 136. The image density is too dark. Adjust the image density. ☛ See page 25.
If You Cannot Make Copies as You Want Action Problem Cause Copies are blank or parts of the image are not copied. The original is not set correctly. Set the originals correctly. ☛ See page 15, 16 or 17. An improper paper size is selected. Select the proper paper size. The selected reproduction ratio does not match the paper size. Select the proper reproduction ratio. The Text mode is selected. Select Auto Text/Photo mode or Photo mode. ☛ See page 31.
Problem A copy image is blurred. Cause Action The image density is too light. Adjust the image density. ☛ See page 25. An improper kind of paper is set. Set the right kind of paper in the paper tray. Note ❐ Copies might be blurred if you copy onto rough grain, coated, or damp paper. ❐ If you cannot correct the problem by taking the above actions, please contact your service representative.
BLoading Paper BLoading Paper Reference ❐ Regarding paper sizes that can be set, ☛ see page 184. Note ❐ If you want to change the paper size, ☛ see page 116.
What to do if Something Goes Wrong BLoading Paper Loading Paper in the Paper Tray 1 Pull out the paper tray until it stops. 2 Remove the back fence. TRSY070E 3 Square the paper and set it in the tray. Note ❐ Shuffle the paper before setting it in the tray. ❐ Do not stack paper over the limit mark. ❐ Make sure that the leading corners of the paper are under the corners. 4 Reinstall the back fence. 5 Push the paper tray in until it stops.
DAdding Toner DAdding Toner There are four kinds of toner (Cyan, Magenta, Yellow, and Black). When D is lit, it is time to add toner. R WARNING: s • Do not incinerate used toner or toner containers. Toner dust might ignite when exposed to an open flame. Dispose of the used toner containers according to local regulations for plastics. R CAUTION: R • Do not eat or swallow toner. • Keep toner (used or unused) and toner containers out of reach of children.
DAdding Toner What to do if Something Goes Wrong 3 Gently pull out the toner container. a new toner container horizon4 Hold tally and shake it 5 or 6 times. 5 Remove the seal. the toner container with the 6 Insert mark at the top. the knob clockwise to the ▲ mark 7 Turn until it clicks. 8 Close the front cover.
xClearing Misfeeds xClearing Misfeeds R CAUTION n • When removing misfed paper, do not touch the fusing section because it could be very hot. Note ❐ When clearing misfeeds, do not turn off the operation switch. If you do, your copy settings are cleared. ❐ To prevent misfeeds, do not leave any torn scraps of paper within the machine. ❐ If paper misfeeds occur repeatedly, contact your service representative.
What to do if Something Goes Wrong xClearing Misfeeds When A, B, C or Y is Displayed: 1 Open the front cover of the machine. You can find a sticker (with x at the 2 top) explaining how to remove misfed paper, inside the front cover as shown in the illustration. misfed paper following the 3 Remove instructions on the sticker. When P is Displayed: Note ❐ This indicator is displayed only when your machine is equipped with the document feeder.
xClearing Misfeeds When R is Displayed: If your machine is equipped with the 20-bin sorter stapler can find a sticker (with x at the 1 You top) explaining how to remove misfed paper, on the cover of the sorter stapler as shown in the illustration. the misfed paper following 2 Remove the instructions on the sticker.
dAdding Staples R CAUTION: R • This machine has been tested for safety using this supplier’s parts and consumables. We recommend you only use these specified supplies. Note ❐ If you use a staple cartridge other than that recommended, staple failure or staple jams might occur. the front cover of the sorter sta1 Open pler. 2 Raise the staple unit towards you. 3 Remove the cartridge. the new cartridge as shown in 4 Hold the illustration, then pull out the stopper.
dAdding Staples 5 Reinstall the cartridge until it clicks. the staple unit to the original 6 Push position. the front cover of the sorter sta7 Close pler.
eRemoving Jammed Staples Note ❐ Staples might be jammed because of curled copies. In this case, try turning the copy paper over in the tray. If there is no improvement, change the copy paper with less curls. ❐ After removing jammed staples, staples might not be ejected the first few times you try to use the stapler. the front cover of the sorter sta1 Open pler. 2 Raise the staple unit towards you. 3 Remove the cartridge. pushing the lock, pull the top 4 While cover. 5 Remove the jammed staple.
eRemoving Jammed Staples 6 Push the top cover until it clicks. Note ❐ If the staple is coming out, press it to the proper position. 7 Reinstall the cartridge until it clicks. the staple unit to the original 8 Push position. the front cover of the sorter sta9 Close pler.
Changing the Machine’s Settings Changing the Machine’s Settings 115
Changing Paper Size Changing Paper Size Note ❒ Make sure to select paper size with the user tools. Otherwise, misfeeds might occur. Reference ❒ For paper sizes, weight, and capacity that can be set in each tray, ☛ see page 184 or 192. sure that the paper tray is not 1 Make being used. 2 Pull out the paper tray until it stops. Note ❒ Remove any remaining copy paper. TRSY050E the screws fastening the side 3 Remove fences using the screwdriver.
Changing Paper Size 5 Fasten the fences with screws. Changing the Machine’s Settings TRSY040E the back fences to the new pa6 Adjust per size. A Note ❒ For 11" × 17" paper, put the back fences inside A. TRSY020E 7 Square the paper and set it in the tray. Note ❒ Shuffle the paper before setting it in the tray. ❒ Do not stack paper over the limit mark. ❒ Make sure the leading corners of the paper are under the corners. 8 Push the paper tray in until it stops.
Changing Paper Size To Adjust the Paper Size with the User Tools 1 Press the User Tools key. sure that [System Settings] is 2 Make selected, then press the [OK] key. TRSS100E TRSS114E the Next key until [Tray Pa3 Press per Size] is displayed. TRSS100E TRSS112E [Tray Paper Size] with the 4 Selectkeys, then press the [OK] key. TRSS100E TRSS114E 5 Select the tray with the then press the [OK] key. keys, TRSS100E TRSS115E 6 Select your desired size with the keys, then press the [OK] key.
User Tools User Tools Accessing the User Tools This section is for the key operators in charge of this machine. You can change or set the machine’s default settings. Changing the Machine’s Settings Note After using the tools, be sure to exit from the user tools. 1 Press the User Tools key. Select [System Settings] or [Copy 2 Features] keys, then with the press the [OK] key. TRSS100E TRSS115E the desired user tools menu 3 Select with the keys, then press the [OK] key.
User Tools the settings by following the 4 Change instructions on the display. Then press the [OK] key. Note TRSS100E ❐ [OK] key: Press to set the new settings and return to the previous menu. ❐ [Cancel] key: Press to return to the previous menu without changing any data. Exiting from User Tools changing the user tools settings, 1 After press the User Tools key. Note ❐ The settings are not canceled even if the operation switch is turned off or the Clear Modes key is pressed.
User Tools User Tools Menu System settings Menu Panel Tone page 124 Ready/Tone page 124 Copy Count Display page 124 System Reset page 124 Function Reset page 124 Control Panel Off page 125 Auto Timer page 125 Tray Paper Size ————— page 125 Tray Priority page 125 Auto Tray Switch page 125 Interleave Print page 125 Output Tray Prio.
User Tools Copy features Menu General Features See ... APS Priority page 128 ADS Priority (FC) page 128 ADS Prio. (B&K/SC) page 128 Orig. Mode Priority page 128 Orig. Type Priority page 128 Col. Mode Priority page 128 page 129 Photo Type (Auto) ————— Photo Type (Photo) page 129 Copy Reset page 129 Max.
User Tools Menu SADF Auto Reset page 133 Thin Paper Mode page 133 ADF Mixed Sizes page 133 ————— ADF Auto Paper Select page 133 FC Copy Sorting page 133 Auto Sort Mode page 133 Changing the Machine’s Settings ADF/ Sorter See ...
User Tools Settings You can Change with the User Tools (System Settings) Reference ❐ For how to access the user tools, ☛ see page 119. SystemMenu setting Panel Tone Description The beeper (key tone) sounds when a key is pressed. This beeper can be turned on or off. Note ❐ Default: On Ready/Tone Choose whether the machine beeps when it becomes ready for a copy run after power up. Note ❐ Default: On ❐ When the “Panel Tone” is set to Off, the beeper does not sound even if the “Ready/Tone” is set to On.
User Tools Menu Description Control Panel Off The machine enters Energy Saver mode automatically after your job is finished, after the selected time. The time can be set from 10 to 990 seconds (in 10 seconds steps), or off. In Energy Saver mode, the panel display turns off. 1. Select [On] or [Off] with the keys. 2. When you select [On], enter the time with the Number keys. Then press the [OK] key.
User Tools Description Menu Output Tray Prio. (For 3-bin sorter only) You can specify a bin to which documents are delivered for each feature (copy and printer). 1. Select [Copy] or [Printer] with the keys. Then press the [OK] key. 2. Select a bin with the keys. Then press the [OK] key. Note ❐ Default: Copy: First bin Printer: First bin Display Contrast You can adjust the brightness of the panel display.
User Tools Menu Description Key Op. Access If you select “On”, only operators who know the key operator code can access the “Key Operator Tools” in the System Settings and Copy Features. Note ❐ Default: Off ❐ If you select “On”, you should register the key operator code. AOF (Keep it on.) Use to register or change the key operator code (up to 8 digits). Note Changing the Copier’s Settings Program KeyOpCode ❐ For details about this function, contact your service representative.
User Tools Settings You can Change with the User Tools (Copy Features) Reference ❐ For how to access the user tools, ☛ see page 119. General Features Menu Description APS Priority As a default setting, the Auto Paper Select is selected just after the machine is turned on or when modes are cleared. You can cancel this setting. Note ❐ Default: On ADS Priority (FC) As a default setting, the Manual Image Density is selected in Full Color mode just after the machine is turned on or when modes are cleared.
User Tools Menu Description Photo Type (Auto) You can select the photo type (Press Print, Glossy Photo, or 2nd Generation) in Auto Text/Photo mode that is selected automatically just after the machine is tured on or when modes are cleared. Note Photo Type (Photo) You can select the photo type (Press Print, Glossy Photo, or 2nd Generation) in Photo mode that is selected automatically just after the machine is turned on or when modes are cleared.
User Tools Menu Description Initial Mode Set You can set the machine to recall program setting when the machine is turned on or when modes are cleared. Note ❐ Default: Normal ❐ Your service representative can store the program setting. ❐ Your service representative can select whether the program setting is recalled when the machine is turned on or when modes are cleared. Key Operator Tools Use these tools to manage use of the machine.
User Tools Menu Program User Code Description You can register your user code (8 digits). 1. Input your desired user code with the Number keys. 2. Press the [OK] key. 3. Select the color mode you want to use with the new code with the keys. 4. Press the [Select] key. 5. Press the [Exit] key. Chg/Del User Code You can change or delete your user code or the color mode you assign your user code. Changing your user code 1. Input user code you want to change with the Number keys. Then press the # key. 2.
User Tools Image Adjustment Menu Description A.D.S. (FC) The Auto Image Density levels in Full Color mode can be made lighter or darker (5 levels). Note ❐ Default: level 3 A.D.S. (B&K/SC) The Auto Image Density levels in Black mode, Single Color mode, or Twin Color mode can be made lighter or darker (5 levels). Note ❐ Default: level 3 A.C.S. Priority You can select color images or black & white images that are priority detected in Auto Color Selection mode.
User Tools ADF/Sorter Menu Description SADF Auto Reset When you set one original at a time in the document feeder, the Auto Feed indicator lights for a selected time after an original is fed to show that the document feeder is ready for another original. The time can be set from 1 second to 99 seconds. Note Thin Paper Mode Use when changing the type of originals to be fed. Select this function to avoid damaging thin originals (40 - 52g/m2, 11-14 lb) set in the document feeder.
User Tools Set Favorite Keys You can register up to 4 frequently used functions in Favorite keys. 1. Press the Favorite key you want to store the function. 2. Select the function you want to store with the keys. 3. Press the [OK] key. Note ❐ Default: 1: Combine 2 Originals 2: Series Copies 3: Margin Adjustment 4: Directional Size Magnification (inch) ❐ You can check the functions that are registered in the Favorite keys with the [Status] key.
Others Maintaining Your Machine Where to Put Your Machine Do’s and Don’ts Remarks Use and Storage of Supplies 135
Maintaining Your Machine Maintaining Your Machine If the exposure glass (platen glass), platen cover or document feeder belt is dirty, you might not be able to make copies as you want. Clean them if you find them dirty. Note ❐ Wipe the machine with a soft, damp cloth. Then wipe it with a dry cloth to remove water. ❐ Do not use chemical cleaner or organic solvent, such as thinner or benzene. If they get into the machine or melt plastic parts, a failure might occur.
Where to Put Your Machine Where to Put Your Machine Machine Environment Your machine’s location should be carefully chosen because environmental conditions greatly affect its performance. Optimum environmental conditions R CAUTION: m • Keep the machine away from humidity and dust. A fire or an electric shock might occur. • Do not place the machine on an unstable or tilted surface. If it topples over, it cause injury.
Where to Put Your Machine Power Connection R WARNING: m • Only connect the machine to the power source described on the inside front cover of this manual. R WARNING: m • Avoid multi-wiring. • Do not damage, break or make any modifications to the power cord. Do not place heavy objects on it, pull it hard or bend it more than necessary. These actions could cause an electric shock or fire. • Do not plug or unplug the power cord with your hands wet. Otherwise, an electric shock might occur.
Where to Put Your Machine Access to Machine Place the machine near the power source, providing clearance as shown. 1 2 4 1. 2. 3. 4. 3 Rear: Right: Front: Left: more more more more than than than than 10cm, 4.0" 37cm, 14.6" 70cm, 27.6" 40cm, 15.8" Note ❐ For the required space when options are installed, please contact your service representative.
Do’s and Don’ts Do’s and Don’ts R CAUTION: r • When you move the machine, unplug the power cord from the wall outlet to avoid fire or electric shock. • When the machine will not be used for a long time, unplug the power cord. • Do not touch areas on or around the fusing unit. These areas get hot. • After making copies continuously, you might feel the exposure glass is heated. But this is not a malfunction. • You might feel warm around the ventilation hole.
Remarks Remarks Copier ❐ When copying from a colored original, the copier will scan the original 4 times for one copy. Be careful not to move the original during the scanning process. If the original is moved slightly, the colors (Cyan, Magenta, Yellow, and Black) might not combine properly. ❐ To avoid problems caused by curled copies, try turning over the paper stack in the paper tray. If there is no improvement, change to copy paper with less curl. ❐ Load paper with the copy side down in the paper trays.
Use and Storage of Supplies Use and Storage of Supplies Copy Paper ❐ Copy paper of the types or in the conditions listed below are not recommended for this copier.
Use and Storage of Supplies ❐ When setting paper thinner than 64g/m2, 17 lb or translucent paper in the paper trays or bypass trays, set it as shown in the figure below. The paper is divided into the vertical and horizontal types depending on the texture flow direction. If you set thin paper or translucent paper in the reverse direction, a paper jam might occur.
144
Projector Unit Operation Projector Unit Operation 145
Guide to Components Guide to Components 4 3 2 1 5 6 12 7 11 8 9 10 TRSR0A0E 1. Power cord Plug the power cord into a wall outlet. 2. Holder slot Set the holder here. 3. Filter slot Insert the P or N filter here. 4. Film cover To protect the slots from dust, close it when you are not using the projector. 5. Mirror unit release lever Slide this to the left when opening the mirror unit. 6. Focusing lever Adjusting the focus with this lever when you make copies from a glass mount film. 146 7.
Guide to Components 1 2 6 N P 3 4 5 TRSR0B0E 1. Lock levers Use to fix the film after setting it in the holder. Projector Unit Operation 2. Film holders Set 35 mm film in one of these holders. • Slide holder: Set mounted positive films in this holder. (This holder is covered with glass.) • Film strip holder: Set negative or positive strip film and base film here. • Glass mount film holder: Set the positive glass mount films in this holder. (This holder is covered with glass.) 3.
Guide to Components Film position sheet Use a duplicate of this sheet to place the film in the correct position on the exposure glass. Make a copy from the original sheet, cut around the surrounding margin on the dotted lines, and cut away the center part corresponding to the size of the film to be copied. Keep the original film position sheet.
Before Operating projector Before Operating the Projector Available Films and Setting Film type/size Slide film holder Slide strip holder Glass mount film Holder Exposure glass (platen glass) 35mm mount film 앪 ✕ ✕ ✕ 35mm glass mount film ✕ ✕ 앪 ✕ 35mm strip film ✕ 앪 ✕ 앪 60 × 45mm ✕ ✕ ✕ 앪 60 × 60mm ✕ ✕ ✕ 앪 60 × 70mm ✕ ✕ ✕ 앪 60 × 80mm ✕ ✕ ✕ 앪 60 × 90mm ✕ ✕ ✕ 앪 6 × 6cm ✕ ✕ ✕ 앪 4" × 5" (101.6 × 127mm) ✕ ✕ ✕ 앪 Maximum size (140 × 210mm, 5.5" × 8.
Before Operating projector About Copying When setting mount films and strip films in the film holders Mount films (using the slide holder) Area of film that can be copied Strip films (using the film strip holder) 21.5mm 0.8" 23mm 0.9" 33mm 1.2" 34mm 1.3" GCFPRE1E Copy size (copying full size) GCFPRE2E 133mm 5.2" 124mm 4.8" 200mm 7.8" 195mm 7.
Before Operating projector Notes for Operation ❐ First, you must perform shading to get the projector to register the condition of the film. This way, the projector can adjust the light intensity automatically while copying. ❐ If you press the Clear Modes key or [Cancel] key while using Projector function, all operations with the Projector will be canceled. ❐ You can adjust the color tone and color density manually.
How to Copy from Film How to Copy from Film The outline procedure for making copies is given below. Refer to the rest of this section for details of each step. Position the projector. ☛ See page 153. ∨ Prepare the film. ☛ See page 154. ∨ Select the film type and perform shading. ☛ See page 158. ∨ Adjust color, density, and focus. ☛ See page 171. ∨ Select modes. ☛ See page 175. ∨ Press the Start key. ∨ Choose next job. ☛ See page 176.
Positioning the Projector Positioning the Projector Note ❐ Do not touch the fresnel lens or the glass on the mirror unit. Fingerprints or dirty parts might appear on the copy. If the fresnel lens becomes dirty, wipe it. ☛ See page 180. 1 Plug the projector into the wall outlet. on the main switch of the projec2 Turn tor. the platen cover or the ducument 3 Lift feeder and lower the projector lens 1 cover. TRSR0C0E 1.
Preparing the Film Preparing the Film Check this table to find out the key you should use for your film type.
Preparing the Film Selecting the Base Film (If Needed) Note ❐ When you use negative film for copying, use that film’s appropriate base film for shading. the manufacture, model 1 Confirm name, and ASA rating of the film you want to use. a base film suitable for the film 2 Select to copy. Note ❐ The following base film slides have been prepared as accessories. • For FUJICOLOR (registered trademark of FUJI PHOTO COMPANY LIMITED.) • For AGFA (registered trademark of AGFAGEVAERT AG.
Preparing the Film Setting Films in the Holder (If Needed) Check which type of holder you should use. ☛ See page 154. Slide Holder/Glass Mount Film Holder Note ❐ The slide holder is covered with glass. Set the mount films in the slide holder. ❐ The glass mount film holder is not covered with the glass. Set the glass mount films (covered by glass) in the glass mount film holder. ❐ Positive films are usually set in a slide mount or glass mount.
Preparing the Film 2 Adjust the position of the film. Note ❐ Do not touch the image parts of the film when adjusting. TRSR0W0E 3 Close the film strip holder and lock it . Cutting the Film Position Sheet (If Needed) If you do not use the holders and position the film on the exposure glass, a positioning sheet is required. Projector Unit Operation Make a copy of one of the positioning sheet originals and use it to make your own sheet.
Selecting the Film Type and Perform Shading Selecting the Film Type and Perform Shading The procedures are different depending on the type of film. 1 Press the Projector key. the projector, then press the 2 Position # key. Reference ❐ Positioning the projector, ☛ see page 153. the film type with the Number 3 Select keys, then press the # key. the film size with the Number 4 Select keys, then press the # key. the shading procedure 5 Follow appropriate to your film type – see below.
Selecting the Film Type and Perform Shading Positive—35mm (Slide Holder/Mount Film Holder/Film Strip Holder) the film cover and insert the “P” 1 Open (Positive) filter firmly in the left slot as shown in the illustration. Then press the # key. 1 Note ❐ Be careful to insert the filter as shown, not the other way around. ❐ Before going to the next step, make sure that fresnel lens is lowered in position. TRSR0F0E 1. Filter 2 To perform shading, press the # key.
Selecting the Film Type and Perform Shading the holder by sliding it up and 5 Adjust down to position the correct frame for copying.Then press the # key. 2 1 TRSR0N0E needed, adjust the color, density, or 6 Iffocus. Reference ❐ For details, ☛ see page 171. 7 If needed, select the copier modes. Reference ❐ For details, ☛ see page 175. 8 Press the Start key. 9 Choose your next job. Reference ❐ For details,☛ see page 176.
Selecting the Film Type and Perform Shading Positive—Special Sizes the “P” (Positive filter) in the 1 Insert left slot as shown in the illustration. Then press the # key. Note ❐ Be careful to insert the filter as shown, not the other way around. 1 TRSR0F0E the positioning sheet to match the 2 Cut film size. 1: Filter Reference ❐ Regarding the positioning sheet, ☛ See page 157. the positioning sheet under the 3 Place mirror unit (on the exposure glass).
Selecting the Film Type and Perform Shading the film size (1 - 8) using the 5 Select Number keys. Then press the # key. No. Film Size 1 60 × 45mm 2 60 × 60mm 3 60 × 70mm 4 60 × 80mm 5 60 × 90mm 6 6 × 6cm 7 4" × 5" (101.6 × 127mm) 8 Maximum size (142 × 210mm or 5.5" × 8.2") the fresnel lens, place the film in6 Lift side the film position sheet, and lower the fresnel lens. Then press the # key. Note ❐ Place the film face down. ❐ If the film is curled, the copy image might be out of focus.
Selecting the Film Type and Perform Shading 9 Press the Start key. 0 Choose your next job. Projector Unit Operation Reference ❐ For details, ☛ see page 176.
Selecting the Film Type and Perform Shading Negative—35mm (Film Strip Holder) Insert the “N” (Negative) filter in the 1 left slot as shown in the illustration. Then press the # key. Note ❐ Be careful to insert the filter as shown, not the other way around. 1 ❐ Before going to the next step, make sure that the fresnel lens is lowered in position. 2 Set the base film in the holder. TRSR0F0E 1: Filter Reference ❐ Regarding setting the base film, ☛ see page 155.
Selecting the Film Type and Perform Shading out the film strip holder with the 6 Pull base film. 7 Set the film in the holder. Reference ❐ Regarding setting the film, ☛ see page 156. TRSR0Z0E pressing the holder lever to the 8 While left, insert the holder in the right slot. TRSR0Y0E the holder by sliding it up and 9 Adjust down to position the correct frame for Projector Unit Operation copying. Then press the # key. 2 1 TRSR0N0E needed, adjust the color, density, or 0 Iffocus.
Selecting the Film Type and Perform Shading ! If needed, select the copier modes. Reference ❐ For details, ☛ see page 175. @ Press the Start key. # Choose your next job. Reference ❐ For details, ☛ see page 176.
Selecting the Film Type and Perform Shading Negative—Special Sizes the “N” (Negative) filter in the 1 Insert left slot as shown in the illustration. Then press the # key. Note ❐ Be careful to insert the filter as shown, not the other way around. 1 TRSR0F0E 1: Filter the positioning sheet to match the 2 Cut film size. Reference ❐ Regarding the positioning sheet, ☛ see page 157. the positioning sheet under the 3 Place mirror unit (on the exposure glass).
Selecting the Film Type and Perform Shading the film cover and while press5 Open ing the holder lever to the left, insert the film strip holder in the right slot. TRSR0Y0E Insert the holder until the ★ mark is 6 placed as shown in the illustration. Then press the # key. 1 TRSR0J0E 7 To perform shading, press the # key. Note ❐ The machine will start shading. out the film strip holder with the 8 Pull base film. Then press the # key.
Selecting the Film Type and Perform Shading the film size (1 - 8) using the 9 Select Number keys. Then press the # key. No. Film Size 1 60 × 45mm 2 60 × 60mm 3 60 × 70mm 4 60 × 80mm 5 60 × 90mm 6 6 × 6cm 7 4" × 5" (101.6 × 127mm) 8 Maximum size (142 × 210mm or 5.5" × 8.2") the fresnel lens, place the film in0 Lift side the positioning sheet, and lower Note ❐ Place the film face down. ❐ If the film is curled, the copy image may be out of focus.
Selecting the Film Type and Perform Shading @ If needed, select the copier modes. Reference ❐ For details, ☛ see page 175. # Press the Start key. $ Choose your next job. Reference ❐ For details, ☛ see page 176.
Adjusting Color, Density and Focus Adjusting Color, Density and Focus After shading, you can adjust the color tone, image density, or manual focusing. Note ❐ When setting the glass mount film holder, manual focus adjustment is required. ❐ You can adjust the focus manually for 35 mm film only. Color Tones in Film Scanning Use these modes when you want to adjust the overall color tone of copies. Also use these modes when you use negative film, because the color tone of copies varies with the film brand.
Adjusting Color, Density and Focus Adjusting the Color Tone/Brightness Using Negative Film ❐ When you copy negative film, adjust the color tone (density of yellow, magenta, and cyan) and brightness (quantity of light) according to the table below. However, even when you use the same type of film, you must use different settings depending on the way the original picture is taken or developed. If you cannot make copies as you want, perform adjustment.
Adjusting Color, Density and Focus 1 If you want to adjust the color tone or image density, select “1” with the Number keys, then press the # key. the level (1 - 9) for Yellow with 2 Select the Number key, then press the # key. Note ❐ Y means Yellow, M means Magenta, and C means Cyan. Level Density 1 Lighter ← ← 5 9 Darker 3 Repeat step 2 for Magenta and Cyan. Projector Unit Operation the density level, then press the 4 Select # key.
Adjusting Color, Density and Focus a blank piece of white paper un6 Place der the mirror unit, then press the # key. the focus with the focusing le7 Adjust ver, then press the # key. Note ❐ After copying, return the focusing lever to the center.
Selecting Modes Selecting Modes You can select copier modes with the projector. ❐ Regarding the modes that cannot be selected with the projector, ☛ see page 96. 1 After shading, select the modes. Note ❐ This operation is the same as that described in the “Copying” chapter. Start key.
Choosing Next Job Choosing Next Job After copying, you can select the next job: • Continue: You can copy the same film again, or you can copy another film which is of the same type. • Retry (Color/Density): You can adjist the color tone, image density, or adjust the focus manually. • Retry (Shading): If the mirror unit is moved, or if some lines appear on the copy, you can perform shading again. • Select film type: You can change the type of film.
Exiting Projector Mode Exiting Projector Mode “2” with the Number 1 Select then press the # key. keys, the mirror unit to its original 2 Replace position. Note ❐ Be careful not to touch the fresnel lens. If you do touch it, clean it. ☛ See page 180. the holders, filters, and other 3 Return accessories to the accessory box. TRSR0R0E 4 Close the lens cover. 5 Turn off the power switch. Projector Unit Operation Note ❐ Though the power switch is turned off, the cooling fan may be still working.
What to do if Something Goes Wrong What to do if Something Goes Wrong 1. If the color balance is not right ❐ If the color density leans to red or blue, or isn’t properly balanced, perform the color density adjustment, and the color balance adjustments for Yellow, Magenta, and Cyan. ☛ See page 88. 2. If the film you want to copy does not match the types of base film included.
What to do if Something Goes Wrong ❐ To extend the area that can be copied, use the glass mount film holder and focus manually. 5. If the projection lamp does not light. ❐ If the projection lamp does not light and a service message appears on the screen, the lamp might be burned out. In this case, please call you service representative. 6. If you move the mirror unit. ❐ Perform the shading operation once again. 7. If lines appear on the copy. ❐ Perform the shading operation again.
Daily Maintenance Daily Maintenance Exterior Wipe with a dry soft cloth. Lens Blow off any dust using the blower brush. If there are fingerprints on the lens, wipe them with a soft cloth. TRSR0T0E Film Holder Blow off any dust using the blower brush. If there are fingerprints on the glass, wipe with a soft cloth. Holder Slot Blow off any dust using the blower brush.
Daily Maintenance Mirror Unit Blow off any dust using the blower brush. If there are fingerprints on the glass, wipe with a soft cloth.
182
Specification Specifications 183
Mainframe Mainframe Configuration: Desktop Process: Dry electrostatic transfer system Resolution: 400 dpi Gradations: 256 gradations Originals: Sheet, book, objects Original size: Maximum: A3, 11" × 17" Copy paper size: Trays: A3l, B4l, A4pl, B5pl, A5l, 11" × 17"l, 81/2" × 14"l, 81/2" × 13"l, 81/2" × 11"pl, 51/2" × 81/2"l Bypass tray: ☛See page 36.
Mainframe Red (Yellow + Magenta): Standard mode OHP/Thick paper mode A4p, 81/2" × 11"p 7 copies/minute 3.5 copies/minute A3l, 11" × 17"l 3.5 copies/minute 1.5 copies/minute Black + Yellow, Black + Magenta, Black + Cyan: Standard mode OHP/Thick paper mode A4p, 81/2" × 11"p 7 copies/minute 3.5 copies/minute A3l, 11" × 17"l 3.5 copies/minute 1.
Mainframe Reproduction ratios: 5 enlargement and 7 reduction Enlargement Full size Reduction Power consumption: Metric version Inch version 400% 400% 200% 200% 141% 155% 122% 129% 115% 121% 100% 100% 93% 93% 82% 85% 75% 78% 71% 73% 65% 65% 50% 50% 25% 25% Copier only Full system* Warm up 1.3kW 1.3kW Stand-by 0.4kW 0.4kW Copying 1.1kW 1.1kW Maximum less than 1.5kW less than 1.
Mainframe Dimensions (W✕D✕H up to the exposure glass): 620 ✕ 680 ✕ 602mm, 24.5" ✕ 26.8" ✕ 23.8" Weight: Approx. 105kg, 231.5 lb Specification ❐ Specifications are subject to change without notice.
Document Feeder (Option) Document Feeder (Option) Original Feed: Automatic reverse document feed - ARDF mode Automatic document feed - ADF mode Semi-automatic document feed - SADF mode Original size: A3 l - B6pl (B6pl cannot be used in ARDF mode) 11" ✕ 17"l - 51/2" ✕ 81/2"pl Original weight: SADF mode, ADF mode: 40 - 128g/m2, 11 - 34 lb ARDF mode: 52 - 105g/m2, 14 - 28 lb (For 40 - 52g/m2, 11 - 14 lb originals, use Thin Paper mode.
20-bin Sorter Stapler (Option) 20-bin Sorter Stapler (Option) Number of bins: 20 bins + proof tray Paper size for bins (Normal paper mode): Sort/Stack: A3l, B4l, A4pl, B5pl, 11" × 17"l, 10" × 14l", 81/2" × 14"l, 81/2" × 13"l, 81/4" × 13"l, 81/2" × 11"pl, 12" × 18"l Staple: A3l, B4l, A4pl, B5pl, 11" × 17"l, 10" × 14"l, 81/2" × 14"l, 81/2" × 13"l, 81/4" × 13"l, 81/2" × 11"pl Paper weight for bins: 52g/m2 - 157g/m2, 14 - 42 lb Bin capacity (Normal paper mode): Sort: A4, 81/2" × 11" or smaller: 30 copies (8
10-bin Sorter Stapler (Option) 10-bin Sorter Stapler (Option) Number of bins: 10 bins + proof tray Paper size for bins: Sort/Stack: A3l, B4l, A4pl, B5pl, 11" × 17"l, 10" × 14l", 81/2" × 14"l, 81/2" × 13"l, 81/4" × 13"l, 81/2" × 11"pl Staple: A3l, B4l, A4pl, B5pl, 11" × 17"l, 10" × 14l", 81/2" × 14"l, 81/2" × 13"l, 81/4" × 13"l, 81/2" × 11"pl Paper weight for bins: 52g/m2 - 157g/m2, 14 - 42 lb Bin capacity: Sort: A4, 81/2" × 11" or smaller: 30 copies (80g/m2, 20 lb) B4, 81/2" × 13" or larger: 25 copie
3-bin Sorter (Option) 3-bin Sorter (Option) Number of bins: 3 bins Paper size for bins: A3l, B4l, A4pl, B5pl, A5pl, B6l, A6l, 11" × 17"l, 10" × 14l", 81/2" × 14"l, 81/2" × 13"l, 81/4" × 13"l, 81/2" × 11"pl, 51/2" × 81/2"l, 12" × 18"l Paper weight for bins: Face-up: 1st bin: 52 - 160g/m2, 14 - 42 lb 2nd and 3rd bins: 52 - 105g/m2, 14 - 28 lb Face-down: 64 - 105g/m2, 17 - 28 lb Bin capacity (Normal paper mode): 1st bin: A4, 81/2" × 11" or smaller: 500 sheets (80g/m2, 20 lb) B4, 81/2" × 13" or larger:
1000-sheet Tray Unit (Option) 1500-sheet Tray Unit (Option) 1000-sheet Tray Unit (Option) Copy paper weight: 64 - 105g/m2, 17 - 28 lb Available paper size: A3l, B4l, A4pl, B5pl, A5l, 11" × 17"l, 81/2" × 14"l, 81/2" × 11"pl, 51/2" × 81/2"l Maximum power consumption: 50W (Power is supplied from the main frame.) Paper capacity: 500 sheets × 2 trays Dimensions: (W ✕ D ✕ H) 620 ✕ 680 ✕ 390mm, 24.5" ✕ 26.8" ✕ 15.4" Weight: Approx. 32kg, 70.6 lb ❐ Specifications are subject to change without notice.
Projector Unit (Option) Projector Unit (Option) Acceptable film types: Type: Size: Positive film, Negative film 35mm Others: 60 ✕ 45mm, 60 ✕ 60mm, 60 ✕ 70mm, 60 ✕ 80mm, 60 ✕ 90mm, 4" ✕ 5" Max: 142 ✕ 210mm, 5.5" ✕ 8.2" Mount: Yes (Up to 5 frames can be set in a film holder.) Strip: Yes (A series of 6 frames can be set in a film holder.) Focusing: Fixed/Manual Maximum power consumption: 70W Weight: Projector: Approx. 7.9kg, 17.5 lb Mirror unit: Approx. 2.7kg, 6.
194
INDEX 2 Sided → 1 Sided, 65 D A A.C.S.
P T Panel Display, 8 Paper Storage, 143 Paper tray, 2 Pastel, 91 Photo mode, 33 Platen cover, 2 Positive/Negative, 79 Power Connection, 138 Preset R/E, 51 Program, 47 Projector Unit Operation, 145 Text mode, 32 Toner Storage, 143 Twin Color mode, 29 R Reduce/Enlarge, 51 Remarks, 141 Removing Jammed Staples, 113 Removing the Platen Cover, 22 Right covers, 3 U U.C.R.
RICOH COMPANY, LTD. 15-5, 1 chome, Minami-Aoyama, Minato-ku, Tokyo Telephone: Tokyo 3479-3111 Operating Instructions Overseas Affiliates Spain RICOH ESPAÑA S.A. Avda. Litoral Mar, 12-14, 08005 Barcelona Phone: +34-(0)93-295-7600 The Netherlands RICOH EUROPE B.V. Groenelaan 3, 1186 AA, Amstelveen Phone: +31-(0)20-5474111 Italy RICOH ITALIA SpA Via della Metallurgia 12, 37139 Verona Phone: +39-(0)45-8181500 United Kingdom RICOH UK LTD.