READ ME FIRST ® *DSL Equipment Installation Guide: Efficient Networks® 5260 *Digital Subscriber Line Part Number: 5250GENQSG Version 1.0 ©2001 SBC Advanced Solutions, Inc. All rights reserved.
Table of Contents Follow Steps 1 through 8 to complete the DSL Equipment Installation Step 1: Verify Your System Requirements and Documents Step 2: Verify the Contents of Your DSL Equipment Kit Step 3: Install a Telephone Filter on Every Telephone Line Step 4: Choose Your Modem and Check Your Minimum Requirements Step 5: Installing the Kingston® Software and Hardware Step 6: Install the Efficient Networks® DSL Modem Step 7: Finish Configuring your System Step 8: Follow Internet Service Provider Instructions
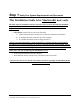
Step 1: Verify Your System Requirements and Documents This Installation Guide is for Macintosh® users only. The SBC Express installation software will ensure that you meet the following minimum requirements. You will not be able to complete the installation without meeting these requirements.
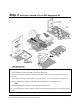
Step 2: Verify the Contents of Your DSL Equipment Kit Your DSL Equipment Kit Contains: A: This Installation Guide and the SBC Express Installation CD. B: 1 Efficient Networks® 5260 DSL Modem with Ethernet cable (connects to Adapter, below), and power cable. C: 1 Filter Pack containing: 5 in-line filters, 1 wall-mount filter, 1 two-way adapter, and 1 data cable.
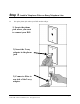
Step 3: 3-1 Install a Telephone Filter on Every Telephone Line Set up the phone jack where your DSL modem will go. 1) Locate the phone jack where you want to connect your DSL 2) Insert the 2-way adapter in the phone jack 3) Connect a filter to one side of the 2-way adapter Installation Guide for Customer Self-Install: Efficient Networks® 5260, Macintosh ©2001 SBC Advanced Solutions, Inc. All rights reserved.
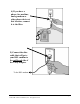
4) If you have a phone, fax machine, analog modem or other phone device at this location, connect it to the filter 5) Connect the data cable that will go to your DSL modem to the unfiltered side of the 2-way adapter To the DSL modem Installation Guide for Customer Self-Install: Efficient Networks® 5260, Macintosh ©2001 SBC Advanced Solutions, Inc. All rights reserved.
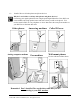
3-2 Install a filter on all other phones and phone devices. Why do I need a filter on all my other phones and phone devices? Converting your regular phone line into a high-speed Digital Subscriber Line (DSL) can cause audible noise (high pitched tones and static) when you talk on the phone. You need to install a filter on every telephone or device that shares the same phone number as your DSL line to eliminate this noise.
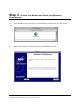
Step 4: Choose Your Modem and Check your Minimum Requirements 4-1 icon. Insert the SBC Express CD into your CD-ROM drive. Double click the “SBC Express” 4-2 SBC Express displays the Welcome screen. Click Start to proceed. Installation Guide for Customer Self-Install: Efficient Networks® 5260, Macintosh ©2001 SBC Advanced Solutions, Inc. All rights reserved.
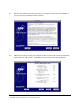
4-3 SBC Express displays the license agreement. If you agree to the terms, click Accept. If you do not accept, installation cannot continue. . 4-4 SBC Express quickly checks your computer system to ensure that it meets the minimum requirements for DSL service. Click Next to proceed if you meet all requirements. Installation Guide for Customer Self-Install: Efficient Networks® 5260, Macintosh ©2001 SBC Advanced Solutions, Inc. All rights reserved.
If your computer meets the minimum requirements, SBC Express automatically proceeds to the next step. You should continue to Step 6 on page 11. If you shutdown your computer, leave the CD in the CD-ROM drive, and SBC Express will continue after you restart. If your computer does not meet the minimum requirements, SBC Express displays a message with details of the problem. Your computer must meet the minimum requirements before you proceed.
Step 5: Installing the Kingston® hardware (if needed) IMPORTANT NOTE: Most Macintosh computers already have an Ethernet card installed. If this is the case with your Macintosh, SBC Express would have reported that you passed the minimum requirements. If you see the following screen, it is not necessary to install the Kingston® Ethernet Adapter provided in this equipment package. You may proceed directly to Step 6 on page 11 if you see the screen above.
Step 6: Install the Efficient Networks® DSL Modem Your computer should be turned on. Your modem should be turned OFF. You should be at the following screen in the SBC Express Installation Software: 6-1 Consult the following diagram to install your modem. Installation Guide for Customer Self-Install: Efficient Networks® 5260, Macintosh ©2001 SBC Advanced Solutions, Inc. All rights reserved.
6-2 Plug the power cable into the DSL modem and an electrical outlet. 6-3 Connect the data cable to your telephone jack and your DSL modem. There should NOT be a filter between the data cable and the wall jack. 6-4 Connect the Ethernet cable to the Kingston® Ethernet Port or the built –in Ethernet Port on the back or side of your Macintosh and to the Ethernet Port on the back of your DSL modem. 6-5 Turn the DSL Modem power switch ON.
Step 7: Finish Configuring Your System 7-1 SBC Express now prompts you for your first and last name. Please type your first and last name and then click Next to proceed. 7-2 Enter your 10-digit phone number in the next screen. Click Next to proceed. Installation Guide for Customer Self-Install: Efficient Networks® 5260, Macintosh ©2001 SBC Advanced Solutions, Inc. All rights reserved.
7-3 Congratulations! You have finished setting up your DSL hardware. Click Quit in SBC Express and then proceed to Step 8. Installation Guide for Customer Self-Install: Efficient Networks® 5260, Macintosh ©2001 SBC Advanced Solutions, Inc. All rights reserved.
Step 8: Install and Configure EnterNet 300 SNET Internet has provided your DSL software separately with instructions for installation and configuration. You should have a DSL CD ROM with EnterNet 300 software. Please follow the instructions carefully. Installation Guide for Customer Self-Install: Westell ® 516, Windows 95/98/2000/ME ©2001 SBC Advanced Solutions, Inc. All rights reserved.
Appendices Installation Guide for Customer Self-Install: Efficient Networks® 5260, Macintosh ©2001 SBC Advanced Solutions, Inc. All rights reserved.
APPENDIX A Having Trouble? If the suggestions below don’t resolve your problem, technical support is available from your Internet Service Provider. Please refer to the Internet Service Provider's information on how to contact them for technical assistance. I can’t open my computer case. What do I do? • Consult your computer manufacturer’s Owner’s Manual. • Call your computer manufacturer’s Support Line. I can’t connect.
APPENDIX B: Installing the Kingston® hardware (if needed—see Step 5) IMPORTANT NOTE: If your computer already has an Ethernet card installed and you passed the minimum requirements step in the SBC Express Installation Software, it is not necessary to install the Kingston® Ethernet Adapter provided in this equipment package. If you have a newer Macintosh (iMac®, iBook®, and G4 Cube®) with a built in Ethernet port you do not need to install the provided Kingston® Ethernet Adapter.
Installing the Kingston® Ethernet Adapter • Follow steps B-1 through B-10 below for Desktop Macintosh installations. • For Laptops, skip to step B-11. DESKTOP Systems B-1 Click Quit in SBC Express and then turn off all peripheral devices. Remember to leave the SBC Express CD in the CD-ROM drive. B-2 Unplug the power cord for your computer from the electrical outlet. B-3 Open the case of your computer (review your computer manufacturer’s Owner’s Manual for specific instructions).
B-8 Verify that the end bracket is flush against the chassis. Make sure the gold connectors along the base of the Kingston® Ethernet Adapter are completely and evenly inserted into the PCI slot. B-9 Fasten the card into the computer chassis with the screw you set aside earlier. B-10 Replace the computer cover. Plug the power cord back into the electrical outlet and turn on your Macintosh, making sure the SBC Express CD is in the CD-ROM drive. Proceed to step B-14.
LAPTOP Systems- Installing the Kingston® Ethernet Adapter B-11 Insert the Kingston® Card into your computer’s PCMCIA Type II or Type III slot. B-12 Carefully push the Media Access Module (MAM) into the socket on the Card until the locking tabs click into place. B-13 drive. Power up your laptop after making sure the SBC Express CD is still in the CD-ROM Installing the Kingston® Software B-14 Insert the SBC Express Installation CD. “Kne111tx” (desktop) or “Knepc2t” (laptop) folder.
B-16 From the Kingston® Welcome screen, click on Continue to proceed. B-17 Click on the Install button in the bottom right corner of the Kingston® Installer window to proceed with the default Easy Install option. This option will install the Kingston® driver and diagnostics application. B-18 Restart the System when prompted to complete the installation. B-19 Proceed to Step 6 (page 11).
Appendix C I want to uninstall/reinstall the Kingston® Adapter. What do I do? 1. Insert the SBC Express Installation CD. Open the “Drivers” folder. Open the “Kne111tx” (desktop) or “Knepc2t” (laptop) folder. 2. Double click on the Installer icon. 3. From the Kingston® Welcome screen, click on Continue to proceed. Installation Guide for Customer Self-Install: Efficient Networks® 5260, Macintosh ©2001 SBC Advanced Solutions, Inc. All rights reserved.
4. Select the Custom Remove option from the pulldown menu in the upper left corner. 5. Place an X in the boxes to select the components to remove and click the Remove button in the lower right corner of the window. Installation Guide for Customer Self-Install: Efficient Networks® 5260, Macintosh ©2001 SBC Advanced Solutions, Inc. All rights reserved.
6. Click Restart to complete the Kingston® software removal. 7. Once the computer has restarted, select Shut Down to power down the desktop or laptop. 8. After the computer shuts down, unplug the computer and any peripheral devices. 9. Remove the Kingston® Adapter Card DESKTOP: For the Internal Kingston® Ethernet Adapter Card: • Open the computer case using your computer manufacturer’s instructions and then remove the screw holding card in place.
APPENDIX D Troubleshooting SBC Express Please refer to this list if you are having problems using SBC Express or if you receive an error message. If after troubleshooting, you are still having problems, then you should contact the numbers listed in Appendix A. Step Problem Minimum Resources SBC Express verifies minimum requirements on several resources including hard drive space, RAM, operating system level, and processor speed and family.
Ping Test The Ping Test is usually accomplished within the Configure TCP/IP step, where SBC Express pings the default gateway. An explicit IP address can also be used. Failure during this test can occur from invalid network settings, the Ethernet cable not being plugged in, the DSL modem not being in synch, or if the specified IP address does not allow a ping. Make sure your Ethernet cable is plugged in and powercycle your DSL modem. Use the “Retry” button to try the test again.