
User manual

Blood Pressure
Monitor
SC 2100
- Instructions for use -
Introduction
Thank you for deciding for the blood
pressure monitor SC 2100 from SCALA
Electronic GmbH. To be able to utilise all
advantages of the blood pressure monitor
to the fullest, you should carefully read
these instructions before using the
monitor. Keep the instruction leaflet in a
safe place.
Safety instructions
The blood pressure monitor SC 2100
enables you to monitor your blood
pressure regularly. However, you should
never change the treatment which your
doctor has prescribed
Self-measurement means monitoring,
it does not imply diagnosis or
treatment.
Discuss unusual values with your doctor.
Do not change the medication
prescribed by your doctor.
The heart rate is not a useful indicator of
the frequency of a cardiac pace maker.
Features of the SC 2100
The monitor automatically detects the
required inflation pressure, i.e., the „P“
(for pump) remains displayed until the
required inflation pressure for a safe
measurement is obtained.
WHO-Interpretation of blood pressure
readings with colored band (See
description at page 7).
The device has 85 memory locations.
If your heartbeat is not regular
(irregular), the “ “ icon appears in
the LC display.
The date and time are displayed and
stored together with every blood
pressure value.
The cuff is suitable for upper arms with
a circumference between 22 and 32
cm.
- 2 -
Preparing the monitor for
measurement / changing battery
Insert the supplied batteriy in the battery
compartment at the rear side of the blood
pressure monitor as shown. Use only an
alkali battery (LR03).
If the battery is depleted, the battery icon
is displayed in the top left corner of
the LC display. The battery needs urgent
replacement because you cannot use the
monitor with depleted battery.
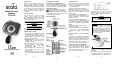
Device description
The LC display
- 3 -
Setting the clock
Switch off the device and hold the TIME
button pressed for approx. 2 seconds.
The year 20XX blinks in the top left
corner of the display.
Set the year with the ON/OFF button.
When the correct year is set, press the
TIME button again. Now the 1 blinks in
the top left corner of the LCD. It stands
for the month.
Set the month with the ON/OFF button.
Another press of the TIME button sets
another 1 blinking. It stands for the first
day in the month.
Set the day with the ON/OFF button.
Another press of the TIME button takes
you to the clock setting – the hours blink.
As b efore, set the clock with the ON/OFF
button.
Pressing the TIME button advances to
the minutes setting.
Set the minutes with the ON/OFF button.
A final press of the TIME button
completes the setting of the date and
time.
How to obtain correct measuring
results?
To obtain correct readings, measure the
blood pressure always under the same
conditions, at rest, not under the effect of
alcohol, not during meals, not after heavy
physical or mental stress. If possible, sit
down at a table for the measurement.
The blood pressure measurement
Put the cuff around your left upper arm in
such a way that the tube is directed
towards the bend of the elbow, with the
lower cuff edge ending about 2-3 cm
above the bend of the elbow.
- 4 -
2-3 cm
The cuff should be reasonably tight.
Switch the device on and off at thee
ON/OFF button. The display shows ”P”
and ”0”. Start inflating the cuff with the
manual pump.
CAUTION:
Pumpe until the”P” disappears
from the display.
Then the measurement starts. Deflation
is automatic.
CAUTION: Setn the deflation rate at
the air deflation valve on the rear of
the monitor to approx. 3 to 4 mmHg
per second. Turning out the deflation
valve reduces the deflation rate. This
setting is only required during the first
measurement – provided the deflation
rate is not changed.
After about 3 seconds a heart starts
blinking in the display (heart rate
identified).
The cuff pressure is reduced further and
is displayed continuously. If the diastoclic
(öower) blood pressure is detected, the
- 5 -