
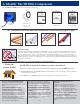
Use and Care Guide


Q & A
5
Please explain what you mean by “as far
away as possible” from tees, elbows,
couplings, valves and curved pipe when
wrapping the signal cable? I do not have
much room to wrap the coil.
For the very best results, the less turbulence in the
water is desired. By saying “as far away as possible”
we prefer it to be a few inches away, if possible, but if
there is no room to wrap the coil you can still wrap the
coil next to the tee, elbow, or coupling. Just make
sure it is not on curved pipe and wrapped over a
coupling or valve, as all the wrappings need to be the
same size or diameter and flush against one another.
Can I extend the ten foot limit on the length of
the signal cable from the coil to the power
box?
No, you cannot extend it. The ten feet of wire is the limit
we allow from going from the signal coil to the power
box. You will need to get the power box location and the
coil wrapping location within those lengths. If needed,
you can use an extension cord to plug the unit in if the
electrical was an issue.
Can I install ScaleBlaster on a copper pipe
that is painted?
Yes. There will be no issues if the pipe is painted or not.
My house is on a slab. There is only 3
inches of pipe before it does a 90° into the
pressure regulator. Can I mount it here?
Install ScaleBlaster after the pressure regulator.
I do not have 12 inches of straight pipe so I
plan on re-piping the line at the water
heater, but this line only controls water
going into the heater. Is this OK?
Yes, it is OK. You will be descaling the hot water
lines, where the majority of the scaling issues take
place.
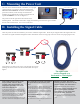
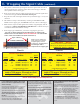
The signal cable
can be wrapped on a
horizontal or vertical pipe.
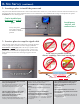
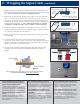
C. Mounting the Power Unit
The unit can be mounted indoors or outdoors, in an upright
vertical position, on a wall or other non-enclosed area
where it is well ventilated. NOTICE: If mounting the
power unit outside, it must be kept out of the direct
sunlight. We recommend the average air temperature to
operate ScaleBlaster at 32 to 122 degrees F.
The picture to the far right shows the location of the
mounting holes. The installer will need to supply the mounting screws for the type of surface
the unit will be mounted on. A # 8 screw works best.
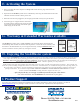
D. Installing the Signal Cable
Once the power box has been mounted, you can now install the signal cable. Insert the pre-stripped end of the signal cable into
one of the two signal terminals and tighten. Follow instruction on how to wrap pipe with wire on next two pages (pages 6 &7).
Twist down to see hole to put wire in, put stripped wire in hole
(making sure the two bare wires do not touch) then twist up to
tighten.
HOLES FOR MOUNTING