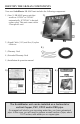
The eco-friendly solution to hard water SB-MAX Installation & Operation Manual Residential unit for large homes and/or very hard water areas Indoor/Outdoor installation
IDENTIFY THE SB-MAX COMPONENTS Your new ScaleBlaster SB-MAX unit includes the following components: 1.) 1.) One (1) SB-MAX power unit that works on 115VAC or 230VAC automatically. If 230VAC is desired, replace plug. This unit comes with a 5 foot power cord. 2.) Signal Cable (110’) and five (5) nylon cable ties 2.) 3.) Warranty Card 4.) Extended Warranty Card 5.) Installation & operation manual 3.) 4.) 5.
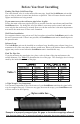
Before You Start Installing Finding The Main Cold Water Pipe The water shutoff valve is on the main cold water pipe. Install the ScaleBlaster unit on this pipe as close to where it comes into the house as possible. This will ensure that the outside spigots and kitchen are being treated. If you cannot access the cold water pipe before it splits Follow the main cold water pipe back as far as possible from the water heater and install the ScaleBlaster there.
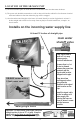
LOCATION OF THE SB-MAX UNIT 1.) The most desirable place to install the unit is on the main water line that enters the house. 2.) The power unit should be mounted on a wall or other solid surface within five feet from an electrical outlet and within ten feet from where the pipe will be wrapped. 3.
MOUNTING THE POWER UNIT The unit can be mounted indoors or outdoors in an upright vertical position on a wall or other non-enclosed area. NOTICE: If mounting the power unit outside, it must be kept out of the direct sunlight. The installer must supply the mounting screws for the type of surface the unit will be mounted on. Mount power unit on a solid surface (out of direct sunlight) using already installed mounting brackets. LED light. See details on bottom of page7.
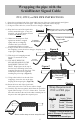
Wrapping the pipe with the ScaleBlaster Signal Cable PVC, CPVC, or PEX PIPE INSTRUCTIONS 1.) Insert the pre-stripped end of the signal cable into one of the two signal terminals and tighten. 2.) Route the signal cable to the inlet pipe. Hold cable parallel and next to the pipe. 3.) Using one of the cable ties, secure the wire to the pipe. (Figure A) 4.) Wrap the loose end of the signal cable securely around the pipe - in any one direction – the proper number of turns as noted in Chart A below.
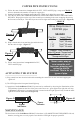
COPPER PIPE INSTRUCTIONS 1.) Follow the same instructions in steps of 1-9 for PVC, CPVC and PEX pipe, except use CHART B below to determine the number of wraps for copper pipe. 2.) Instead of a double coil wrapping around the pipe, a third one is added for copper pipe. 3.) YOU MUST KEEP THE THIRD WRAPPING IN THE SAME DIRECTION AS THE FIRST AND SECOND! Wrap right over the top of the second layer continuing in the same wrapping direction as the first and second layer.
WARRANTY & EXTENDED WARRANTY This unit comes with a five (5) year warranty to be free from defects in material and workmanship under normal use from the date of purchase. A five (5) year extended warranty is available on this unit at a very minimal cost. 120-DAY MONEY-BACK GUARANTEE We are so sure you will be satisfied with ScaleBlaster, we are offering a 120-day money back guarantee from the date of purchase if you are not 100% satisfied with the product.