
User guide
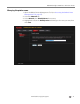
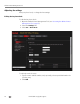
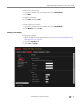


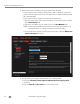
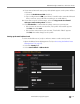
Table Of Contents
- Printer Overview
- Networking Your Printer
- Connecting to a wireless network
- Adding a wireless network connection to a USB-connected computer
- Online Printer Management Tool
- Handling Paper
- Printing
- Mobile Printing
- Copying
- Scanning
- Faxing
- Maintaining Your Printer
- Troubleshooting
- Product and Safety Specifications
- Features and Specifications
- Print performance
- Photo printing features
- Copy document features
- Copy photo features
- Scanning features
- Faxing features and specifications
- Input paper tray
- Output paper tray
- Automatic Document Feeder (ADF) for originals
- Ink cartridges
- Connectivity
- Software support
- Physical specifications
- Warranty
- Minimum System requirements
- Safety information
- Regulatory compliance
- ENERGY STAR® Qualified
- Warranty Information
- Declaration of Conformity
- Features and Specifications

Online Printer Management Tool
24 www.kodak.com/go/aiosupport
4. For each person:
a. Type the person’s Name.
b. Type the person’s Email Address.
c. Click Add.
5. When you are finished adding email addresses, click
OK.
Setting options for scan to email
When you send a scan to an email address, the printer uses defaults — subject line,
body, and scan settings — that you set up under email options.
1. Open the Online Printer Management Tool (see Accessing the Online Printer
Management Tool, page 15).
2. Select the Settings tab.
3. Select Scan To Email > Email Option.
4. Select and replace the default subject line and body text, if necessary.
This subject line and body text will be included with every scan you send to
an email address.