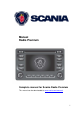
Manual Radio Premium Complete manual for Scania Radio Premium This manual can be downloaded at www.scania.
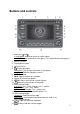
Buttons and controls 1. Arrow keys and : In radio mode: Automatic search for radio stations. In CD/MP3 mode: Select track (short press), Fast-forward/rewind (long press). 2. Slot for CD disc. 3. Display/touch screen 4. Eject CD disc. 5. : Display day-night. Short press: Day or night illumination in the display. Long press: Switch the display on or off. 6. MAP: Show map 7. NAVI: Open the menu for navigation. 8. Slot for SD card for navigation. 9. SETUP: Opens the menu for system settings. 10.
16. MEDIA: Change between different audio sources: • CD disc • USB • AUX • Bluetooth 17. FM•AM: Start the radio mode and change between different sources.
Table of contents Manual Radio Premium .............................................................................................. 1 Complete manual for Scania Radio Premium 1 Buttons and controls ................................................................................................... 2 Important information .................................................................................................. 8 Warning texts 8 Please note the following! 8 Stipulated use .....................
Setting the volume for voice guidance (navigation) .........................................................................................22 Setting the volume for the phone sound ..........................................................................................................22 Camera 23 Radio .........................................................................................................................
Use ..................................................................................................................................................................40 Telephone:.................................................................................................................41 General Information 41 Bluetooth profiles .............................................................................................................................................42 Bluetooth connection .......
Select route outline ..........................................................................................................................................59 Changing the mode for the time display ..........................................................................................................60 Previous destinations .......................................................................................................................................60 Setting route options ....................
Important information This Scania Radio Premium has been manufactured according to the latest technological developments and in compliance of applicable technical safety regulations. However, the failure to comply with these safety instructions could involve risk: Read through the whole manual carefully and thoroughly before using any of the functions. Store the Audio Operating Guide where it is easily accessible for all users.
Important information! Do not adjust settings or input information into the navigation system while the truck is in motion. Stop before you enter a new destination or change system settings! The navigation equipment must be used in a way that does not put you and other road users in danger. Traffic safety must always come first. The risk of serious accident is great if you neglect to keep your full attention on the traffic situation.
Note Use the demo mode when the truck is stationary to familiarise yourself with the functions available in the Scania navigation system. Read more about this in the section " SETUP button and the Navigation menu" in the chapter "Navigation". Risk of injury Do not open or make alterations to the inside of the Radio with Navigation! The CD player contains a Class 1 laser which emits invisible laser beams that could damage your eyes. Do not repair or otherwise modify the Radio with Navigation.
Cleaning Only use mild detergents to prevent damage to the plastic surface of the Radio with Navigation. The display must be cleaned with a treated screen wipe designed for monitors and displays. Clean other surfaces with a dry or lightly moistened cloth, and use a mild detergent when necessary. Disposal (EU countries) Do not throw electronic products out with the household waste! Take them to a suitable recycling and recovery centre for disposal.
About the Scania Radio Premium manual Read carefully through the manual before using the Scania Radio Premium and store the manual in the truck. The manual describes all functions to help you use the radio, CD player and navigation system safely and efficiently. To help you quickly locate safety instructions, these have been marked using the with a grey background. symbol Useful information is indicated by symbol .
Introduction General Information Mode Function Radio FM - 12 station memories AM - 6 station memories Internal CD player Playback of audio CD discs and MP3/WMA CD discs Connection for external storage media iPod MP3 players USB flash drives Portable CD players Other mass storage devices via cable or Bluetooth Navigation system Dynamic route guidance for avoiding traffic congestion or other traffic problems Phone connection Connection for Bluetooth mobile phones Always use the system in such a
Operating modes Radio Press the FM•AM (17) button to switch on the radio function. See the chapter ”Radio” for more information. Media Press the MEDIA (16) button to start a CD disc, MP3 disc, iPod, USB, Bluetooth AUDIO or AUX function (if available). See the chapter ”Media” for more information. Navigation Press the NAVI (7) button to start the Navigation menu. See the chapter ”Navigation” for more information.
Risk of damage to the touch screen Never use any sharp or hard material objects, such as pens or pencils, to operate the touch screen. Multi-function button To navigate through menu options, Turn the multi-function button (11) clockwise or anticlockwise. To activate the selected menu item, Press the multi-function button (11). The corresponding system function is then activated or a message or a submenu with additional options is shown.
Setting the volume Turn the multi-function button (13). The current setting is shown. When the system is switched on, the volume is set according to the last selected volume. Press the multi-function button (13) in order to switch off the volume on the device or to return to the original volume. If the volume is switched off then the symbol is shown on the screen. Note The volume is switched on again automatically as soon as you change audio source.
Selecting the settings The following example describes a method for changing the settings that are available in the different menus, either by using the menu options on the screen or the multi-function button (11). System settings The standard settings for the system can be changed via the SYSTEM SETUP menu. Press the SETUP (9) button and tap on System. With the touch screen: Tap on a menu item in order to change a setting.
Note If you select "Automatic" then the screen will automatically change according to the external light conditions. The dots under a setting indicate that there are more options available. Press on the dots to show the other options. With the multi-function button (11): Turn the multi-function button (11) clockwise or anticlockwise in order to select a menu item. Press the multi-function button (11) in order to change the setting.
Activating or deactivating the clicking sound If the Touch click option is activated then a clicking sound is heard each time you touch the screen. Activating or deactivating the system sounds If the System sounds option is activated then the following user or system actions will be indicated by a beep: Radio: When storing a radio station on a station button. CD player: When activating fast-forward/rewind forward or backward.
Radio settings See the chapter ”Radio”, subchapter ”Radio Data System (RDS)”, section ”Activating or deactivating RDS regional mode”. Truck attributes See the chapter ”Navigation”, subchapter ”Vehicle specifics”, section ”Activating or deactivating RDS regional mode”. Volume settings The volume of the voice commands can be changed during a guidance message using the multi-function button (13) or via the NAVIGATION SETUP menu.
Balance: Use this setting to adjust the volume balance between the left and righthand loudspeakers in the vehicle. With the multi-function button (11): Turn the multi-function button (11) clockwise or anticlockwise in order to select a menu item. Press the multi-function button (11) in order to activate the selected menu item. The selected menu item is highlighted. Turn the multi-function button (11) clockwise or anticlockwise in order to change the setting.
Setting the speed-dependent volume When the speed-dependent volume is activated the volume is automatically changed in order to compensate for road and wind noise that occurs when you drive. Press the SETUP (9) button and tap on Audio. Note Alternatively you can use the multi-function button (11) for setting if a main menu for audio is activated. You cannot select the Audio button in the SETUP menu if the volume on the device is switched off.
Note When the volume of the phone sound changes the ring signal volume will also change. Camera The device supports the display of a camera image, e.g. a rear view camera. The following formats are supported: PAL BG: PAL Conformity acc. Rec. ITU-R 624-4:1990 and ITU-R BT.1700 (2005) NTSC M: NTSC Conformity acc. SMPTE 170M-2004 Activating the camera Press the (15) button. If a camera is connected then the camera image is shown for a second.
Radio In the menus for the radio you can only use the touch screen to select or activate the menu items. Starting radio mode Switch on the system. Press the FM•AM (17) button. The radio is activated. The last played radio station will be played when the radio is switched on. Note If an RDS station is played then the station name and programme-related information are shown.
Selecting frequency ranges Press the FM•AM (17) button once or repeatedly in order to set the desired frequency range. The last played radio station in the selected frequency range is played. Note If a frequency range is changed from FM1 to FM2, to AM or vice versa then the current radio station will also be activated in the future. If the current radio station is saved by using one of the station buttons then the corresponding button number is shown on the screen.
Activating or deactivating RDS Regional Press the SETUP (9) button and then tap on RADIO SETUP The RADIO SETUP menu is shown. Set RDS Regional to "On" or "Off". RDS Regional is activated or deactivated. Traffic announcements (TA) Activating or deactivating TA Press the (17) button or the (16) button The Radio menu or the Media menu is shown. Tap on TA. When the button is green TA is activated. Tap on TA again to deactivate. The TA function is only available in FM radio mode.
Note If you have activated traffic announcements then the radio is on in the background even if the CD player or navigation is activated. If you have previously selected a radio station that does not broadcast any traffic announcements then the system will automatically tune to a radio station that does broadcast traffic announcements. The traffic announcements also follow if you have selected the AM frequency band before.
Manual tuning Using the multi-function button (11): Turn the multi-function button (11) in the ”Radio” menu clockwise or anticlockwise in order to change the reception frequency. Using the frequency screen: Tap on Tune. A frequency scale is shown. Perform one of the following steps in order to set the desired station manually. Tap on the frequency scale. Briefly press the Press the Turn the multi-function button (11) clockwise or anticlockwise. or or (1) button.
Select the FM station you want to play. Note The system’s twin tuner constantly updates the FM station list in the background. This ensures that the station list always contains the FM stations that are available in the local area during a long journey. The update takes time and so not all FM stations are immediately available if the reception area suddenly changes.
Storing a station Within each frequency range (AM, FM1 and FM2), you can store 6 radio stations using the station buttons. Select the desired frequency range. Set the desired station or select the station in the FM station list. Press one of the station buttons 1-6 (12) and hold it depressed until you hear a beep. The corresponding button number, e.g. P1, is shown beside the name of the frequency range in the top line of the menu (see screenshot below). The station currently playing will be saved.
Media Playing CDs General Information The system can play back audio CD discs and MP3/WMA CD discs. Risk of injury The internal CD player is a Class 1 laser product. It contains an invisible laser beam that may be potentially hazardous to humans. The CD player may only be used according to the enclosed instructions. Never open the cover panel of the Radio with Navigation. Never perform repairs yourself. Repairs and maintenance must only be performed by trained professionals.
Self-recorded CD-R discs and CD-RW discs are more susceptible to mishandling than pre-recorded CD discs. Correct handling must be ensured, in particular of self-recorded CD-R discs and CD-RW discs. Note Self-recorded CD-R discs and CD-RW discs may not play back properly or at all. On CD discs with mixed content (combinations of audio and data e.g. MP3) only the audio tracks are played back. Avoid leaving fingerprints when you change the CD disc.
Playing CDs Risks for the device Never attempt to insert a CD disc into the CD drive if there is already another CD disc in the drive. This may damage the CD drive or the CD disc. If there is a CD disc in the CD drive then you can select CD mode by pressing the MEDIA (16) button, you may have to press several times. Scania disclaims any liability for damage to the CD drive or CD disc that results from a further CD disc being inserted into the drive.
Pausing playback (Pause) To pause the playback of a loaded CD disc, turn off the volume on the device by pressing the left-hand multi-function button (13). To continue the CD playback; press the left-hand multi-function button (13) again. Selecting a track During the playback of an audio CD disc Tap on Browse in order to show a list of all the tracks on the CD disc. The track that is currently being played back is highlighted. Select the desired track.
Random playback During the playback of an audio CD disc: If the mix mode is activated then all the tracks on an audio CD disc are played in random order. Tap on Mix to activate or deactivate the mix mode. If the mix mode is activated then the ”Mix” symbol is shown on the screen. During the playback of an MP3 CD disc: If there is an MP3 CD disc in the drive then all of the tracks in the currently selected folder, or all of the tracks on the CD disc, are played in random order.
Note If you do not remove the disc when it is ejected then it will be automatically drawn into the slot (2) again after a few seconds. USB port General Information USB port location is described in the documentation for the vehicle. Note Make sure you always keep the USB port clean and dry. You can connect an MP3 player, a USB device, an SD card (via USB connection/adapter) or an iPod to the USB port.
It is possible that MP3 and WMA files written in formats that are not listed in this section will not be played back correctly. In addition, it is possible that their file and folder names are not shown. The following limitations apply to data stored on external devices connected to the USB port: Maximum number of folders/playlists: 5000 Maximum number of files/songs: 15000 Maximum number of files/songs per folder/playlist: 6000 A hierarchy of at least 8 folders deep is supported.
Bluetooth audio connection General Information Note You can only connect Bluetooth devices to your system if you have installed SCANIA handsfree equipment in the vehicle. You can connect Bluetooth-activated audio sources that support the Bluetooth A2DP music protocol to the system. Important information The system only connects Bluetooth devices that support A2DP (Advanced Audio Distribution Profile) version 1.2. The Bluetooth device must support AVRCP (Audio Video Remote Control Profile) version 1.
Follow the instructions on the Bluetooth device for pairing. If necessary, use the PIN code ”1234”. A message is shown when pairing is complete. Note If another Bluetooth device was connected to the system earlier then the device will now be disconnected. If the Bluetooth connection fails then you must repeat the pairing or read the manual for the Bluetooth device.
Note The method required for activating the Bluetooth music mode depends on the Bluetooth device’s functionality. AUX connection General Information You can connect external audio sources to the AUX input. AUX input location is described in the documentation for the vehicle. Note Not all vehicles have an AUX connection. Make sure you always keep the AUX input clean and dry. It is possible, for example, to connect a portable CD player with a 3.5 mm jack to the AUX input.
Telephone: Note You can only connect Bluetooth mobile phones to your system if you have installed SCANIA handsfree equipment in the vehicle. You can use your mobile phone via the system. The mobile phone must then be connected via Bluetooth to the system. When the Bluetooth connection has been established between the system and the phone you can talk on the phone via the microphone and loudspeakers in the vehicle. Note It is possible that some phone functions are not supported.
Bluetooth profiles The Bluetooth profiles HFP 1.1, PBAP, GAP, SDP and SPP are used in accordance with the Bluetooth standard 2.0. The system’s Bluetooth phone port is certified by the Bluetooth Special Interest Group (SIG). More information on specifications can be found on the Internet via the link http://www.bluetooth.com. Bluetooth connection Bluetooth is a radio standard for wireless connection of devices such as a mobile phone or an MP3 player.
Activate the Bluetooth function on the Bluetooth device (if it is not already activated: see the manual for the Bluetooth device). A confirmation is shown when the Bluetooth connection has been correctly implemented. Note If another Bluetooth device was connected to the system earlier then the device will now be disconnected. It is only possible to connect one Bluetooth device at a time to the system regardless of whether it is an audio streaming device, a mobile phone or a combination device (e.g.
Emergency calls Note Sometimes it is not possible to make an emergency call due to poor signal strength. For this reason you must not rely on the mobile phone if you have to make a critical call (e.g. a medical emergency). Many networks require that there must be a correctly inserted and valid SIM card in the mobile phone. In some circumstances it is not possible to make emergency calls via the mobile network.
Controls on the front panel for phone use Multi-function button (13) for adjusting the volume. The (14) button shows the phone menu. Handsfree mode Make sure that the Bluetooth function in the system is activated. Make sure that the Bluetooth function on the mobile phone is activated (to activate Bluetooth, see the manual for the phone). The mobile phone must be set to ”visible” (see the manual for the phone).
Making a call using the phonebook Contacts are saved in the phonebook with name and phone number. To make a call using the phonebook: Tap in the PHONE menu on Phonebk. The PHONEBOOK menu is shown. Note If the phonebook contains many entries, see the chapter ”Searching for a phone number”. Scroll through the list of phonebook entries and select the desired contact. The phone number for the selected contact is shown. To make a call, select the desired phone number.
Note Tap once or repeatedly on Delete in order to delete an incorrect entry. The list with the names that start with the first entered letters is shown. Tap on OK. A menu with all the phone numbers saved for the selected contact is shown. Note If you are looking for a phonebook entry that has been saved using only the phone number, or which contains special characters, then tap 123ÄÖ in order to change the keyboard.
Entering the phone number Tap in the PHONE menu on the button. The following screen is shown: To make a call, enter the desired phone number. Tap on Delete to delete an incorrect entry. Tap on OK. The phone number entered is dialled. Accessing the voice mailbox Enter the phone number of the connected mobile phone manually. Note See the chapter ”Entering the phone number”. Select the entry for the voice mailbox with the phone number of the connected mobile phone.
A second incoming call If you receive another phone call during an active call then a message with the phone number or name is shown (if the function is available in the phone). Note If your service provider provides the service then you may hear a beep to indicate that a call is waiting. To take the second call and end the first, Tap on the green button on the screen. To reject the second call and continue the first, Tap on the red button on the screen.
Setting the phonebook Once you have paired a mobile phone with the system, the phonebook with phone numbers and names (if available) in your mobile phone will be automatically downloaded into the system. The download may take several minutes depending on the number of phone numbers in your phonebook and which phone is connected. As long as the mobile phone is paired with the device then the telephone numbers are saved permanently in the system.
Show the phonebook on the SIM card or in the phone memory There are 2 different phonebooks in mobile phones - one on the SIM card and the other directly in the mobile phone. Both phonebooks in the connected mobile phone will be downloaded into the system. You can show the entries in both downloaded phonebooks (if available). Press the SETUP (9) button. Tap on Bluetooth. Tap on Telephone settings Tap on Phonebook once or repeatedly until you see the desired option, Phone, SIM or Both.
Navigation Traffic safety The device has been produced for use in trucks. During route calculation the navigation system takes into account e.g. height limits or maximum permissible road load required to guide the truck. However, this assumes that the corresponding information is stored in the navigation data. Be constantly aware of all restrictions in street traffic while driving, even if you are following the driving recommendations from the device.
is determined by vehicle speed, a gyro sensor registers the turning manoeuvres, and the position is determined by the GPS satellites (Global Positioning System). By comparing the sensor signals with the digital maps on the SD card, it is possible to determine the position with an accuracy of approx. 10 metres. The system even works with poor GPS reception, but then the position calculations are not as accurate. When the address of the destination or waypoint (e.g. next petrol station, hotel, etc.
full trailer, or with and without dangerous goods in the load) in up to 4 different profiles. Press the SETUP (9) button. Tap on Truck. Tap repeatedly on Profile if required, in order to select or modify a profile.
Saving the current position You can save the address/GPS coordinates for the current position with any name in the address book. Select a menu item in order to show a menu with a keyboard for entering the name. Enter a name for the current position. Note To show a keyboard for entering numbers and special characters, tap on More. To delete characters, tap on Delete. Tap on OK to save the address/GPS coordinates. The position name is inserted in the address book.
The Navigation menu provides all system functions for entering the destination as well as navigation. Select destination Tap on Destination. The following screen is shown: Note When the navigation system is active, you can add a waypoint (an intermediate destination) on the route to the current destination. You can also replace set destination data with new data.
Entering the address Tap on Enter address. The ENTER ADDRESS menu is shown. Enter the name of the desired city by tapping on one letter key at a time. Note The system automatically locks all the letters that cannot occur in the name of the city. If you need to enter a letter or a special character, tap once or repeatedly on Continue until you see the desired letter or desired special character.
Enter the desired street number. Note If you enter a street number that does not exist then the system gives you the following options: No number: No account is taken of the street number. The destination is set to the middle of the street that forms the destination. Select number from list: A list of available street numbers is shown. Select the desired option. Note If you select the No number option then the CONFIRM DESTINATION menu is shown.
Select route outline Press the NAVI (7) button and then tap on route outline. The following route list is shown: The route list shows all the streets on the calculated route outline: the list starts with the current position.
Changing the mode for the time display Press the MAP (6) button. The following screen is shown: Tap on the time information to the left of the screen, above Menu. Previous destinations Use this option to show a list of destinations that have been previously used for navigation. You can select an entry in this list and set it as a new destination. Selecting a previous destination Press the NAVI (7) button. Tap on Previous destination. The list of previously used navigation destinations is shown.
Select previous destination. The following menu options are available: Save: Tap on this option to save the displayed information about the destination in the address book. Del. all: Tap on this option to delete the whole list of previous destinations. Delete: Tap on this option to delete the destination shown from the list of previous destinations. OK: Use this option to enter the address shown or GPS coordinates shown as a new destination and to start the navigation to this destination.
Stopping the guidance Use this option to interrupt the current guidance. If an additional waypoint is currently set for navigation then you may receive the following messages: The navigation to both the waypoint and final destination is interrupted. The navigation to the waypoint is interrupted. Note If you only want to stop navigating to the intermediate destination then the navigation system will automatically recalculate the route outline in order to take you to the final destination.
The following menu options are available: Avoid road ahead: With this option you can exclude the first selected streets on the route by defining the length of the section to be omitted starting from the vehicle's current position. To exclude selected streets, tap on the the settings "Avoid Dist.". / screen buttons in order to change Tap on Recalculate Route. The route outline is recalculated.
Route outline Use this option to show a list of all traffic events on the current stretch of road. Select an item in the list in order to obtain detailed information about a specific traffic event. All Use this option to show all traffic events on the current stretch of road. In addition, you can show all traffic events near the vehicle’s current position. SETUP button and NAVIGATION menu Press the SETUP (9) button to open the SETUP menu. Tap on Navigation. The NAVIGATION SETUP menu is shown.
Show speed signs: If you set this option then a valid speed limit is shown for the section of road you are currently driving on. Traffic safety The system only shows the general speed. Always take into account the speed limits that apply for your vehicle. Note Speed limits can only be shown if they are included in the navigation data. Always observe existing traffic signs and always adjust your speed to the actual speed limit.
Tap on POI Warning Distance: A list of distances that can be selected to warn of POIs is shown. Select the required warning for the POI. Download User POI Now:: This option is only available if there is a USB device connected containing user-defined POIs. Note See the chapter ”User-defined points of interest (POI)” and ”Downloading user-defined POIs” for more information. Remove User POIs From System: This option is only available if user-defined POIs have been downloaded into the system.
Information on the map Press the MAP (6) button in order to see the map at the current position. If the navigation system is activated then the following information is shown: A. Selected audio source B. Details about the current playback (e.g. current frequency in radio mode or track on a CD disc). C. Status of the road on which your vehicle is currently driving: • There is truck-specific information available about the road: the road is suitable for the currently set vehicle specifics.
Note The final destination is marked with a black chequered flag. An intermediate destination is marked with a red chequered flag. Traffic events, e.g. traffic congestion, are shown with the corresponding symbols, and a section of road marked in black on the map. Traffic events will only be shown on the map if the dynamic navigation is activated. H. Display of speed limits and truck-specific restrictions for the road that the vehicle is currently driving on (e.g.
Note Tap on Info to repeat the last voice command. Touch Info for a few seconds in order to activate or deactivate the voice guidance. User-defined points of interest (POI) In addition to the points of interest (POIs) that are stored on the SD card, you can define your own POIs. The POIs you create can be downloaded into the system. You can create the following: Waypoints Warnings for POIs Own POIs: The POIs can be used as destinations for the navigation system.
Enter the coordinates for longitude and latitude in the text file separated by a comma. Enter any name for the waypoint. Note The name must be in quotation marks and separated from the GPS coordinates by a comma. Enter additional POIs on a new line in the text file. Save the text file (e.g. on the hard drive of your PC or laptop). Warnings for POIs You can create warning messages to be displayed before you reach a certain waypoint (e.g. sharp bends in the road).
Enter any name for the waypoint. Note The name must be in quotation marks and separated from the GPS coordinates by a comma. Enter additional POIs on a new line in the text file. Save the text file (e.g. on the hard drive of your PC or laptop). Saving text files on a USB device Create a folder named "myPOIs" in the root directory of a USB drive (e.g. "L:\myPOIs" where "L:\" is the root directory on the USB device). Save the text file with the waypoints in the ”myPOIs” folder.
Maps The map data needed for navigation are stored on an SD card that is supplied with the vehicle. Map data are also sold separately and are available for different regions: Europe, South America and Australia/New Zealand. Contact your dealer for more information. SD cards with maps The SD card reader in the system can only read SD cards supplied specifically for use with a navigation system for vehicles. The SD card reader cannot read any other SD cards.
Replacing an SD card with maps Open the cover for the SD card slot (8) using a small paper clip. Risks for the device Never use force to open the cover for the SD card slot. Press on the inserted SD card in order to release it. Carefully pull the SD card out of the slot. Carefully insert the new SD card with the label side up and cut-outs to the right of the SD card slot (8). Close the cover for the SD card slot. You have now replaced the SD card.
Steering wheel buttons You can control the device using the buttons on the steering wheel. 1 and 3: Short press:: Switch to the previous or next radio station (among the saved stations) or audio track (on CD disc, USB or Bluetooth device) Long press: Search among available radio stations or fastforward/rewind the track forward or backward.
PIN list The device supports line-out (D10, D11 and D12) with 2 V_eff output. The output is configured as stereo, with a linear frequency response. Terminal A1 A2 A3 A4 A5 A6 A7 A8 B9 B10 B11 EU Fakra RF + (Woofer) RF + (Tweeter) LF + (Tweeter) LF + (Woofer) RF - (Woofer) RF - (Tweeter) LF - (Tweeter) LF - (Woofer) CAN H CAN L 12V switched B12 B13 GND (Kl.31) 12V switched B14 B15 B16 C1 C2 C3 C4 C5 C6 C7 C8 C9 C10 C11 C12 D1 D2 D3 D4 D5 D6 D7 D8 D9 D10 D11 D12 Ignition (Kl15) Battery (Kl.
Frequently asked questions Problem Reason Action The device has not been switched off with the starter key but manually with the left-hand multifunction button (13). Switch on the device with the lefthand multi-function button (13). Always switch off the device with the starter key. If you turn the starter key to radio position (or ignition position) the device will then be switched on the next time.
Problem Reason Action Apparatus temperature too high; e.g. if the sun is shining and makes it very hot in the cab. The message ”No int. CD” is shown. When the device is within the possible operating temperature the CD drive is reactivated. If playback of a self-burned CD disc stops or if the sound skips then it may be due to the following reasons: Follow the recommendations in the chapter ”Preparing an MP3 CD” if you want to burn your own CD. The writable CD disc is not accepted.
Problem Reason Action Interference occurs in the GPS reception. The device receives signals from the GPS (Global Positioning System) satellite system for precise positioning. If it receives insufficient GPS signals then it is not possible to make a precise calculation from the vehicle’s position to the destination. (See also the point ”No GPS reception”.) Use a map to find your way or continue driving along the current route if possible.
Problem Reason No GPS reception Interference in GPS reception due to Reflection and shielding (by means of e.g. tall buildings, traffic tunnels, mountains, dense foliage) Thunderstorm and/or heavy rainfall GPS satellites shut down due maintenance or repairs Action The signal strength of the GPS can be read in the position display. (See the ”More navigation functions,” section ”Position display ”.
Technical Specifications Power Supply Operating voltage 12 W (10.8 V - 15.6 V) Power consumption Use 1.3 A Max approx. 4.0 A Standby < 3 mA Fuse Current rating 10 A Output Nominal output 4 x 20 watt / ≥ 4 ohm Output level (UB = 14.4 V): ≥ 8.0 V / K = 2.5 % Frequency range VHF (FM) 87.
Frequency response (±3 dB) Tuner 35–16 000 Hz MP3/CD 20–20 000 Hz Temperature range Operating temperature -20 ℃ to +70 ℃ Storage temperature -40 ℃ to +85 ℃ Dimensions and weight 2-DIN cover (WxDxH) 190 x 159 x 110 mm Cap (WxH): 192.3 x 123.9 mm Weight 2.7 kg Subject to change.
Glossary AM Amplitude modulation. Also: MV (medium wave). Electromagnetic waves in the frequency range between 531 and 1602 kHz. Waveband for transmitting radio. Dynamic route guidance is made possible with TMC. The radio system receives TMC traffic messages and checks the traffic situation.
RDS services include: AF (Alternative Frequencies) EON (Enhanced Other Networks) REG (Regional) RT (Radio Text) TA (Traffic Announcement) TP (Traffic Programme) REG Regional (RDS-Service). Some radio stations divide their programming into regional programmes with different content at certain times. The REG function prevents the radio from automatically switching to a set radio station's alternative frequencies with different programme content. SD (Secure Digital) Memory Card.