User Manual Version 8.15.5 This publication contains proprietary information of the Card Scanning Solution Company, provided for customer use only. No other use is authorized without the express written permission of Card Scanning Solution.
Disclaimer Disclaimer Warranty Card Scanning Solutions provides this publication “as is” without warranty of any kind, either express or implied, including, but not limited to, the implied warranties of merchantability or suitability for any particular purpose. Card Scanning Solutions reserves the right to revise this publication, and to make changes in the content hereof from time to time without notification.
Table of Content 3 Table of Content DISCLAIMER................................................................................................................2 Warranty ................................................................................................................2 Notice to User ........................................................................................................2 Publication...............................................................................................
Table of Content 4 READING PASSPORTS (*SCANSHELLOCR ONLY) .....................................................33 5. APPENDIX A – SUPPORTED STATES FOR DETECTION ......................35 6. APPENDIX B – SUPPORTED SCANNERS ..................................................38 7. APPENDIX C - MAINTAINING THE SCANNER .......................................39 CALIBRATING THE SCANNER .....................................................................................39 CLEANING THE SCANNER ................
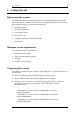
Getting Started 1. Getting Started Before using the scanner The application has been carefully packaged to avoid damage during transportation. Before operating the scanner, please remove the packaging materials.
Getting Started :\Scanner Driver\MagShell900 (for magnetic reader model MagShel900) After you specify the driver, click Next until the installation is complete. ScanShell User Manual version 8.15.
Installation Installation To install the software on the computer, do the following: 1. Close all programs. 2. Insert the CD into the CD ROM drive. 3. Wait until the install program begins and follow the instructions on the screen. 4. If the install program does not automatically start, click the My Computer icon on the desktop and then select the CD ROM drive. 5. Double click on the Setup program. Once the Setup program starts, select the application name from the left list and click on the Setup icon.
Introduction 2. Introduction Important! This manual refers to two versions of ScanShell: ScanShell and ScanShellOCR. Please note that if you purchased ScanShell only, some of ScanShellOCR advanced features (namely text recognition, extraction and manipulation) are not available in your version. Whenever this manual refers to options that are only included in ScanShellOCR, they will be marked as “*OCR Only”. ScanShell scans medical insurance cards, and saves their image in a variety of ways.
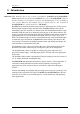
Program Interface The Program Interface The following figure shows the application main screen: Note: Some features are only available in ScanShellOCR – see details below, and the first paragraph in chapter 2 - Introduction. Figure 1: Main Screen The main screen controls • • Always on Top: Toggles the application window between normal mode and always-on-top mode. Help: Shows this document. • Print Preview: Shows the scanned image and the data before printing.
Program Interface • Live Update: Updates your software with the most recent version, using the Internet. • Category: Toggles between Bar Code / Driver License / Passport, and sets the source for data detection accordingly. Driver’s license country: Sets the country and state to be used for the OCR recognition template. In the case of the US you can select ‘Auto Detect’ (top of the list), or select a state manually from the state list. • • • Rotate Image: Rotates the image 90 degrees clockwise.
Program Interface • Open OCR View (*ScanShellOCR Only): Opens extracted text view. • Open Configuration Dialog: Opens the configuration dialog screen in which all the application behavior can be set. • Exit / End of Scan: Used to close the application or to save the current image (used in automatic save mode only). • Background Save Progress: Shows the background saving progress (used in automatic save mode only).
Program Configuration 3. Configuring The Program Before you start scanning, it would be a good idea to configure the program’s scanning and file saving parameters. Click on the ‘Open configuration screen’ button in the main screen (see figure 1 page 9). The following configuration panel will be displayed: Figure 2: Scanner configuration panel The configuration panel first tab is the Automation tab. Here you can set various parameters of scanning and saving data and images.
Program Configuration – Data Source Data Source The Data Source section determines the data input source: Scanners, magnetic strip or image file. Checking the ‘Scanner’ option does the following: • Sets the scanner as the input image device. • Sets the Scan button icon to a scanner image in the main screen. • Enables the lower checkbox, titled ‘Paper auto detection’.
Program Configuration – Saving Options Saving options Once an image is imported, it can be saved to a file or to the clipboard. Images can be saved in two ways: Manual save: The image is saved to the hard disk or to the clipboard as soon as the user clicks on the Save button or immediately after the scanning, depending on user settings. Automatic save: The image is saved to the hard disk in a predefined directory.
Program Configuration – File Naming File Naming Clicking on the ‘File naming’ button will take you to the following configuration screen: Figure 3: File naming configuration This dialog sets the naming properties of the automatically saved image files. The file destination folder can be typed into the ‘File Path’, or selected by clicking the File Path button. In the window that opens you can navigate to the directory in which you want to save the files.
Program Configuration – File Naming 16 Save immediately after scan - Checking the checkbox titled ‘Save immediately after scan’ (See Figure 2 page 12), will save the image and data immediately after the scan is done. If the ‘Save immediately after scan’ checkbox is unchecked, the saving will occur on the next scan job (in the automatic saving option) or when the user clicks on the Save button (in the manual saving option). ScanShell User Manual version 8.15.
Program Configuration – Data Extraction Tab Data extraction tab (*ScanShellOCR Only) Figure 4: Scanner configuration panel - License data processing tab • Extract full image: extracts the complete ID card image and saves it as a separate file. • Extract face image: Isolates the face image rectangle from the ID card image and saves it as a separate file. • Extract signature image to file: Isolates the signature image rectangle from the ID card image and saves it as a separate file.
Program Configuration – Data Extraction Tab Extract face image to file The face image rectangle is extracted from the ID image and saved to a file. The face image is saved under the ID image name with the .Face extension (e.g. if the card image name is c:/images/ID-1.bmp, the face image is saved as c:/images/ID-1Face.bmp). To find out more about file naming methods, see the Image manual save and Image auto-save sections on page 14.
Program Configuration – Data Extraction Tab Notes: 1. If a specific field is not supported in the current state, its corresponding value is empty. 2. ID number and License number have the same value in the US. 3. ID image file name holds the full path and name of the ID card image file. 4. First name, Middle name, Last name, Name suffix fields are generated by parsing the Name field and not directly from the cards. 5. Text lines 1-3 are extracted only for Chile driver licenses.
Program Configuration – Medic Text Export Tab 20 Medic text export tab (*ScanShellOCR Only) Figure 5: Scanner configuration panel – Image tab By checking the first checkbox, text extracted from the scanned card will be saved to a text file, which will have the same name as the image file (ending with the .txt extension), and which will be placed in the directory where the image files are saved. ScanShell User Manual version 8.15.
Program Configuration – Image Tab Image tab The following scanned image parameters can be controlled from the Image tab: • Document size: The scanned area size in the document, Passport or Driver License. • Color scheme: The number of colors used by the image. • Resolution: Number of dots-per-inch used for scanning the image (dpi). • JPG Quality: Set the image compression factor when saving the image in JPG format.
Program Configuration – Image Tab Height Document size: The document size determines the size of the scanned area.
Program Configuration – Image Tab File size = 2 number of bits Accordingly, if a certain document scanned in black and white format produces a file of 50KB, the same document produces an image file of 400KB when scanned in 256 colors (or gray scale), and 1.2 MB for true color. Resolution: The resolution parameter defines how vividly the image will be displayed. In general, an image that is scanned in higher resolution shows more details of the original document image.
Program Configuration – Print Tab Printing – Print tab Image Print Size Surprisingly, the printed image size depends very much on the graphic program used. In some low-end graphic applications (such as Microsoft Paint that comes with Windows), the printed image size depends on the image resolution. The more dpi – the larger the image size that will be printed.
Program Configuration – Print Tab 25 Print data from driver’s license card: Places the data from the card under the card image. The printed image and data fields can be selected using the appropriate check boxes. ScanShell User Manual version 8.15.
Program Configuration - Live Update Tab Live Update Live Update checks for updates whenever you are connected to the Internet, and updates your program automatically with the most recent version of your program available. Note: If you don’t configure your software for automatic Live Update, you can still update it manually using the Live Update button in the main screen. To use the automatic Live Update feature, go to the Live Update tab in the configuration screen: Figure 9: Live Update tab 1.
Program Configuration - Live Update Tab b. At preset times; Use the combo boxes to specify the updating frequency. 3. Click on the ‘Set User Data’ button. Figure 10: Live Update user details 4. Fill in your details. Note: ‘Email’ is obligatory and must be filled in. 5. Click ‘OK’. ScanShell User Manual version 8.15.
Program Operation 4. Program Operation Overview ScanShell operation can be divided into six main operation categories: 1. Scanning and Image import 2. Saving and exporting data and images 3. Magnetic Strip reading (*ScanShellOCR Only) 4. Extracted text manipulation and export (*ScanShellOCR Only) 5. ID card Verification (*ScanShellOCR Only)? 6.
Program Operation – Scanning a New Document 29 Scanning a new document To scan a new document, just feed the driver’s license into the scanner. If the scanner is set to automatic scan mode, the scanner will start scanning the card automatically. In manual scan mode, the scanner starts scanning when you click on the Scan button in the main screen. See Paper auto detection page 13. Once the scan is complete, the program will process the image.
Program Operation – ID Data ID Data (*ScanShellOCR Only) After scanning and processing the ID card, you can review the acquired text information by opening the ID Data window. To open the ID Data window, press the button titled ‘OCR’ on the main screen. The ID Data window shows the data retrieved either from the scanned image by OCR (Optical Character Recognition), or from the scanned image Barcode, depending on the option selected. Irrelevant fields are disabled (depending the state).
Program Operation – ID Card Authentication 31 ID Card authentication (*ScanShellOCR Only) Use this option to check if the card you scan is genuine. ScanShell will scan the data on the card using OCR, and then compare it to data from a second source on the card, either the barcode or the magnetic strip (if available). If the data from the two sources match, the card is genuine. Else, the card is either faked, or one of the data sources on the card is corrupted. To authenticate a card: 1.
Program Operation – ID Card Authentication 7. ScanShell will scan the card, and than prompt you to scan the card a second time. Insert the card again in the scanner/reader and repeat the steps above. 8. If the data from the two sources on the card matched, the icon on the authentication button will be green. If it did not match, the icon will be red, which means the card is not in order, (either faked, or one of the data sources on the card is corrupted. 9. Press OK to save the record to database.
Program Operation – Reading Passports 33 Reading Passports (*ScanShellOCR Only) Passports scanning can only be done with the ScanShell 1000 scanner. This scanner was designed specifically for reading / scanning of passports; however, it can be used also for ID / Driver License reading / scanning. With the ScanShell software the ScanShell 1000 has full functionality for Passport and ID / Driver Licenses.
Program Operation – Reading Passports Figure 13: The placing of a passport ScanShell User Manual version 8.15.
Appendix A – Supported States and Countries 35 5. Appendix A – Supported States for Detection The following table shows the countries and states supported by ScanShell. This list will be updated in each new version release of ScanShell. Country: USA State Name State id Signature Extraction Support Alabama 0 √ Alaska 1 √ Arizona 2 √ Arkansas 3 √ California 4 √ Colorado 5 √ Connecticut 6 √ Delaware 7 √ Washington D.C.
Appendix A – Supported States and Countries New Hampshire 28 √ New Jersey 29 New Mexico 30 √ New York 31 √ North Carolina 32 √ North Dakota 33 √ Ohio 34 √ Oklahoma 35 √ Oregon 36 No Signature on card Pennsylvania 37 √ Rhode Island 38 √ South Carolina 39 √ South Dakota 40 √ Tennessee 41 √ Texas 42 √ Utah 43 √ Vermont 44 √ Virginia 45 Washington 46 √ West Virginia 47 √ Wisconsin 48 √ Wyoming 49 √ Hawaii 54 √ Country Name: Australia State
Appendix A – Supported States and Countries Country Name: Malaysia State Name Malaysia State id Signature Extraction Support 55 Country Name: Canada State Name State id Signature Extraction Support Ontario 70 √ Alberta 71 √ Country Name: Chile State Name Chile State id 80 Signature Extraction Support √ ScanShell User Manual version 8.15.
Appendix B – Supported Scanners 6. Appendix B – Supported Scanners Before using ScanShell, the scanner driver must be installed. ScanShell can work with the following scanner types: • Scanshell 800: Driver for the scanner can be found at http://www.id-scan.com/FTP/Scanner_Drivers/scanshell800 • ScanShell 900: Driver for the scanner can be found at http://www.id-scan.com/FTP/Scanner_Drivers/MagShell900 • ScanShell 1000: Driver for the scanner can be found at http://www.id-scan.
Appendix C – Maintaining the Scanner 39 7. Appendix C - Maintaining the scanner Calibrating the scanner With time, the scanner colors detection tends to change to incorrect values. This phenomenon affects the text detection accuracy as well as the resulted image quality. To reset the scanner to the proper colors, the scanner needs to be calibrated.
Appendix D – Minimized Interface & Program Line Switches 40 8. Appendix D - Minimized Interface Mode & CommandLine Switches The ScanShell application behavior can be modified to best suit your needs. This is done by running the program while using command lines switches. ScanShell offers the following switches: MI – Runs the application with minimum amount of control buttons on the main screen and eliminate access to the configuration dialog screens.
Appendix D – Minimized Interface & Program Line Switches "C:\Program Files\Card Scanning Solutions\…\ScanShellOCR.exe" /MI This alters the program main screen as follows: Calibrate Scanner Clean Scanner Help Select State Select Country Scanner connection status Figure 14: Main screen in minimized mode Main screen function controls: • Help: Opens this help document. • Calibrate Scanner: Activates the scanner’s Calibration Wizard. • Clean: Activates the scanner Cleaning Wizard.