
Instruction manual


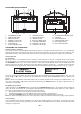


FEATURES AND CONTROLS
8. SLEEP BUTTON
9. SELECT BUTTON
10. INFO BUTTON
11. SCROLL ▲ BUTTON
12. VOLUME CONTROL
13. PRESET 3 BUTTON
14. PRESET 4 BUTTON
1. STANDBY BUTTON
2. DAB/FM BUTTON
3. MENU BUTTON
4. PRESET 1 BUTTON
5. PRESET 2 BUTTON
6. LCD DISPLAY
7. SCROLL ▼ BUTTON
15. ALARM/SNOOZE BUTTON
16. HANDLE
17. ROD ANTENNA
18. HEADPHONE JACK
19. BATTERY DOOR
20. AC CORD SOCKET
1
2
3
4
5
6
7
8
9
10
11
12
13
14
15
16
17 18
19 20
LI STE NIN G TO YOUR R ADI O
Hints for better reception
This radio carries a single DAB/FM telescopic antenna, to obtain the best performance, you should fully
extend the antenna and adjust its position as well as the direction until you find the best reception. For
ideal DAB reception, always maintain the antenna in an upright vertical position is highly recommended.
Getting started
AC operation
When the radio is connected to the AC power for the first time, it will be in standby mode. The display
backlight will be on for a few seconds, the display will first show the greetings and finally the clock. Press
the STANDBY button once to turn the radio on, it will then automatically enter into the DAB mode and
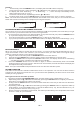
perform auto scan function. During the scan the display will show “Scanning …” together with a slide bar
that indicates the progress of the scan and the amount of stations that have been found so far. (F. 1) (F. 2)
Once the scan has finished, the radio will select the first alphanumerically found station. You can now
press the ▲ or ▼ button to explore the found stations and then press the SELECT button to select your
station.
Note: If there is no stations found after auto scan, the radio will then enter into the Tune Select Menu, you
can now press the ▲ / ▼ buttons followed by pressing the SELECT button to select “Manual tune” or
“Autoscan” for stations.
DC (Battery) operation
In DC operation, the STANDBY button will work as a POWER ON/OFF button. The display will be totally off
when the radio is powered off. The display backlight will be dimmed after radio power on, and it will be
turned on to full brightness for 5 seconds on every key press.
1. Ensure the AC power cord is disconnected from the radio.
2. Installed the batteries (4X1.5V UM2 battery) into the battery compartment.
3. Press the STANDBY button on the front panel to toggle the radio between on and off.
Note: To obtain the best performance in DC operation, the use of alkaline batteries is highly recommended.
Clock setting
The clock will only set and be updated if you can receive DAB signals in your location. In order for the clock
to synchronise to the current local time you must leave it one DAB station for a short period. Manual clock
setting is not required.
UK-2
F1
F2