IG300BT C1/C2 Area image Barcode Scanner Quick Start Guide 1
Conents 1. Introduction ............................... 4 1.1 2. Illustration ........................................ 4 Installation ................................. 5 2.1 Unpacking ........................................ 5 2.2 Mounting ........................................... 5 3. Set up Bluetooth Communication ................................... 8 3.1 Pairing............................................... 8 3.2 Set up Master Mode Communication ........................................ 8 3.
5.6 Firmware Version ........................... 19 5.7 Set Cradle Interface Barcode ........ 20 5.8 Cradle RS232 Mode Parameter ............................................... 20 5.8.1 Cradle Baud Rate ...................... 20 5.8.2 Cradle Data Bits .......................... 21 5.8.3 Cradle Stop bits .......................... 21 5.8.4 Cradle Parity................................ 21 5.8 Decoding Selection ........................ 22 5.8.1 Symbologies Selection ............... 22 5.
1. Introduction Thank you for purchasing this brand-new designed 2D imager hand held barcode scanner. This is a cutting-edge gun-type Area Imaging barcode scanner which is designed specifically for retailer, entertainment coupons, medical environment, shipping industry and etc. That adds on more user friendly functions and has replaceable cable that makes it more easily to be operated by the customers.
2. Installation 2.1 Unpacking 1) Take device and its accessories out of the box. 2) Remove the packing material. 3) Check the standard shipment packing list to make sure you have received all of the items ordered. Wireless 2D Imager Scanner Bluetooth Cradle or Charger (optional) Power Adaptor (if applied) Communication Cable Skip resistant pad Iron panel of cradle and screw Quick Start Guide 4) Visually inspect the device and accessories for any evidence of physical damage.
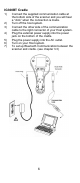
IG300BT Cradle 1) 2) 3) 4) 5) 6) 7) Connect the supplied communication cable at the bottom side of the scanner and you will hear a “click” when the connection is made. Turn off the host system. Connect the other side of the communication cable to the right connector of your Host system. Plug the external power supply into the power jack on the bottom of the cradle. Plug the power supply into the AC outlet. Turn on your Host system. To set up Bluetooth Communication between the scanner and cradle.
Cable Installation Connect cable and adaptor to Cradle. The other end of cable will be connected with Host device. Lock the iron panel of Cradle by screwdriver.
3. Set up Bluetooth Communication Before the operation, Bluetooth Communication must be set up between the scanner and cradle. 3.1 Pairing Each scanner has to be paired to a cradle by scanning the unique Bluetooth MAC address code located on the bottom of cradle. The pairing between scanner and cradle is one to one that is one scanner can be paired to a cradle only. 3.2 Set up Master Mode Communication Please follow the steps to set up the communication between the scanner and cradle.
ATTENTION: It is important to know that the scanner will only communicate with the cradle with the unique Bluetooth MAC address. Other scanner can not pair with that cradle until the original connection is broken. If the cradle pairs with another scanner, the cradle will disconnect with the first scanner and then re-connect with another scanner. 3.3 Set up Slave Mode Communication Please follow the below steps to set up the communication between the scanner and Bluetooth application device.
3.4.1 Set Scanner Pin Code Mode Set Default Security Code Set Security Code ON 3.4.2 Set Pin Code Character (PINCODE max. 6 digits/0-9and A-Z ASCII CODE) Set Default Security Code Barcode 1) Begin to Set PINCODE 2) Go to the ASCII Tables in Appendixes; scan 6 labels that represent the PINCODE.
3.5 Bluetooth Cradle Setup 3.5.1 Set Cradle Security Mode Set Default Security Code Barcode Set Security ON 3.5.2 Set Cradle Pin Code (PINCODE max. 6 digits ,0-9,A-Z ASCII CODE ) Set Default Security Code Barcode 1) Begin to Set PINCODE 2) Go to the ASCII Tables in Appendixes; scan 6 labels that represent the PINCODE.
4. Configuring 4.1 Preface How to configure this device: The Barcode Programming Feature gives the possibility to change the scanner settings with use programming codes. 4.2 Changing Scanner Settings with Programming Codes You can setup your device by scanning all necessary programming codes for parameters that meet applications. After these scans, the device will save directly and permanently. To go back to the factory default settings, just scans the programming code factory default.
4.3 Changing Scanner Settings with Utility Tool Manufacturer has setup this scanner with the most common used programming codes, It could be possible that you need more advanced settings to use the scanner without any problems into your application. In this case you can setup your scanner by using the advanced Utility Tool. This tool can be used with the following operation systems: Windows98, Windows2000, Windows XP en Windows Vista. This Utility Tool can be delivered on request.
5. Operating Settings 5.1 Factory Default Set Scanner /Cradle factory default The scanner and cradle factory default settings are shown with bold < > in the following pages. Reset all configuration parameters to their factory default setting. After this reset you must select all required parameters that meet applications. 5.
Pulse A reading session begins when beam is activated and stays on until a period of inactivity lasting the time specified by the timeout. After the timeout, the scan engine turns off. Flashing Flashing mode allows power up the lighting and decoding are on (no need to activate the trigger line) and after a period of inactivity lasting the time specified by the trigger timeout, the scanner starts flashing, checking for a bar code to be read.
Toggle This mode allows lighting and decoding toggle when the trigger line is activated. First trigger activation = lighting and decoding on, second trigger activation = lighting and decoding off. Presentation This mode allows power up lighting and decoding are on. After a period of inactivity lasting the time specified by the trigger timeout, the lighting turns off or is dimmed. When a new bar code is presented the lighting and decoding restart and stay on until another period inactivity.
5.3 Imager Mode You can set the best reading performance depends on the environment, your used application and type of barcodes. Linear mode for decode 1D Barcodes. Area mode for decode 1D and 2D barcodes. Area mode allows you to set the position of the VEGA in any direction regardless of the orientation of the barcode, and perform a good read on 1D and 2D barcodes. Linear mode allows you to increase your decoding speed while scanning 1D barcodes.
5.4 Sleep Mode The scanner is equipped with sleep mode function to save battery energy when the scanner is not used for 1 minute or 10 minute. During sleep mode, all the functions and connection will be halted until pressing the trigger button of scanner to wake up and reconnect the communication with the cradle or Bluetooth device. Sleep Mode 10 min. ON Sleep Mode OFF 5.5 Batch Mode This Batch mode function is enabled when you have scanned “Memory ON” barcode.
Out Of Range Memory Mode ON Memory Read Memory Clear 5.6 Firmware Version Display the firmware version of the scanner, please scan below barcode. 5.6.1 Engine Firmware Version 5.6.2 Scanner Decoder Firmware Version 5.6.
5.6.4 Scanner Bluetooth MAC Address 5.6.5 Cradle Bluetooth MAC Address 5.7 Set Cradle Interface Barcode Set Cradle KB Interface Barcode Set Cradle RS232 Interface Barcode 5.8 Cradle RS232 Mode Parameter 5.8.
9600 <19200> 38400 5.8.2 Cradle Data Bits 7 data bits <8 data bits> 5.8.3 Cradle Stop bits <1 bit> 2 bits 5.8.
Even Odd 5.8 Decoding Selection 5.8.
Codablock A ON Codablock F ON CODE 11 ON CODE 39 OFF CODE 93 ON 23
CODE 128 OFF GS1-128 OFF DATAMATRIX OFF Dutch Post ON EAN-8 OFF EAN-13 OFF 24
EAN 128 OFF GS1 CC-A/B ON GS1 CC-C ON GS1 DataBar-Omni ON GS1 DataBar Limited ON GS1 DataBar Expanded ON Infomail ON 25
Interleaved 2 of 5 ON Japan Post ON Matrix 2 of 5 ON MaxiCode ON MicroPDF417 ON MSI ON 26
PDF417 OFF Planet ON PLESSEY ON Postnet ON QR Code ON QR Code - model 1 ON 27
Standard 2 of 5 ON Sweden Post ON Telepen ON TLC 39 ON UPC-A OFF 28
UPC-E OFF 5.9 Disable All Symbologies. If you want to disable all Symbologies, please scan below programming code. Or you can scan the “Off” option to disable individual symbologies. Disable All Symbologies Note: Do not reset individual parameters settings for each symbology. When you enable a symbology, you will recover the parameter settings stored in memory. Anytime, you may reset to factory defaults by scanning the programming code of “Set factory default” .(please see Appendixes).
5.10 Multi Code The multicode function is used configure the scanner to read a series of bar codes and then transmit them all at once. Active Active Exclusive Number of bar codes – compose: 2 Number of bar codes – compose: 3 5.11 Activates user defined symbology identifier (UDSI) transmission for all symbologies.
Data Format: [UDSI symbology id] Symbology Default Identifier Australia Post P3 Aztec D3 BPO P2 Canada Post P6 Codabar B7 Codablock A K0 Codablock F K1 Code 11 C1 Code 39 B1 Code 93/93i B6 Code 128 B3 DataMatrix D0 Dutch Post P4 EAN-8 FF EAN-13 F GS1-128 C9 GS1 Composite A/B G0 GS1 Composite C G1 GS1 DataBar C3 GS1 DataBar Limited C4 GS1 DataBar Expanded C5 Interleaved 2 of 5 B2 Japan Post P5 31
Matrix 2 of 5 B4 MaxiCode D2 MicroPDF417 C8 MSI Code B8 PDF417 C7 Planet P1 Plessey Code C2 Postnet P0 QR Code D1 Standard 2 of 5 B5 Sweden Post P7 Telepen C6 TLC 39 H0 UPC-A A0 UPC-E E0 32
5.
Appendixes A.
2D Symbologies Symbologies Readable ○ ○ ○ ○ ○ ○ ○ Data Matrix PDF417 MicroPDF417 MaxiCode QR code Aztec EAN.UCC composite Default Enable ○ B.
C.
D. Electrical Characteristics Operation Voltage Current Operating Current Standby AC transformers 5 VDC ±5% 450 mA (max) @ 5 VDC 37 mA typical @ 5 VDC 5.2 VDC @ 650 mA / Input AC 100-240V E. Environmental Operating Temp Storage Temp. Relative Humidity Ambient light F. 0°C to 50°C -20°C to 70°C 0 to 95% non-condensing 100,000 Lux (direct sunlight) Scan Map Symbology Code 39 Density 0.125 mm 0.20mm 0.25mm 0.5mm 1mm 37 Minimum Distance (+/- 10%) 5.2 cm 2.0 cm 2.
UPC / EAN Data matrix PDF417 0.33 mm 0.191 mm 0.254 mm 0.381 mm 0.16 mm 0.254 mm 0.381 mm 4 cm 5.3 cm 3.8 cm * 5.2 cm 3.5 cm 3 cm 31 cm 16.2 cm 21 cm 28 cm 14.4 cm 22 cm 36 cm G. Test Symbologies Scan one or more of these barcodes to test barcode symbologies you enabled.
Interleaved 2 of 5 MSI code PDF417 GS1 DataBar Omnidirectional GS1 DataBar Omni Stacked GS1 DataBar Expanded GS1DataBar Expanded Stacked GS1 DataBar Limited UPC A 0 12345 67890 5 UPC E 0 39 123456 5