INTERFACE MANUAL DISCOVERY WLAN 802.11b/g REL 1.1 Copyright © 2007 Scantech ID BV This manual is copyrighted, with all rights reserved. Under the copyright laws, this manual may not, in whole or in part, be copied, photocopied, reproduced, translated or converted to any electronic medium or machine readable form without prior written consent of Scantech ID BV.
Contents SCOPE................................................................................................................................ 1 IN GENERAL ........................................................................................................................ 2 How to connect to and configure the SG-20 Discovery WLAN................................................. 3 1 Switching between WLAN and 10/100 BASE-T Ethernet.................................................
SCOPE This document describes the interface aspects of the of SG-20 Discovery with WLAN (and Ethernet) communication feature (Scantech P/N A3601171) and is complementary to the Discovery User’s Manual. Please follow all installation instructions as mentioned there. The SG-20 WLAN is provided with a converter module which lifts the standard Discovery communication to WLAN (802.11B/G) and 10/100 Ethernet interfaces. The supported protocols are ARP, UDP, TCP/IP, ICMP, Telnet, TFTP, DHCP, HTTP, SNMP, and BOOTP.
IN GENERAL The Discovery/WLAN links to 802.11b/g and Ethernet networks using the IP protocol family (TCP for connection-oriented stream applications and UDP for datagram applications). The main benefit is providing network connectivity. The unit is connected through a TCP data channel or through a Telnet connection to host computers or other Device Servers.
Introduction: How to Connect to and Configure the SG-20 Discovery WLAN Before the WLAN interface will work, some 802.11b/g specific parameters (like SSID, WEP keys, etc) have to be configured first. Since it's not likely that the wireless communication will work without these specific parameters, the Discovery has to be configured to work with wired 10/100 Base-T Ethernet first. This way the 802.11b/g settings can be made while interfacing on the 10/100 Base-T Ethernet.
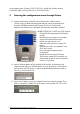
1 Switching between WLAN and 10/100 BASE-T Ethernet At the Discovery, the most frequently used Ethernet parameters (e.g. IP addresses, gateway address, subnet mask, etc) can be configured by using the buttons on the Discovery terminal itself. So without a remote utility or a Telnet session etc, but simply by applying the Service Screens. Any 802.11b/g settings require a remote utility (see next chapters), simply because it's too timeconsuming to enter these by using just 4 buttons.
1.6 Own IP Address: The IP Address the Discovery will use. Enter 0.0.1.0 to obtain an address through DHCP. 1.7 Own Port: The Port number to communicate on 1.8 Remote IP Address: the IP Address the Discovery tries to connect to (in case of TCP Client) or is sending its data to (in case of UDP (see also 1.12). 1.9 Remote Port: The remote port. 1.10 Subnet Mask: Enter The Subnet mask 1.11 Gateway: The gateway to communicate through. Enter 0.0.0.0 if not used 1.
In the examples below, IP address 192.137.81.210 is used for the Discovery terminal and the MAC address of the specific unit is: 00-20-4A-82-43-CB. 2 Entering the configuration menu through Telnet 2.1 Connect the Discovery, preferably with an Ethernet cross cable to your PC. Start-up U-Start, the demo and configuration program, which you received on the Discovery CD-ROM enclosed with the Discovery or by E-mail (Ustart.exe for Windows).
2.4 Input a Port number. The Port number should be 9999, which is a special configuration port on the WLAN module. After connecting to it, a special configuration menu appears. 2.5 Click on the button. The program will search for the unit on your local network and try to make connection. The following information (or alike) should appear on your monitor: 2.
3 Configure the WLAN 802.11b settings The WLAN module inside the SG20 can operate in three interface modes: 1. 10/100 Mbit Wired LAN. 2. 802.11b/g WiFi. 3. Ethernet<->WLAN bridge. To choose one of these modes, select '0' from the main menu. This shows the following question: Network Mode (0=Wired Only 1=Wireless Only 2=Bridging(One Host) [0] Choose '1' for wireless. The options, which will pop up next, are discussed in chapter 4. 3.1 From the main menu, select a4 of the WLAN module.
3.3.7 Change Key [N] ? Choose 'Y' to change the key. 3.4 Data rate TX 0=fixed, 1=auto [1] ? If '0' is entered, you should select the required data rate. 3.5 Enable Power Management [N] ? Power management reduces the overall power consumption of the WLAN module. However, selecting 'Y' increases the response time. Interface Manual Scantech SG-20 Discovery WLAN Rel 1.
4 Configure the IP-Settings Note: The most frequently used parameters of this menu can also be accessed through the Discovery Service Menus (using the buttons) See Chapter 1 4.1 From the main menu, select a0 to configure the IP address of the WLAN module. 4.2 First, select the required interface: Network Mode (0=Wired Only 1=Wireless Only 2=Bridging(One Host) [0] ? 4.
5 Set the BackOffice/Server IP-Settings Note: The most frequently used parameters of this menu can also be accessed through the Discovery service menus (using the buttons) See Chapter 1. 5.1 From the main menu, select a1 a in order to set the back-office server IP-settings. Note : The same menu gives access to the RS232 settings of the WLAN module, so be careful not to change any of these if your not a trained expert. 5.2 Baudrate [38400] a a Do not change 5.
7 Non-Windows users Below you find a detailed description how to access and configure the 802.11b/g parameters of the Discovery/WLAN in case you do not use U-Start on MS-Windows. The semantics may vary slightly per Operating system. MAKING CONNECTION, WHEN THE IP-ADDRESS OF THE DISCOVERY IS UNKNOWN The MAC address of the Discovery should temporarily be coupled to an IP address, before any connection can be made. The utility ARP can be used to do this.
8 How to connect to a Discovery WLAN? The Discovery WLAN can be configured in 3 ways (see Chapter 2 how to configure) : - As a TCP Client - As a TCP Server - UDP ATTENTION On the back side of the Discovery, a wired Ethernet connection can be found. You can always connect an Ethernet cable to this port for a guaranteed connection. Connect to a Discovery TCP Client You need a server program running on your computer.