Content Accessories ………………………………………………………………………………………………………………………………………...02 Unit Installation………………………………………………………………………………………………………………………………..03 Wire Connection………………………………………………………………………………………………………………………………03 Parking Brake Connection ………………………………………………………………………………………………………04 Speaker connection……………………………………………………………………………………………………………………….05 Button Description………………………………………………………………………………………………………………………….06 Remote Control………………………………………………………………………………………………………………………………..
01 Accessories Package contains the following accessories for installation and operation of the unit.
Unit Installation Bracket Screw 1. Put the 2 brackets to the left and right side of the unit; 2. Use screws to fix the brackets to the unit.
Parking Brake Connection 1. In order for videos to be viewed, and to comply with federal and local laws, the parking brake wire must be connected to the power side of the parking brake switch.
Speaker Connection After connecting, when you start up the reverse gear, the unit will receive the picture from car rear view camera. Note: - Use only with 4-8 ohm, non-chassis grounded speakers - Always observe correct polarity - Loudspeaker cables and/or optional external power amplifiers must always be about 11.8 inch away from the antenna and/or antenna extension parts. Connect the speakers according the following diagram, incorrect connections will damage the unit or your loudspeakers.
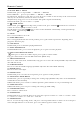
Button Description 1. IR Sensor IR Remote control signal receiving window. Max distance is 6-8 meters, 45 angels. 2. RST Press it with a thin, sharp object, the device will then be reset to factory default settings. 3. MODE BUTTON Press mode button to change mode. 4. BAND BUTTON Press band button to band of FM and AM. 5. MENU BUTTON Press menu button to return back to main menu. 6. POWER / MUTE Button /VOL Press it to turn on the unit. Press and hold for 2 seconds to turn the unit off .Press the button.
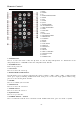
Remote Control 1: MODE 2: POWER 3: UP 4: BAND/RANDOM/CLEAR 5: ENTER 6: LEFT 7: DOWN 8: EJECT 9: STEREO/MONO/* 10:P.SCAN/REPEAT/# 11: SEEK-/BACKWARD 12: LOUD 13: STOP/PBC 14:OSD 15: PLAY/PAUSE 16: MUTE/BLUETOOTH 17: MENU/ROOT 18: SUBTITLE 19: RIGHT 20: SETUP 21: DIAL/ANGLE 22: HANG UP 23: VOLUME UP 24: ZOOM 25: SELECT 26: SEEK+/FORWARD 27: VOLUME DOWN 28: AUDIO 29: NUMERIC KEY 1.
Remote Control 10. P.SCN/ RPT /# button In DVD mode, press to repeat REP 1 => REP Title => REP ALL. In SD /USB mode ,press to repeat REP 1 => REP Dir => REP ALL. In radio mode, PS (preset scan): Press to scan all preset stations in the memory of the current band and stay on each memory stations for about 5 seconds. AS (Auto Save), long press to save the stations with good reception automatically. In bluetooth mode, press it to make a # symbol. 11.
Remote Control 26. / SEEK + buttons button to skip to the next track, press and hold button for two seconds to In DVD mode, press activate fast forward (FF) search in a track. button to select station forward automatically, touch again will stop In radio mode, press and hold select station. button frequency up. 27. VOLUME DOWN button Press to decrease volume level. 28. AUDIO In DVD mode press it to select the audio language. 29.
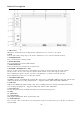
Main Menu The best way to discover the program is to explore each screen in detail, and to find out how to move from one to another. Read this chapter for a guided tour. Unit starts by displaying the main menu. This is the root of the screen hierarchy, and you can simply access all features by tapping on the touch screen buttons. Tap the icons to enter a desired mode. Slip the screen left and right to switch between the 3 menu pages.
DVD Operation DVD Player To start DVD player, tap on DVD button from main menu screen. Touch Screen Menu You will not see any buttons while DVD is played, buttons will appear when you tap on TFT screen. Tap the screen again to hide the buttons, slide the subtitle part of bottom screen to switch the following 2 pages. Note: 1. DVD player will automatically start playing when you insert the DVD disc. 2. Suggest that don’t watch video if the vehicle is moving for driver's safety. 3.
USB/SD Operation When a file of USB or SD card is played (music, video, photo), the screen will show following interface: Press it to repeat REP 1 => REP DIR => REP ALL Press it to skip to the previous track. Play/pause button. Press it to break the track, press again to resume playback. Press it to skip to the next track.
Settings Operation Tap Wallpaper button to setup wallpaper Tap Panel Adjust button to setup panel touch Tap center of the and hold at least 2S, after tap five point, then it will show OK in the picture. and press OK exit calibration mode. Tap time setting button to setup time Tap SWC item to program SWC There are 3 wires for SWC function, connect to SWC1 (white), SWC2 (Brown), GND (Black) 1) First check whether the car has steering wheel button.
Settings Operation [1].Subtitle Lang setting: With this option you can select the preferred language for the subtitles. When the selected language is recorded on the disc then this language will automatically be shown. If not, the first language recorded on the disc is displayed. [2].Audio Lang setting: With this option you can select the preferred language for the audio output.
Settings Operation Bluetooth section Auto connect: select on/off Auto answer : select on/off Subwoofer Connect the subwoofer to the unit using sub output (see electrical diagram), tap menu on screen enter into main menu setting choose setting menu., choose sound and set subwoofer on to enable subwoofer. Parking When the car is stopped and the parking brake is working, the screen can display the video image, otherwise the screen can't display the video image.
Bluetooth Operation Calling Button Tap on calling button to enter call mode. In call mode, the unit can be used as your phone, making and receiving calls are possible with bluetooth, simply tap phone number and tap button to button to hang up. make a call, and tap 1) Tap clear button shortly to delete a wrong digit, tap the clear button or press RDM/C button on remote for 3-4 seconds to delete all the numbers at once.
Notes of Disc Use only with 4-8 ohm, non-chassis grounded speakers Always observe correct polarity Loudspeaker cables and/or optional external power amplifiers must always be about 11.8 inch. away from the antenna and/or antenna extension parts. If want to display for 6.2” TFT, parking wire must be connected to ground.
Troubleshooting Symptom Power does not turn on (No sound is produced) General No sound output when operating the unit with amplifiers or power antenna attached Cause Remedy Fuse is blown Replace with fuse of the same amperage. If the fuse blows again, consult your store of purchase In correct wiring Consult your local retailer Power antennal lead is shorted to ground, excessive current is required or remote on the amplifiers or power antenna 1. Turn off the unit 2.
Troubleshooting symptom Cause Solution The car ignition is not on If the power supply is properly connected to the car accessory switch the ignition key to “ACC” The fuse is blown Replace the fuse Presence of disc inside the player Remove the disc in the player then put a new upward Inserting the disc in upside down Insert the compact disc with the label facing upward No power Disc cannot be loaded Disc cannot be read Compact disc is extremely dirty or defective Clean the disc or try to play
General Specification General Power supply Current consumption Maximum power output Compatible formats Dimensions (W x D x H) / weight Working temperature range ESP function TFT display Screen size Resolution Aspect ration Brightness Contrast ratio FM radio Frequency range(Europe area) Frequency range(America area) Frequency range(Asia area) Frequency range(South America area) Frequency range(Russia area) Preset memory stations AM(MW)radio Frequency range(Europe area) Frequency range(America area) Frequency
FCC Radiation Exposure Statement: This equipment complies with FCC radiation exposure limits set forth for an uncontrolled environment. This equipment should be installed and operated with minimum distance 20cm between the radiator & your body. FCC Warning This device complies with Part 15 of the FCC Rules.
20 20 21