User Guide November 2009 CATx KVM Extender Local Hubs Standard Hubs Model SDRK/6 Model SDRK/6D Model SDRK/12 Serial Hubs Model SDRK/6S Model SDRK/6SD Audio/Serial Hubs Model SDRK/6A Model SDRK/6AD
Notices Cautions and Notes The following symbols are used in this guide: CAUTION. This indicates an important operating instruction that should be followed to avoid any potential damage to hardware or property, loss of data, or personal injury. NOTE. This indicates important information to help you make the best use of this product. Copyrights and Trademarks ©2004/2009. All rights reserved. This information may not be reproduced in any manner without the prior written consent of the manufacturer.
2 CATx KVM Extender Local Hubs Safety Precautions and Installation Guidelines To ensure reliable and safe long-term operation please note the following installation guidelines: • Do not use to link between buildings. • Only use in dry, indoor environments. • If the building has 3-phase AC power, try to ensure that equipment connected to the Local and Remote Units is on the same phase. • Try not to route the CATx link cable alongside power cables.
3 Contents Contents 1. 2. 3. 4.
4 CATx KVM Extender Local Hubs Appendix A: Example Applications 27 Appendix B: Audio/Serial Ports: Operation & Multi-Port Configuration 32 Appendix C: Obtaining Technical Support 37 Appendix D: Specifications 38 Appendix E: EU Regulatory Compliance 41 Appendix F: North American Regulatory Compliance 42 Appendix G: Disclaimer 42
Overview 1. Overview Introduction SDRK KVM Extender Local Hubs enable high-resolution video, PS/2 keyboard and mouse, stereo audio, and serial port signals to be communicated up to 300m over Category 5, 5e or higher (CATx) cable. A basic KVM extension system comprises a Local Unit (transmitter) and a Remote Unit (receiver). The Local Unit connects directly to the computer (or a KVM switch system) using the supplied cable(s). The user console (keyboard, mouse and monitor) attaches to the Remote Unit.
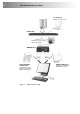
6 CATx KVM Extender Local Hubs Local Access Dual Access Hubs only. LOCAL Hub KVM extension over CATx cables up to 300m. REMOTE Unit Serial and Audio Transmission Using extenders and hubs from the Serial or Audio/Serial families. Figure 1 KVM extender system Additional Monitors Using dual or quad head SDBX Remote Units.
Overview Features All members of the SDRK product family offer the following features: • Support for high video resolution over extended distances. • Fully buffered signals to ensure consistent remote operation of your PC. • Intelligent PS/2 keyboard and mouse emulation ensures PCs do not lock-up and allows peripherals to be hot-plugged. • Dual-Access models allow local or remote operation.
8 CATx KVM Extender Local Hubs Product Range This manual describes the following seven products from the SDRK range: KVM Extension Only SDRK/6 6 x Single Video Channel, PS/2 KB & Mouse (Single Access) SDRK/6D 6 x Single Video Channel, PS/2 KB & Mouse (Dual Access) SDRK/12 12 x Single Video Channel, PS/2 KB & Mouse (Single Access) KVM and Serial Extension SDRK/6S 6 x Single Video Channel, PS/2 KB & Mouse, Serial (Single Access) SDRK/6SD 6 x Single Video Channel, PS/2 KB & Mouse, Serial (Dual Acce
Overview Compatibility Interface Compatibility • • • • • PS/2 Keyboard: Compatible with all standard keyboards. Certain keyboards with enhanced features may also be supported with custom firmware. PS/2 Mouse: Compatible with all standard 2-button, 3-button and wheel mice. To connect to a PC that does not have a PS/2 mouse port, an active serial converter is required - Model: Mdapt (PS/2). Audio: Input and output are line-level. Amplified speakers are required.
10 CATx KVM Extender Local Hubs Extender Compatibility You can use SDRK, SDLink, SDBX, and SDMX products belonging to the same family in any combination. However, it is not possible to mix Standard, Serial and Audio products within a system.
Overview How to Use This Guide This guide describes the SDRK range of KVM Extender Local Hubs. During installation and configuration, you should also refer to the manual supplied with your Remote Unit(s). Although the connection and operation of the system is relatively straightforward, you should consider the following before getting started: Connection & Compatibility You will require cables to connect your CPUs to the SDRK Local Hub. Order Code Description SDCK2 CPU KVM Cable Kit (1.
12 CATx KVM Extender Local Hubs 2. Installation For first-time users, we recommend that you carry out a test placement, confined to a single room, before commencing full installation. This will allow you to identify and solve any cabling problems, and experiment with the KVM extender system more conveniently. Package Contents You should receive the following items in your extender package. If anything is missing, please refer to Appendix C: Obtaining Technical Support, page 37.
Installation Local Hub Installation To install the Local Hub: 1. Switch off all PCs and other devices before connection. 2. Using the combination CPU KVM cable(s), connect the keyboard, monitor(s) and mouse connectors on each computer (or KVM switch) to the corresponding connectors on a port of the Local Hub as shown in Figure 2 (Standard Hubs), Figure 3 (Serial only Hubs) or Figure 4 (Audio/Serial Hubs). Ensure that you attach the keyboard and mouse connectors to the correct ports.
14 CATx KVM Extender Local Hubs Connect to computer’s video output, PS/2 keyboard and mouse ports using the CPU KVM cable. SDRK/6 Connect to computer’s video output, PS/2 keyboard and mouse ports using the CPU KVM cable. Connectors correspond to ports on front of hub. SDRK/12 Connect to Local PS/2 mouse. Connect to Local PS/2 keyboard. Connect to Local monitor. SDRK/6D Connect to computer’s video output, PS/2 keyboard and mouse ports using the CPU KVM cable.
Installation Connect to computer’s serial port. SDRK/6S Connect to computer’s video output, PS/2 keyboard and mouse ports using the CPU KVM cable. Connect to Local PS/2 mouse. Connect to Local PS/2 keyboard. Connect to Local monitor. Connect to computer’s serial port. SDRK/6SD Connect to computer’s video output, PS/2 keyboard and mouse ports using the CPU KVM cable.
16 CATx KVM Extender Local Hubs Connect to computer’s audio in/ microphone input (pink/blue). Connect to computer’s audio output (green). Connect to computer’s serial port. SDRK/6A Connect to computer’s video output, PS/2 keyboard and mouse ports using the CPU KVM cable. Connect to Local PS/2 mouse. Connect to Local PS/2 keyboard. Connect to Local monitor. Connect to computer’s serial port. SDRK/6AD Connect to computer’s audio in/ microphone input (pink/blue).
Installation Interconnect – carries video and data signals. Connect to Interconnect port on Remote Unit using CATx cable. Figure 5 Power/Status LED. Hub Port - front view Power Requirements In most cases, there is no need to connect the 5V PSU supply as each port independently takes its own power from the PS/2 keyboard connection to the host computer. Each Local Hub port normally takes power through the PS/2 keyboard connection to the host computer.
18 CATx KVM Extender Local Hubs 3. Operation Overview The operation and configuration of dual access Standard, Serial and Serial/Audio enabled systems is slightly different. Please read the appropriate section for your system. Dual Access, with consoles at both the Remote Unit and Local Hub port, operates on a first-come, first-served basis.
Operation Operation of Dual Access Standard and Serial Local Hubs SDRK/6D and SDRK/6SD only Scroll Lock Function Standard and Serial Remote Units redefine the function of the Scroll Lock key for use within the Extender system. You may need normal Scroll Lock activity for a specific application. In this case, you can restore the Scroll Lock key to its usual function. In doing so, you will disable Private Mode operation on a dual access system.
20 CATx KVM Extender Local Hubs Local Console Commands On a dual access system, you can issue the following commands at the local console: Command Key Sequence Activate Console Any key and (optionally) mouse action Gain control of CPU from remote console. Only operates if inactivity timeout period has expired. Start/End Private Mode Start/End ‘Private Mode’ at local console. Private Mode prevents the remote console from being used even if the inactivity timeout period expires.
Operation Operation of Dual Access Audio/Serial Local Hubs SDRK/6AD only The ‘Hot’ Key With these systems, keyboard ‘hot’ keys are used to carry out various functions. To enter these commands: 1. Press and release the initial ‘hot’ key. By default, the initial ‘hot’ key is 2. Press and release the command key. With these systems, the Scroll Lock operates as normal unless you have pressed the initial hot key. You can change the Hot Key to .
22 CATx KVM Extender Local Hubs Local Console Commands After pressing the initial ‘hot’ key on the local keyboard, you can issue a number of commands by pressing additional keys. These commands allow you to start a private mode session on the local console or to reset the keyboard and mouse. These commands only apply to SDRK/6AD Local Hubs having firmware versions ‘S50’ and above. Command Key Sequence Private Mode Lock out the remote console by triggering a ‘Private Mode’ function.
Troubleshooting 4. Troubleshooting Video The image is not sharp, or is badly smeared. Have you adjusted the video equalization? Refer to the manual supplied with your Remote Unit. Check the Interconnect cable between the Remote and Local Units. Is it of the recommended type (see page 12)? Is it intact along its entire length and securely connected at both ends? Is it wired correctly (see page 12)? Ensure that all video connections throughout the system are attached securely.
24 CATx KVM Extender Local Hubs The PC won’t boot into the correct graphics mode The extender includes DDC emulation for all standard resolutions and there should not normally be any issues. However, you must be using DDC capable CPU cables on each hub port. For non-standard resolutions, you will need to explicitly set the resolution in your operating system configuration ignoring the DDC data read from the Local Unit. Contact Technical Support if you have problems selecting your required graphics mode.
Troubleshooting Keyboard & Mouse When I am typing, I get wrong or missing characters on the screen. Your keyboard may be in the wrong mode. Use the appropriate commands to reset the keyboard and mouse as described in the manual supplied with your Remote Unit. The PC comes up with ‘keyboard error’. Press or . If the keyboard now operates correctly, you need to adjust the BIOS setup to disable keyboard testing during booting. The system does not detect a PS/2 mouse.
26 CATx KVM Extender Local Hubs General Questions Is it possible to use a cable longer than 300m? It might be possible to use a cable of up to 500m at lower resolutions. However, we do not recommend this and cannot guarantee that it will work. Can the extender be daisy chained? In certain circumstances, it is possible to cascade extenders, though we do not recommend doing so. Careful consideration needs to be given to extender setup, and the electrical environment.
Appendix A: Example Applications Appendix A: Example Applications This section illustrates four specific applications using SDRK Local Hubs: • Simple system using SDRK/6A Hub and SDLink/RA Remote Units to extend audio, serial and KVM for up to six PCs (Figure 6). • Six remote serial touch screens with local access through a KVM switch (Figure 7). • Information distribution system sharing a single PC at up to six remote locations (Figure 8).
28 CATx KVM Extender Local Hubs SDRK/6A Extender Hub Takes primary video, keyboard, mouse, audio and serial signals from each CPU (only two shown). SDLink/RA Remote Units connect to KVM console, audio and serial devices.
Appendix A: Example Applications KVM Switch Local access ports connect to single KVM console through switch. SDRK/6SD Extender Hub Takes KVM and serial signals from each CPU (only two shown). SDLink/RS Remote Units connect to touch screens.
30 CATx KVM Extender Local Hubs SDRK/6D Extender Hub CPU connects to Port 1. Local access ports are daisy-chained to allow operation from any console and/or video to be distributed to multiple locations. 5V PSU SDLink/RLC Remote Units connect to KVM consoles.
Appendix A: Example Applications SDRK/6A Extender Hub Takes primary video, keyboard, mouse, audio and serial signals from each CPU (only two shown). 5V PSU SDRK/6 Extender Hub Takes secondary video from each CPU. 5V PSU required. SDBX/RA2 Remote Units connect to KVM console and secondary monitor.
32 CATx KVM Extender Local Hubs Appendix B: Audio/Serial Ports: Operation & Multi-Port Configuration This appendix describes audio & serial interface operation for: • SDRK/6S and SDRK/6SD • SDRK/6A and SDRK/6AD Please note that on dual access Local Hubs, the serial link remains active during a Private Mode session but audio transmissions are stopped.
Appendix B: Audio/Serial Ports: Operation & Multi-Port Configuration 3. Place the jumper across the posts as shown in Figure 11. 4. Set the hardware flow control jumpers to RTS/CTS Flow Control Across CATx Link as shown in Figure 12. This mode will support most, but not all, serial mouse and trackball devices. You must also configure the Remote Unit to use this protocol. Refer to the manual supplied with your Remote Unit.
34 CATx KVM Extender Local Hubs Hardware Flow Control The serial daughterboards in both Local Hub and Remote Units have a series of jumpers that allow the selection of alternative hardware flow control schemes across the CATx link (see Figure 10). Most applications will not require hardware flow control across the link, and therefore the flow control jumpers are set to loopback by default and should not need adjustment.
Appendix B: Audio/Serial Ports: Operation & Multi-Port Configuration Audio/Serial Interface Setup and Operation SDRK/6A and SDRK/6AD only Serial Port Configuration No setting up or user adjustments are required. In the Audio/Serial extender family, the serial port is wired as DTE - the same as that on a PC. To connect a serial printer or other DTE (rather than DCE device) to the Remote Unit, you will need a Null-Modem crossover cable between the Remote Unit and the printer.
36 CATx KVM Extender Local Hubs Audio Port Configuration The audio interface is line-level and is designed to take the output from a sound card (or other line-level) source and be connected to a set of powered speakers at the other end of the link. Stereo audio may be transmitted either way across the link (simultaneously). No setup is required unless a microphone is connected to the Remote Unit.
Appendix C: Obtaining Technical Support Appendix C: Obtaining Technical Support If you have any problems or questions, contact your dealer for technical support. To enable us to provide efficient and effective support, please make a note of the following information before you call: • The KVM extender’s firmware revision level.
38 CATx KVM Extender Local Hubs Appendix D: Specifications Video Maximum Resolution See manual supplied with Remote Unit(s) Video Compatibility VGA to UXGA, RGB Video I/O 0.
Appendix D: Specifications Serial Interface Max Baud Rate Supported SDRK/6S and SDRK/6SD Serial Data Format: Flow Control: SDRK/6S and SDRK/6SD: 1200, 9600 or 19200 Baud (user-selectable) SDRK/6A and SDRK/6AD: 19.
40 CATx KVM Extender Local Hubs Size and Shipping Weight SDRK/6 Local Hub: 482x112x44mm (1U) Shipping Weight: 2.45 Kg SDRK/6D Local Hub: 482x112x44mm (1U) Shipping Weight: 2.65 Kg SDRK/6S Local Hub: 482x112x44mm (1U) Shipping Weight: 2.60 Kg SDRK/6A Local Hub: 482x112x44mm (1U) Shipping Weight: 2.65 Kg SDRK/12 Local Hub: 482x112x88mm (1U) Shipping Weight: 2.80 Kg SDRK/6SD Local Hub: 482x112x88mm (2U) Shipping Weight: 3.56 Kg SDRK/6AD Local Hub: 482x112x88mm (2U) Shipping Weight: 3.
Appendix E: EU Regulatory Compliance Appendix E: EU Regulatory Compliance Warning This is a class A product. In a domestic environment, this product may cause radio interference in which case the user may be required to take adequate measures. This product complies with the following harmonized standards for Information Technology Equipment: EN55022:2006 (Class A), EN55024:1998 + A1:2001 + A2:2003. To maintain compliance the use of correctly installed shielded (STP/FTP) interconnection cable is advised.
42 CATx KVM Extender Local Hubs Appendix F: North American Regulatory Compliance This equipment has been found to comply with the limits for a Class A digital device, pursuant to Part 15 of the FCC Rules. These limits are designed to provide reasonable protection against harmful interference when the equipment is operated in a commercial environment.