User Guide November 2009 SDMX PS/2 Mini Extender Range Dual Video Channel Kits Model SDMX/S2 Model SDMX/SA2 Dual Video/Local Access Channel Kits Model SDMX/D2 Model SDMX/DA2 Dual Video Remote Units Model SDMX/R2 Model SDMX/RA2
Notices Cautions and Notes The following symbols are used in this guide: CAUTION. This indicates an important operating instruction that should be followed to avoid any potential damage to hardware or property, loss of data, or personal injury. NOTE. This indicates important information to help you make the best use of this product. Copyrights and Trademarks ©2005/2009. All rights reserved. This information may not be reproduced in any manner without the prior written consent of the manufacturer.
2 SDMX PS/2 Mini Extender Range Safety Precautions and Installation Guidelines To ensure reliable and safe long-term operation please note the following installation guidelines: • Do not use to link between buildings. • Only use in dry, indoor environments. • If the building has 3-phase AC power, try to ensure that equipment connected to the Local and Remote Units is on the same phase. • Try not to route the CATx link cable alongside power cables.
3 Contents Contents 1. 2. 3. 4. 5. 6.
4 SDMX PS/2 Mini Extender Range Appendix A: Example Applications 33 Appendix B: Rack Mount Options 37 Appendix C: Flash Upgrading & External Configuration 38 Appendix D: Cable Pinning 39 Appendix E: Audio/Serial Ports: Operation & Multi-Port Configuration 40 Appendix F: Obtaining Technical Support 42 Appendix G: Specifications 43 Appendix H: EU Regulatory Compliance 46 Appendix I: North American Regulatory Compliance 47 Appendix J: Disclaimer 47
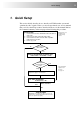
Quick Setup 1. Quick Setup This section briefly describes how to install your KVM extender system and optimize the video signals. Unless you are an experienced user, we recommend that you follow the full procedures described in the rest of this manual. Refer to the command summary on the next page when following this procedure. Install system: 1. 2. 3. 4. Connect Remote Unit to KVM and audio/serial devices (if present). Connect Local Unit or Extender hub to CPU.
6 SDMX PS/2 Mini Extender Range Command Summary By using a specific ‘hot’ key sequence, you can put the remote console keyboard into a Command Mode. From this, you can use various keys and key combinations to equalize the video signal and generally configure the extender system. The following table summarizes the ‘hot’ key command sequences.
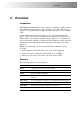
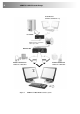
Overview 2. Overview Introduction The SDMX PS/2 Mini Extender Series enables two channels of high-resolution video, PS/2 keyboard and mouse, and, optionally, stereo audio and serial port signals to be communicated up to 50m over CATx (Category 5, 5e, 6 or higher) cable. A basic KVM extension system comprises a Local Unit (transmitter) and a Remote Unit (receiver). The Local Unit connects directly to the computer (or a KVM switch system) using the supplied cable(s).
8 SDMX PS/2 Mini Extender Range Local Access SDMX/D2, SDMX/DA2 only. Local Unit KVM extension over CATx cables up to 50m.
Overview Features Members of the SDMX PS/2 Mini Extender Series offer the following features: • Supports high video resolution for use with TFT displays: 1600x1200@75Hz up to 50m • All control and video tuning made through attached keyboard. • Settings stored in EEPROM memory. • Local and Remote Units are flash-upgradeable.
10 SDMX PS/2 Mini Extender Range Product Range There are six products in the range: Dual Video Channel Kit (Standard) SDMX/S2 Dual Video Channels, PS/2 KB & Mouse Local Unit (Single Access) + Remote Unit SDMX/D2 Dual Video Channels, PS/2 KB & Mouse Local Unit (Dual Access) + Remote Unit Dual Video Channel Kit (Audio) SDMX/SA2 Dual Video Channels, PS/2 KB & Mouse, Serial, Stereo Audio Local Unit (Single Access) + Remote Unit SDMX/DA2 Dual Video Channels, PS/2 KB & Mouse, Serial, Stereo Audio Local U
Overview Extender Compatibility The SDMX range of PS/2 Mini extender products offer enhanced performance while maintaining complete compatibility with existing SDLink standalone and rack mount CAT5 extenders. You can use SDLink and SDMX products belonging the same family in any combination. However, it is not possible to mix Standard and Audio products within a system except for video only applications. SDMX units are not currently compatible with SDLink SUN or SDLink Serial (no audio) products.
12 SDMX PS/2 Mini Extender Range How to Use This Guide This guide describes the installation and configuration of the SDMX PS/2 Mini range of KVM extenders. Although the connection and operation of the system is relatively straightforward, you should consider the following before getting started: Connection & Compatibility If you have purchased an SDMX Extender kit, this will contain all the cables required to connect the Local Unit to your PC or KVM switch.
Installation 3. Installation For first-time users we recommend that you carry out a test placement, confined to a single room, before commencing full installation. This will allow you to identify and solve any cabling problems, and experiment with the KVM extender system more conveniently. Package Contents You should receive the following items in your extender package. If anything is missing, please refer to Appendix F: Obtaining Technical Support, page 42. • Extender Remote Unit.
14 SDMX PS/2 Mini Extender Range Interconnection Cable Requirements To connect the Local and Remote Units you will need CATx (any category 5, 5e, 6 or higher) cable terminated with RJ45 plugs. Please note that shielded cable is advised to maintain regulatory EMC compliance. Interconnect cables must be solid-core type. Stranded patch cable will give poor results over longer distances. The pairing of the cable and pinning of its connectors should normally be in accordance with EIA-568B (see page 39).
Installation Remote Unit Installation To install a Remote Unit: 1. Switch off all devices. 2. Connect your keyboard, monitor(s) and mouse to the Remote Unit as shown in Figure 2. These ports may also be attached to the CPU side of a KVM switch in order to have a remote CPU. However, if you are attempting to use the extender between cascaded KVM switches this may not work. Please contact Technical Support to discuss your application. 3. If appropriate, connect audio equipment and serial devices.
16 SDMX PS/2 Mini Extender Range SDMX/SA2, SDMX/DA2 and SDMX/RA2 only Connect to speakers and microphone. Connect to second monitor. Figure 2 Connect to Primary monitor. Connect to serial device, such as a touch screen. Connect PS/2 keyboard and mouse. Connect supplied 5V PSU. Remote Unit – rear view INTERCONNECT 1 – carries primary video and data signals. Status OFF ON FLASHING INTERCONNECT 2 – carries secondary video signals.
Installation Local Unit Installation To install a Local Unit: 1. It is recommended that the PC and other devices are switched off before connection. 2. Using the supplied CPU KVM cable(s), connect the keyboard, monitor(s) and mouse connectors on the computer (or KVM switch) to the corresponding connectors on the Local Unit as shown in Figure 4. Ensure that you attach the keyboard and mouse connectors to the correct ports. The keyboard connector is purple; the mouse connector is green.
18 SDMX PS/2 Mini Extender Range Local Console Connections (SDMX/D2 and SDMX/DA2 only) Connect to Local PS/2 keyboard and mouse. Connect to Local monitors. Optional connection for 5V PSU (not supplied) Audio/Serial Connections (SDMX/SA2 and SDMX/DA2 only) Connect to audio ports on computer. Connect to computer’s secondary video output. Connect to serial port on computer. Connect to computer’s PS/2 keyboard and mouse ports and primary video output.
Installation Connection to Rack Mount Hub Local Units Remote Units are compatible with CAT5 KVM Extender Local Hubs belonging to the same family: Family Remote Units Compatible Local Rack Hubs Standard SDMX/R2 SDRK/6, SDRK/6D, SDRK/12 Audio SDMX/RA2 SDRK/6A, SDRK/6AD Video only: SDRK/6, SDRK/12 The following features may not be available when Remote Units are used with these Rack Hubs: DDC Transfer (see page 26) and Private Mode Video Blanking Toggle (see page 21).
20 SDMX PS/2 Mini Extender Range 5V PSU Figure 6 SDRK/6 rack used with SDMX/R2 Remote Units to extend dual video
Remote Unit Configuration & Operation 4. Remote Unit Configuration & Operation Cat5/5e/6 cables are specifically designed for networking applications and not for transmitting analog video. Your SDMX PS/2 Mini Extender includes, and requires, advanced technology to enable its use at high screen resolutions. This section describes how to optimize the video signal, configure the Extender system and operate the Remote Unit.
22 SDMX PS/2 Mini Extender Range Status LEDs in Command Mode In Command Mode, the Remote Unit: • Illuminates the yellow Interconnect 1 LED continuously (see Figure 5). Note. The Yellow LED on Interconnect 2 is not lit. • Flashes the status LEDs (Num Lock, Caps Lock, Scroll Lock) on the connected keyboard to indicate the selected video channel (to which adjustments will be applied).
Remote Unit Configuration & Operation Adjusting Video PS/2 Mini Extender Remote Units incorporate video equalization circuitry, allowing you to compensate for the loss in image quality that occurs when video signals are transmitted along CATx cables. At the factory, Remote Units are configured to optimize the video signals for Interconnect cables up to 25m in length. If you intend to use cables of 25-50m in length: 1.
24 SDMX PS/2 Mini Extender Range Other Remote Configuration & Operation Options The SDMX PS/2 Mini Extender Series has additional commands to reset the keyboard and mouse, to restore the factory default configuration, change DDC settings, and to initiate and control a Private mode session (Dual Access models only). Command Key Sequence Reset Mouse and Keyboard Resets the remote console’s keyboard and mouse and then automatically exits Command Mode.
Remote Unit Configuration & Operation Private Mode On dual access systems, a user at one console can lock out the other console by triggering a ‘Private Mode’ function. This prevents the other console from being used even if the two-second inactivity timeout period expires. To indicate that the Private Mode session is active, the extender system: • Slowly flashes the Scroll Lock LED on the user’s keyboard. • Illuminates all three LEDs on the other console’s keyboard.
26 SDMX PS/2 Mini Extender Range Transferring DDC Information To support non-standard screen settings or other features, it is possible to read and store DDC information into the Local Unit directly from the monitors connected to the Remote Unit. You only need to carry out this procedure once; the extender units store the DDC information in non-volatile memory and restore it at power-up. 1. Ensure that you have installed and powered up the system according to the instructions in Section 3. 2.
Local Unit Operation 5. Local Unit Operation Overview For more information about serial/audio port operation, see Appendix E: Audio/Serial Ports: Operation & Multi-Port Configuration, page 40. Keyboard and Mouse Emulation Local Units have keyboard and mouse emulation. The attached PC operates normally without requiring a keyboard or mouse to be attached to either the Remote or Local Units (in the case of a dual access system).
28 SDMX PS/2 Mini Extender Range Local Console Commands After pressing the initial ‘hot’ key sequence on the local keyboard, you can issue a number of commands by pressing additional keys. These commands allow you to control a Private mode session on the local console, reset the keyboard and mouse or restore the Local Unit’s factory default settings.
Troubleshooting 6. Troubleshooting Video The image is not sharp, or is badly smeared. Have you adjusted the video equalization? Follow the instructions on page 23. Check the Interconnect cable between the Remote and Local Units. Is it of the recommended type (see page 13)? Is it intact along its entire length and securely connected at both ends? Is it wired correctly (see page 39)? Ensure that all video connections throughout the system are attached securely.
30 SDMX PS/2 Mini Extender Range Jitter is evident on video. Adjust the clock and/or phase on your flat-panel. Contact Technical Support if this fails to improve the situation. Are you testing a system using a coiled drum of CATx cable? Try uncoiling the cable. If this solves the video jitter, you should not have a problem after full installation. The image is not stable and is blanking regularly. Re-power the Remote Unit. Can the extender be used with RGB video? Yes.
Troubleshooting When I ‘hot-plug’ the Local Unit, the mouse no longer moves. When connecting the Local Unit to a live system, connect the mouse cable to the CPU before keyboard connection to ensure the mouse is enabled. Try issuing the Mouse Recovery command. Some of the mouse buttons don’t work. The Extenders support standard 2/3-button mice (with or without a wheel). Additional buttons will not operate. I have an enhanced keyboard with extra keys and indicators.
32 SDMX PS/2 Mini Extender Range General Questions Is it possible to use a cable longer than 50m? It might be possible to use a longer cable at lower resolutions but video quality will degrade substantially beyond about 75m. However, we do not recommend this and cannot guarantee that it will work. Can the extender be daisy chained? In certain circumstances, it is possible to cascade extenders, though we do not recommend doing so.
Appendix A: Example Applications Appendix A: Example Applications This section illustrates three specific applications using SDMX PS/2 Mini Extender units: • Six dual-monitor consoles with serial and audio extension (Figure 7). Requires six SDMX/RA2 Remote Units, and SDRK/6A and SDRK/6 Local Hubs. • Remote serial touch screens with local access through a KVM switch (Figure 8). Requires two SDMX/DA2 kits. • Extender system with second screen for security monitoring (Figure 9). Requires one SDMX/S2 kit.
34 SDMX PS/2 Mini Extender Range SDRK/6A Extender Hub Takes primary video, keyboard, mouse, audio and serial signals from each CPU (only two shown). 5V PSU SDRK/6 Extender Hub Takes secondary video from each CPU. 5V PSU required. SDMX/RA2 Remote Units connect to KVM console and secondary monitor.
Appendix A: Example Applications KVM switch Local access ports connect to single KVM console through a multihead KVM switch. 2 x SDMX/DA2 kits Remote Units connect to touch screens.
36 SDMX PS/2 Mini Extender Range Security System Provides secondary video input. SDMX/S2 Local Unit Takes KVM signals from standard PC and secondary video from security system. SDMX/S2 Remote Unit Connects to KVM console. Secondary monitor used for security monitoring.
Appendix B: Rack Mount Options Appendix B: Rack Mount Options Up to 3 extender units can be mounted in a 19” rack using the SDBR3 mounting kit The kit contains one rack plate and M3 countersunk mounting screws. To mount a unit: 1. Remove the feet from the extender unit. 2. Align the holes on the base plate with the vacant screw holes on the base of the extender unit. 3. Fasten the base of the unit to the plate of the mounting kit using the supplied screws.
38 SDMX PS/2 Mini Extender Range Appendix C: Flash Upgrading & External Configuration Each extender unit contains a service port. This can be accessed through the mouse port on a Remote Unit or through the 25-way D-connector on a Local Unit. By attaching an upgrade cable between the appropriate port and the serial port on any PC (or laptop) a unit’s firmware may be upgraded. To operate the configuration port, you need: • A laptop or PC close to the extender unit running Windows.
Appendix D: Cable Pinning Appendix D: Cable Pinning The following table illustrates which RJ45 connector pins the extenders use for various signals. It also details the standard EIA-568B wiring scheme that is recommended for most installations. Looking into the RJ45 socket on a Remote Unit, Pin 1 is on the right and Pin 8 on the left.
40 SDMX PS/2 Mini Extender Range Appendix E: Audio/Serial Ports: Operation & MultiPort Configuration This appendix details audio & serial interface operation for those models that have this feature: • SDMX/SA2 • SDMX/DA2 • SDMX/RA2 These extender products contain daughter boards that allow bi-directional stereo audio and a full-duplex serial data link to be sent across the CATx interconnection cable in addition to PS/2 keyboard, mouse and video.
Appendix E: Audio/Serial Ports: Operation & Multi-Port Configuration Audio Interface - Set Up and Operation The audio interface is line-level and is designed to take the output from a sound card (or other line-level) source and be connected to a set of powered speakers at the other end of the link. Stereo audio may be transmitted either way across the link (simultaneously). No setup is required unless a microphone is connected to the Remote Unit.
42 SDMX PS/2 Mini Extender Range Appendix F: Obtaining Technical Support If you have any problems or questions, contact your dealer for technical support. To enable us to provide efficient and effective support, please make a note of the following information before you call: • The KVM extender’s firmware revision level.
Appendix G: Specifications Appendix G: Specifications Video Maximum Resolution 1600x1200@75Hz up to 50m Operation at higher resolutions/refresh rates may be possible at shorter distances Video Compatibility Analog VGA to UXGA, RGB VESA DDC Emulated DDC for each video channel Local Unit reports as universal monitor capable of all standard resolutions and refresh rates. DDC information may be disabled, flash-upgraded or read from remote monitors. Video I/O 0.
44 SDMX PS/2 Mini Extender Range Serial Interface Max Baud Rate Supported 19.2K Baud Serial Data Format Transparent Signals Transferred TX, RX, RTS, CTS, DTR, DSR Local Unit Connector DB9 female (DCE) Remote Unit Connector DB9 male (DTE) Audio Interface Description Bi-directional stereo audio link Transmission method Digitized virtually CD quality audio (16-bit, 38.4kHz) Signal levels Line level (4 Volts Pk-Pk maximum) Input Impedance 47kΩ Local Unit Connectors 2x3.
Appendix G: Specifications Size and Shipping Weight SDMX/S2 Local Unit: 145x100x29mm Remote Unit: 138x100x29mm) Shipping Weight: 1.9kg SDMX/SA2 Local Unit: 145x100x44mm (1U) Remote Unit: 138x100x44mm (1U) Shipping Weight: 2.2kg SDMX/D2 Local Unit: 145x100x44mm (1U) Remote Unit: 138x100x29mm Shipping Weight: 2.0kg SDMX/DA2 Local Unit: 145 x100x44mm (1U) Remote Unit: 138x100x44mm) (1U) Shipping Weight: 2.3kg SDMX/R2 Remote Unit: 138x100x29mm Shipping Weight: 1.
46 SDMX PS/2 Mini Extender Range Appendix H: EU Regulatory Compliance WARNING! This is a class A product. In a domestic environment, this product may cause radio interference in which case the user may be required to take adequate measures. This product complies with the following harmonized standards for Information Technology Equipment: EN55022:2006 (Class A), EN55024:1998 + A1:2001 + A2:2003. To maintain compliance the use of correctly installed shielded (STP/FTP) interconnection cable is advised.
Appendix I: North American Regulatory Compliance Appendix I: North American Regulatory Compliance This equipment has been found to comply with the limits for a Class A digital device, pursuant to Part 15 of the FCC Rules. These limits are designed to provide reasonable protection against harmful interference when the equipment is operated in a commercial environment.