Dear Valued Customer, Congratulations on your new Smart Sound Bar 2.1 purchase. Thank you for your support. This sound bar is built-in Android™. To ensure safety and many years of trouble free operation of your Sound Bar 2.1, please read the manual carefully before making any adjustments, and keep them in a safe place for future references. The Smart Sound Bar 2.1 is a versatile speaker unit with both digital and analog audio inputs for audio visual sources.
Table of Contents TABLE OF CONTENTS 2 SAFETY INFORMATION 3 SAFETY INSTRUCTIONS 4 PACKAGE CONTENTS 6 OVERVIEWS 6 FRONT & BACK 6 SOUND BAR REMOTE & EXTRAS 7 MOUNTING THE SOUND BAR 12 INSTALLING BATTERIES TO THE REMOTE CONTROL 14 CONNECTION SUGGESTIONS 15 IF YOU HAVE DIGITAL AUDIO WITH YOUR TV 15 IF YOU HAVE ANALOG AUDIO WITH YOUR TV 16 IF YOU HAVE AN AUDIO DEVICE WITH YOUR TV 17 OPERATION 19 HOW DO I CLEAN THE SOUND BAR? 25 TROUBLESHOOTING 26 CALL US IF YOU NEED HELP! 27 SPECIFICATION 28 LIMITED PRODUCT WARRA
SAFETY INFORMATION Electricity is used to perform many useful functions, but it can also cause personal injuries and property damage if improperly handled. This product has been engineered and manufactured with the highest priority on safety. However, improper use can result in electric shock and / or fire. In order to prevent potential danger, please observe the following instructions when installing, operating and cleaning the product.
SAFETY INSTRUCTIONS This product is designed and manufactured to operate within defined design limits, and misuse may result in electric shock or fire. To prevent the product from being damaged, the following rules should be observed for the installation, use and maintenance of the product. Read the following safety instructions before operating the Sound Bar. Keep these instructions in a safe place for future reference.
apparent, unplug the power cord and contact your dealer immediately. Do not try to repair the product yourself. Avoid using dropped or damaged appliances. If the product is dropped and the housing is damaged, the internal components may function abnormally. Unplug the power cord immediately and contact your dealer for repair. Continued use of the product may cause fire or electric shock. Do not install the product in an area with heavy dust or high humidity.
Package Contents Smart Sound Bar x 1 User Manual x 1 Warranty x 1 Drywall Anchor with Screw x 2 Sets 3 Head RCA Audio Cable x 1 3.5 mm Mini-jack Cable x 1 Smart Sound Bar Remote Control with AAA Battery x 1 Overviews Front & Back 1. 2. 3. 4. 5. 6. 7. 8. 9. 10. 11. 12. 13. WALL MOUNT BRACKETS – Use these brackets to hang the sound bar on a wall. POWER CABLE – Connect this to a surge protector or wall outlet. COAXIAL SPDIF – Connect your digital audio outputs to this connection for audio.
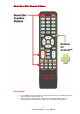
Smart Sound Bar Remote & Extras PLEASE NOTE: The Sound Bar remote power button controls both the turning on and turning off function of the Sound Bar and any Sceptre TV. The mute button of the Sound Bar only mutes the sound bar not the Sceptre TV, however if you use the Sceptre TV remote’s mute, it will mute the Sound Bar. -7Smart Sound Bar 2.
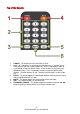
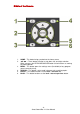
Top of the Remote 1. 2. 3. 4. 5. 6. POWER – This button turns the sound bar on or off. (0-9), *, # – 0 functions as numerical key and space key. 1 functions as the numerical key and also the punctuation key. Press it repeatedly in order to cycle through all the punctuation marks. 2 to 9 functions as numerical and alphabetical keys. Press it repeatedly in order to cycle through the letters labeled. (*) button functions as the * input key and # functions as the # input key.
Middle of the Remote 1. 2. 3. 4. 5. 6. HOME – This button brings you back to the home screen. ▲▼◄► – These buttons function as up, down, left, and right selection. When you press the KEYBOARD/MOUSE button it also functions as moving the mouse pointer. MENU – This button opens the settings menu (if available) of any program you are currently using. SEARCH – This button is to be used in browsers for searching topics. ENTER – This button functions as the enter / selection tool.
Bottom of the Remote ZOOM IN / ZOOM OUT – These buttons zooms in and out for pictures and web pages. 2. VOL(+) / VOL(-) – These buttons increases or decreases the sound bar’s volume. 3. PLAY/PAUSE, REWIND, FAST FORWARD, PREVIOUS CHAPTER, NEXT CHAPTER – These buttons control the media player under Android. 4. SOURCE – This button switches the sound source from the sound bar between, AUX, NET (Android), COAX, and LINE. 5. S-MODE – This button selects the sound modes of the sound bar. 6.
Some Sceptre HDTV remotes might also have buttons used to control the sound bar. If you see Power, Source, Mode, Vol (+/-) buttons encircled with the SOUNDBAR word next to it, you can use them to control the Sound Bar. 1. 2. 3. 4. 5. POWER – This button turns on or off the Sound Bar. SOURCE – This button changes the sound source on the Sound Bar between COAX, AUX, LINE and NET (Android). MODE – This button changes the sound mode on the Sound Bar. VOL(-) – This button decreases the volume on the Sound Bar.
Mounting the Sound Bar To mount the Sound Bar you need to have 520 mm of horizontal space on the wall. 1. 2. 3. 4. 5. Measure the length of 520mm on the wall. With a pencil mark the two entry points where you are going to install the dry wall anchors and puncture the points with a nail so it is easier for the anchor to be screwed in. With a #2 Phillips screw driver press the anchor tip slightly into the point marked previously on the drywall.
6. Align the mounting brackets on the back of the sound bar to the two screws protruding on the wall and fit into them, then finally slowly lower the sound bar so that it securely hangs onto the screws. - 13 Smart Sound Bar 2.
Installing Batteries to the Remote Control Please insert two AAA batteries into the remote control. Make sure that you match the (+) and (-) symbols on the batteries with the (+) and (-) symbols inside the battery compartment. Afterwards, re-attach the battery cover. Please note: Only use AAA batteries. Do not mix new and old batteries. This may result in cracking or leakage that may pose a fire risk or lead to personal injury.
Connection Suggestions If you have digital audio with your TV… 1. 2. 3. 4. 5. 6. Grab the included 3 head RCA audio cable and use the black colored RCA plug. Find the SPDIF digital audio coax connection on the back of the TV and connect one end of the cable to it. Connect the other end of the cable to the back of the Smart Sound Bar’s black coax connection. Turn on the TV, make sure you output PCM signal to the Smart Sound Bar.
If you have analog audio with your TV… 1. 2. 3. 4. 5. 6. Grab the included 3 head RCA audio cable and use the red and white colored RCA plug. Find the analog audio out on the back of the TV and connect one end of the cable to it matching the colors red to red, and white to white. Connect the other end of the cable to the back of the Sound Bar’s AUX red and white connection. Turn on the TV, and the Smart Sound Bar. Press the SOURCE button on the Smart Sound Bar’s remote repeatedly until you see AUX.
If you have an audio device with your TV… 1. 2. 3. 4. 5. 6. Grab the included 3.5mm mini-jack cable. Find the headphone jack connection on the audio device and connect one end of the cable to it. Connect the other end of the cable to the back of the Smart Sound Bar’s LINE IN connection. Turn on the audio device. Turn on the Smart Sound Bar and press the SOURCE button on the Smart Sound Bar’s remote repeatedly until you see LINE. Enjoy your Smart Sound Bar! - 17 Smart Sound Bar 2.
Using the features of Android on the Sound Bar with your TV… 1. 2. 3. 4. 5. 6. Obtain a HDMI cable (not included). Find a HDMI port on the sound bar and the TV. Connect one end of the cable to the back of the Smart Sound Bar’s HDMI connection and the other end to TV’s HDMI connection. Turn on the TV and switch the TV’s source to HDMI. Turn on the Smart Sound Bar and press the SOURCE button on the Smart Sound Bar’s remote repeatedly until you can’t see LINE,AUX and COAX in the Smart Sound Bar’s display.
Operation TO SWITCH ON / OFF THE UNIT 1. 2. Press the POWER icon on the front panel or the RED button on the remote control to turn on the unit. If the unit is ON you will see the display window show the source selected, volume level and sound mode. Press the POWER button on the front panel or the RED button on the remote control again to turn off the unit. Please note: The display will have a small dot lit up when it is on standby.
Setting up for Android 1. Follow the instructions in page 18. 2. Once the sound bar is displaying the initial setup screen for Android, you can begin setting it up. Use the directional buttons on page 9 to select through the options. 3. Go through the selection, choosing your language, and setting up wireless network.
5. In the event you cannot enter letters via the number pad, press the EN/CH button on the remote control repeatedly until you see on the screen, then you can start entering alphabets via the number pad. 6. Adjust the time, date, and finally adjust the screen size. The white border is supposed to be at the edge of your screen. Once you finish hit the back button on the remote. 7. Once you finish setting up everything you will see the home screen below.
Apps, Media, & Settings Apps The APPS selection contains all the installed programs that allow the user to do a variety of things similar to a computer such as to go on the internet, or use email. You can also go on Google Play Store™ to install or remove additional applications. Use the remote’s directional buttons to select the app you want to launch. To exit the app press the HOME button or press the BACK button repeatedly. - 22 Smart Sound Bar 2.
Media The media selection allows the user to connect a USB flash drive or SD memory card and play music, picture, or video files from them. Use the remote’s directional buttons to select the media you want to launch. To exit the app press the HOME button or press the BACK button repeatedly. - 23 Smart Sound Bar 2.
Settings The settings selection allows the user to adjust the inner workings for Android. You can manage where to store your applications, change wall paper, setup WIFI manually, change the language and input language for Android. You can also perform factory reset (wiping clean everything and start from the beginning). Use the remote’s directional buttons to select the media you want to launch. To exit the app press the HOME button or press the BACK button repeatedly. - 24 Smart Sound Bar 2.
How do I clean the Sound Bar? IMPORTANT 1. 2. The power cable has to be removed from the socket before cleaning the Sound Bar. Do not use volatile solvent (alcohol, rosin, and toluene) to clean the Sound Bar. These types of chemicals might damage the housing. Cleaning the bezel and remote control 1. 2. Use a 100% cotton cloth or micro-fiber cloth for cleaning.
Troubleshooting The following table contains the common problems and the solutions to these problems. Please check this list before you contact the technicians. Problems NO SOUND Solutions Try increasing the volume of the speaker. Check that the Sound Bar is not turned off. Check the Sound Bar volume level. Make sure the correct input is selected. Make sure the proper cables are connected. If you are using digital audio, make sure the source is sending out a PCM signal.
Call Us If You Need Help! Products are often returned due to a technical problem rather than a defective product that may result in unnecessary shipping charges billed to you. Our trained support personnel can often resolve the problem over the phone or email. For more information on warranty services or repairs after the warranty period, please contact our support department at the number below. For technical help, contact our Technical Support Group via email or phone.
Specification Full range Speaker Speaker(s) x Diameter (inch) 2 × 2” Speaker type Active Rated Impedance Frequency Response (Hz) 160 Hz – 20k Hz Sound Pressure Level (dB) 80dB ± 3dB Output Power (Watt) Subwoofer x Diameter (inch) Bonus Sound Bar Spec Subwoofer Rated Impedance Frequency Response (Hz) Output Power (Watt) Connectivity Technology Connection Power Analog Audio Input Power Off Consumption CPU ARM Output Resolution Supported Video Playback Resolution Supported Version RAM NAND
Standard (AES), Inputs (NTFS / FAT32 / FAT) Inputs (NTFS / FAT32 / FAT) I/O Ports Outputs Network Multimedia Smart Sound Bar Sound Bar 2.1 SRS WOW HD Preset EQ Subwoofer 35W with Passive Radiator Play Store Features Android system HDMI output 2.1 sound channel Sleep LED Dimmer Mute Subwoofer Level Design Touch Sensory Control Connection ports Easy installation Media Sharing app USB 2.
What’s Included General 1× 1× 1× 1× 1× 1× 1× SB301524W 2.1 Sound Bar 3 head RCA Audio Cable 3.5mm Stereo Cable Remote Control with Battery (AAA) Drywall Anchor with Screw (2 sets) User Manual Warranty Card Sound Bar Dimension (inch) 37.4” x 2.17” x 3.54” Packaging Dimension (inch) 38.9” x 5.4” x 4.1” Dimension Product Weight (pound) 4.25 lb Gross Weight (pound) 6.
LIMITED PRODUCT WARRANTY Please read this warranty card carefully, it is a “ONE-YEAR LIMITED WARRANTY” on parts and labor (90 days for commercial use) and is only valid when purchased from an Authorized Reseller, only on new and non-refurbished product, and available to customers in the Continental US, Alaska, Hawaii and Puerto Rico. See below for the SCEPTRE Extended Service warranty. SCEPTRE’s Responsibility SCEPTRE units purchased from an authorized SCEPTRE U.S.
by a manufacturing defect; or Sound Bars on which the serial number has been removed or defaced. Mishandling are not covered by this warranty. Installation, removal, transportation and reinstallation of a speaker and routine maintenance and cleaning, are not covered by this warranty. Any hardware, components, and/or software bundled with the Sound Bar are not covered by this warranty.
Disclaimer, Trademarks, & Copyright Information Android is a trademark of Google Inc. Google Play is a trademark of Google Inc. “HDMI, the HDMI logo and High-Definition Multimedia Interface are trademarks or registered trademarks of HDMI Licensing LLC.” High-speed / Broadband Internet service and access equipment are required and not provided by SCPETRE. Additional fees and/or subscriptions are required for certain content and services.
FCC Compliance Statement This device complies with Part 15 of the FCC Rules. Operation is subject to the following conditions: This device may not cause harmful interference This device must accept any interference received, including interference that my cause undesired operation. Please Note: This equipment has been tested and found to comply with the limits for a Class B digital device, pursuant to part 15 of the FCC Rules.