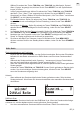
DE EN Bedienungsanleitung User Manual DAB 402
DE Vorwort Vielen Dank, dass Sie sich für dieses Produkt entschieden haben. Bitte lesen Sie diese Bedienungsanleitung sorgfältig, damit Sie in der Lage sind, die maximale Leistungsfähigkeit dessen auszuschöpfen und die Sicherheit bei Installation, Verwendung und Wartung gewährleistet wird. Bewahren Sie diese Bedienungsanleitung so auf, dass Sie sie immer griffbereit haben. Unsere Hotline für technische Fragen: 0900/1000036 (Mo. – Do.: 8.00 – 16.30 Uhr | Fr.: 8.00 – 15.00 Uhr | 0,99 €/Min.
Sicherheitshinweise 1. 2. 3. 4. 5. 6. 7. 8. 9. 10. 11. 12. 13. 14. 15. 4 | DE Bedienungsanleitung lesen – Lesen Sie die Bedienungsanleitung aufmerksam, um sich mit der Bedienung des Gerätes vertraut zu machen. Bedienungsanleitung aufbewahren – Bewahren Sie die Bedienungsanleitung sorgfältig auf. Hinweise beachten – Beachten Sie alle Hinweise und Anweisungen in der Bedienungsanleitung. Wasser und Feuchtigkeit – Das Gerät darf nicht in der Nähe von Wasser (z. B.
DE 16. 17. 18. 19. 20. 21. personal durchgeführt werden. Versuchen Sie niemals, das Gerät selbst zu reparieren. Öffnen Sie niemals das Gehäuse. Offenes Feuer – Halten Sie das Gerät fern von offenem Feuer. Stellen Sie keine brennenden Kerzen oder ähnliches auf das Gerät. Gewitter – Während eines Gewitters sollten Sie den Netzstecker ziehen.
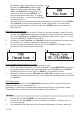
Bedienelemente 1 2 5 3 6 4 7 8 11 9 10 12 13 15 14 1. 2. 3. 4. 5. Lautsprecher Taste STANDBY Taste MODE LCD-Display Taste MENU/INFO 6. 7. 8. 9. 10. Taste TUN/CH▼ Taste TUN/CH▲ Taste SELECT Taste PRESET Taste VOL+/- 11. 12. 13. 14. 15. Kopfhöreranschluss Netzadapteranschluss Antenne Batteriefach Adapter Stromversorgung Netzadapter 0,5A. 1. Die Stromaufnahme des Gerätes beträgt DC 6V 2. Verbinden Sie den mitgelieferten Netzadapter mit dem Netzadapteranschluss am Gerät.
DE 3. Versichern Sie sich, dass die Ausgangsleistung der Steckdose mit der vom Netzadapter benötigten Spannung übereinstimmt. Hinweis: • Wenn Sie das Gerät längere Zeit nicht verwenden, ziehen Sie den Netzadapter aus der Steckdose und aus dem Gerät. Batteriebetrieb Setzen Sie 4 Stk. 1,5V-Batterien der Größe UM-3/AA in das Batteriefach ein. Achten Sie darauf, die Batterien richtig und wie am Batteriefach illustriert einzulegen, um Beschädigungen zu vermeiden.
Hinweis: • Aktuelle Einstellungen oder Standardwerte sind im Menü durch ein Sternchen (*) an der oberen Zeile rechts gekennzeichnet. Uhrzeiteinstellung Die Uhrzeit in diesem Radio synchronisiert sich automatisch über das DAB- oder RDS-Signal. Wenn das Radio eingeschaltet und ein DAB-Sender empfangen wird, stellt sich die Uhrzeit entsprechend automatisch ein. Dies kann bis zu 1 - 2 Minuten dauern. Wenn in der Region weder DAB- noch FM-RDS-Empfang besteht, ist es notwendig, die Uhrzeit manuell einzustellen.
DE 5. 6. 7. 8. 9. 10. Wählen Sie anhand der Tasten TUN/CH▲ oder TUN/CH▼ den Menüpunkt „System“. Wenn „System“ angezeigt wird, drücken Sie die Taste SELECT, um die Systemeinstellungen zu öffnen. In den Systemeinstellungen wählen Sie anhand der Tasten TUN/CH▲ oder TUN/CH▼ das Menü „Time“. Wenn „Time“ angezeigt wird, drücken Sie erneut SELECT, um das Uhrzeitmenü zu öffnen. Wählen Sie hier den Menüpunkt „” und drücken Sie SELECT, um die Uhrzeit einzustellen. Die Stunden blinken.
2. Hauptmenü, indem Sie im Betrieb 2 Sekunden lang die Taste MENU/INFO gedrückt halten. Wählen Sie dann anhand der Tasten TUN/ CH▲ oder TUN/CH▼ den Menüpunkt „Full scan” und drücken Sie dann SELECT, um den Sendersuchlauf zu beginnen. Im Display werden „Scanning…” und ein Fortschrittsbalken angezeigt (Abb. F.3). Alle gefundenen Sender werden automatisch gespeichert. Anhand der Tasten TUN/CH▲ und TUN/CH▼ können Sie die gefundenen Sender durchsuchen.
DE 4. die Taste TUN/CH▲ oder TUN/CH▼ 2 Sekunden lang gedrückt. Im Display wird „Scanning...” angezeigt und der nächste gefundene Sender wird gespielt (Abb. F.6, F7). Um manuell nach einem Sender zu suchen, drücken Sie wiederholt die Taste TUN/CH▲ oder TUN/CH▼. Jeder Tastendruck ändert die Frequenz um 0,05 MHz. Hinweis: • Für einen optimalen Empfang ziehen Se die Antenne vollständig aus und justieren Sie deren Position oder versuchen Sie, das Radio an einem anderen Ort aufzustellen.
2. 3. 4. Wählen Sie anhand der Tasten TUN/CH▲ oder TUN/CH▼ den gewünschten Speicherplatz. Drücken Sie dann SELECT, um den Sender zu speichern. Der aktuelle Sender wurde auf dem gewählten Speicherplatz gespeichert (Abb. F.9). Um einen gespeicherten Sender zu wählen, drücken Sie einmal die Taste PRESET und wählen Sie dann anhand der Tasten TUN/CH▲ oder TUN/CH▼ den Speicherplatz, auf welchem sich der gewünschte Sender befindet. Drücken Sie dann SELECT, um den Sender zu spielen.
DE Kopfhöreranschluss Ein Kopfhöreranschluss befindet sich an der rechten Seite des Gerätes. Bei der Musikwiedergabe können Sie an diesen Kopfhörer (nicht im Lieferumfang enthalten) anschließen. Beachten Sie die Sicherheitshinweise auf Seite 4 ff. Während Kopfhörer angeschlossen sind, ist der geräteinterne Lautsprecher deaktiviert. Um wieder über den Lautsprecher zu hören, trennen Sie die Kopfhörer vom Gerät.
Safety Information 1. 2. 3. 4. 5. 6. 7. 8. 9. 10. 11. 12. 13. 14. 15. 16. 17. 18. Read Instructions - All the safety and operating instructions should be read before the appliance is operated. Retain Instructions - The safety and operating instructions should be retained for future reference. Heed Warnings - All warnings on the appliance and in the operating instructions should be adhered to. Water and Moisture – Do not use the apparatus near water (e.g.
19. 20. 21. ensure that the apparatus is working properly and safely. Batteries – Always place batteries in the correct polarization into electrical components. Danger of explosion if battery is incorrectly replaced. Replace only with the same or equivalent type. Do not mix old and new batteries. Take attention to the environmental aspects of battery disposal. Batteries shall not be exposed to excessive heat such as sunshine, fire or the like. Remove batteries before disposing of the product.
Product Overview 1 2 5 3 6 4 7 8 11 9 10 12 13 15 14 1. 2. 3. 4. 5. Speaker STANDBY button MODE button LCD Display MENU/INFO button 6. 7. 8. 9. 10. TUN/CH▼ button TUN/CH▲ button SELECT button PRESET button VOL+/- button 11. 12. 13. 14. 15. Headphone jack DC Input socket Antenna Battery door Adaptor Power Supply Power Adaptor 0.5A. 1. The unit requires DC 6V 2. Plug the supplied adaptor cable into the DC input socket of the unit and the other end into a suitable wall socket. 3.
adaptor. Note: • If not using the unit for a longer period of time, unplug the adaptor from the wall outlet and from the unit. Battery Power 1. Ensure that the AC/DC adaptor is disconnected from the radio and the mains power supply. 2. Insert 4x 1.5V size UM-3/AA batteries into the battery compartment. Be sure that the batteries are inserted correctly to avoid damage to the appliance.
line of the character display. Clock Setting The clock in this radio is equipped to receive a DAB radio frequency and RDS time signal. After the unit has been turned on, it will automatically tune into a DAB radio station (see below) and update the clock. It may be necessary to wait for 1-2 minutes to allow the unit to receive the time signal. If there is no DAB or FM-RDS reception it will be necessary to manually set the clock. To manually set the clock: 1. Power the unit as described above. 2.
6. 7. 8. 9. 10. Once “Time” is displayed, press the SELECT button to enter the time menu and select “”. Press the SELECT button again to enter the time setting. The hours are flashing. Set the current hour by pressing the TUN/CH▲ or TUN/CH▼ button. Confirm by pressing the SELECT button. The minutes are flashing. Set the current minute by pressing the TUN/CH▲ or TUN/ CH▼ button. Confirm by pressing the SELECT button. In the next step the date must be set.
DAB Manual Tuning 1. To select manual tune, press and hold the MENU/INFO button for 2 seconds to enter the menu, then press the TUN/CH▲ or TUN/CH▼ button to select “Manual tune” (F.4, F.5). 2. Press TUN/CH▲ or TUN/CH▼ button to move through the DAB channels, the display will show “5A to 13F” and their associated frequencies. 3. When your desired frequency appears in the display, press the SELECT button to listen, the name of the station group (ensemble/multiplex) will be displayed.
Scan Setting This function enables you to search only for stations with strong reception or for all stations during automatic tuning. 1. During FM mode, press and hold the MENU/INFO button for 2 seconds to enter the menu and then press the TUN/CH▲ or TUN/CH▼ button to select “Scan setting”. Finally press the SELECT button to confirm. 2. Press the TUN/CH▲ or TUN/CH▼ button to select “Strong stations”. Press the SELECT button to confirm the setting.
be displayed in the lower half of the display (F.10). If the preset has not been allocated “Preset Recall #: (Empty)” and then “Preset empty” will be shown in the display. Note: • If the unit is disconnected from the mains supply for any length of time and the batteries are not installed, the programmed stations will be lost.
Technical Specifications Rated Voltage (adaptor): Adaptor Output: Batteries: Radio Frequency Range: Dimensions (WxDxH) ca.: EN AC 100-240V ~ 50/60Hz, 0.3A DC 6V 0.5A DC 6V (4x 1.5V UM-3/AA size, not included) DAB: 174 - 240 MHz FM 87.5 - 108 MHz 181 x 45 x 105 mm Technical specifications and design may change without notice.
Ansprechpartner für dieses Schaub-Lorenz-Produkt: Contact for this Schaub-Lorenz product: Karcher AG Gewerbestr. 19 75217 Birkenfeld Germany www.karcher-products.