DE EN Bedienungsanleitung User Manual RK 410
Vorwort Vielen Dank, dass Sie sich für dieses Produkt entschieden haben. Bitte lesen Sie diese Bedienungsanleitung sorgfältig, damit Sie in der Lage sind, die maximale Leistungsfähigkeit dessen auszuschöpfen und die Sicherheit bei Installation, Verwendung und Wartung gewährleistet wird. Bewahren Sie diese Bedienungsanleitung so auf, dass Sie sie immer griffbereit haben. Unsere Hotline für technische Fragen: 0900/1000036 (Mo. – Do.: 8.00 – 16.30 Uhr | Fr.: 8.00 – 15.00 Uhr | 0,99 €/Min.
DE Sicherheitshinweise 1. 2. 3. 4. 5. 6. 7. 8. 9. 10. 11. 12. 13. 14. 15. Bedienungsanleitung lesen – Lesen Sie die Bedienungsanleitung aufmerksam, um sich mit der Bedienung des Gerätes vertraut zu machen. Bedienungsanleitung aufbewahren – Bewahren Sie die Bedienungsanleitung sorgfältig auf. Hinweise beachten – Beachten Sie alle Hinweise und Anweisungen in der Bedienungsanleitung. Wasser und Feuchtigkeit – Das Gerät darf nicht in der Nähe von Wasser (z. B.
16. 17. 18. 19. 20. 21. personal durchgeführt werden. Versuchen Sie niemals, das Gerät selbst zu reparieren. Öffnen Sie niemals das Gehäuse. Offenes Feuer – Halten Sie das Gerät fern von offenem Feuer. Stellen Sie keine brennenden Kerzen oder ähnliches auf das Gerät. Gewitter – Während eines Gewitters sollten Sie den Netzstecker ziehen.
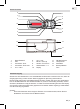
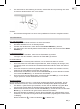
DE Bedienelemente 5 7 1 9 2 9 9 10 9 3 9 4 8 6 13 13 12 11 14 1. 2. 3. 4. 5. Radio EIN/AUS SET Countdown-Timer Countdown-Timer AUS AL-1 / VOL+ 6. 7. 8. 9. 10. AL-2 / VOLMinute / Tune Up Stunde / Tune Down Stationstasten 1 - 5 Display 11. 12. 13. 14. FM-Wurfantenne Lautsprecher Standfüße Backup-BatterieFach Stromversorgung Stecken Sie den Netzstecker in eine haushaltsübliche Steckdose.
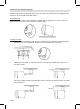
Aufstellen und Unterbaumontage Dieses Gerät ist ideal zur Montage unter einem Schrank (z. B. Küchenschrank) geeignet, kann aber auch als Tischgerät verwendet werden. Tischaufstellung Um das Gerät auf einem Tisch aufzustellen, klappen Sie die Standfüße (13) nach unten und platzieren Sie das Gerät auf einer ebenen, stabilen Fläche. Unterbaumontage 1. Montieren Sie die Halterung mithilfe von Schrauben an der Unterseite eines geeigneten Schrankes wie unten abgebildet. Klappen Sie die Standfüße (13) nach oben.
DE 3. Um das Gerät von der Halterung zu nehmen, drücken Sie den Clip vorsichtig nach oben und ziehen das Gerät dann nach vorne heraus. Hinweis: • Die Unterbaumontage darf nur durch einen qualifizierten Fachmann ausgeführt werden. Grundfunktionen Ein- und ausschalten 1. Versorgen Sie das Gerät mit Strom wie oben beschrieben. 2. Das Gerät befindet sich nun im Standby-Modus. 3. Schalten Sie das Gerät ein, indem Sie die Taste Radio EIN/AUS (1) drücken. 4.
4. 5. 6. 7. Um Ihre Einstellungen zu speichern, drücken Sie für 3 Sekunden keine Taste. Wenn Sie „Buzzer als Weckton” gewählt haben, ertönt zur eingestellten Weckzeit ein Buzzer. Wenn Sie „Radio als Weckton” gewählt haben, wird zur eingestellten Weckzeit die zuletzt eingestellte Frequenz in der zuletzt eingestellten Lautstärke gespielt. Wenn Sie „Wecker aus” gewählt haben, so ist der Wecker ausgeschaltet und ertönt nicht zur eingestellten Uhrzeit.
DE Technische Daten Stromversorgung: Batterien: Radiofrequenzbereich: Maße (BxTxH) ca.: AC 230V ~ 50Hz 9V Blockbatterie (nicht im Lieferumfang enthalten) FM 87,5 - 108 MHz 195 x 87 x 60 mm Technische und optische Änderungen jederzeit vorbehalten.
Safety Information 1. 2. 3. 4. 5. 6. 7. 8. 9. 10. 11. 12. 13. 14. 15. 16. 17. 18. Read Instructions - All the safety and operating instructions should be read before the appliance is operated. Retain Instructions - The safety and operating instructions should be retained for future reference. Heed Warnings - All warnings on the appliance and in the operating instructions should be adhered to. Water and Moisture – Do not use the apparatus near water (e.g.
19. 20. 21. ensure that the apparatus is working properly and safely. Batteries – Always place batteries in the correct polarization into electrical components. Danger of explosion if battery is incorrectly replaced. Replace only with the same or equivalent type. Do not mix old and new batteries. Take attention to the environmental aspects of battery disposal. Batteries shall not be exposed to excessive heat such as sunshine, fire or the like. Remove batteries before disposing of the product.
Product Overview 5 7 1 9 2 9 9 10 9 3 9 4 8 6 13 13 12 11 14 1. 2. 3. 4. 5. Radio ON/OFF SET Count-down timer Count-down timer OFF AL-1 / VOL+ 6. 7. 8. 9. 10. AL-2 / VOLMinute / Tune Up Hour / Tune Down Preset stations 1 - 5 Display 11. 12. 13. 14. FM Wire Antenna Speaker Stand feet Back-Up Battery Compartment Power Supply Plug the AC power cord to a household outlet. Ensure that the output power of the outlet matches the power requirement as indicated on the unit’s rating label.
Unit Placement EN This unit is specially designed to be installed under a cabinet (e.g. kitchen cabinet) or to be placed on top of a desk by using the stand feet (13). Desktop Use For desktop use fold the stand feet (13) downwards and place the unit on a flat, stable surface. Under Cabinet Installation 1. Install the plastic mounting bracket under a suitable cabinet using screws as shown below. Fold the stand feet (13) on the unit up. 2.
shown and pull the unit with reverse direction from the installation. Note: • The under cabinet installation shall only be carried out by a qualified expert. Basic Functions Switching the Unit On & Off 1. Power the unit as described above. 2. The unit is now in standby mode. 3. To switch the unit on, press the Radio ON/OFF button (1) once. 4. To switch the unit off into standby mode, press the Radio ON/OFF button (1) again. Volume Control • To increase the volume, press the VOL+ button (5).
6. 7. When you have selected “Alarm Off”, the alarm is off and will not sound at the set time. To cancel an active alarm, press the Radio ON/OFF button (1) once. The alarm will sound again at the set time on the next day. To turn off the alarm before it sounds, repeatedly press the AL-1 button (5) [or AL-2 button (6)] until the there is no dot on the display next to the symbols and .
Ansprechpartner für dieses Schaub-Lorenz-Produkt: Contact for this Schaub-Lorenz product: Karcher AG Gewerbestr. 19 75217 Birkenfeld Germany www.karcher-products.